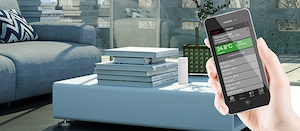
Set Up
After downloading the "Mobile Alerts" app, follow these steps:
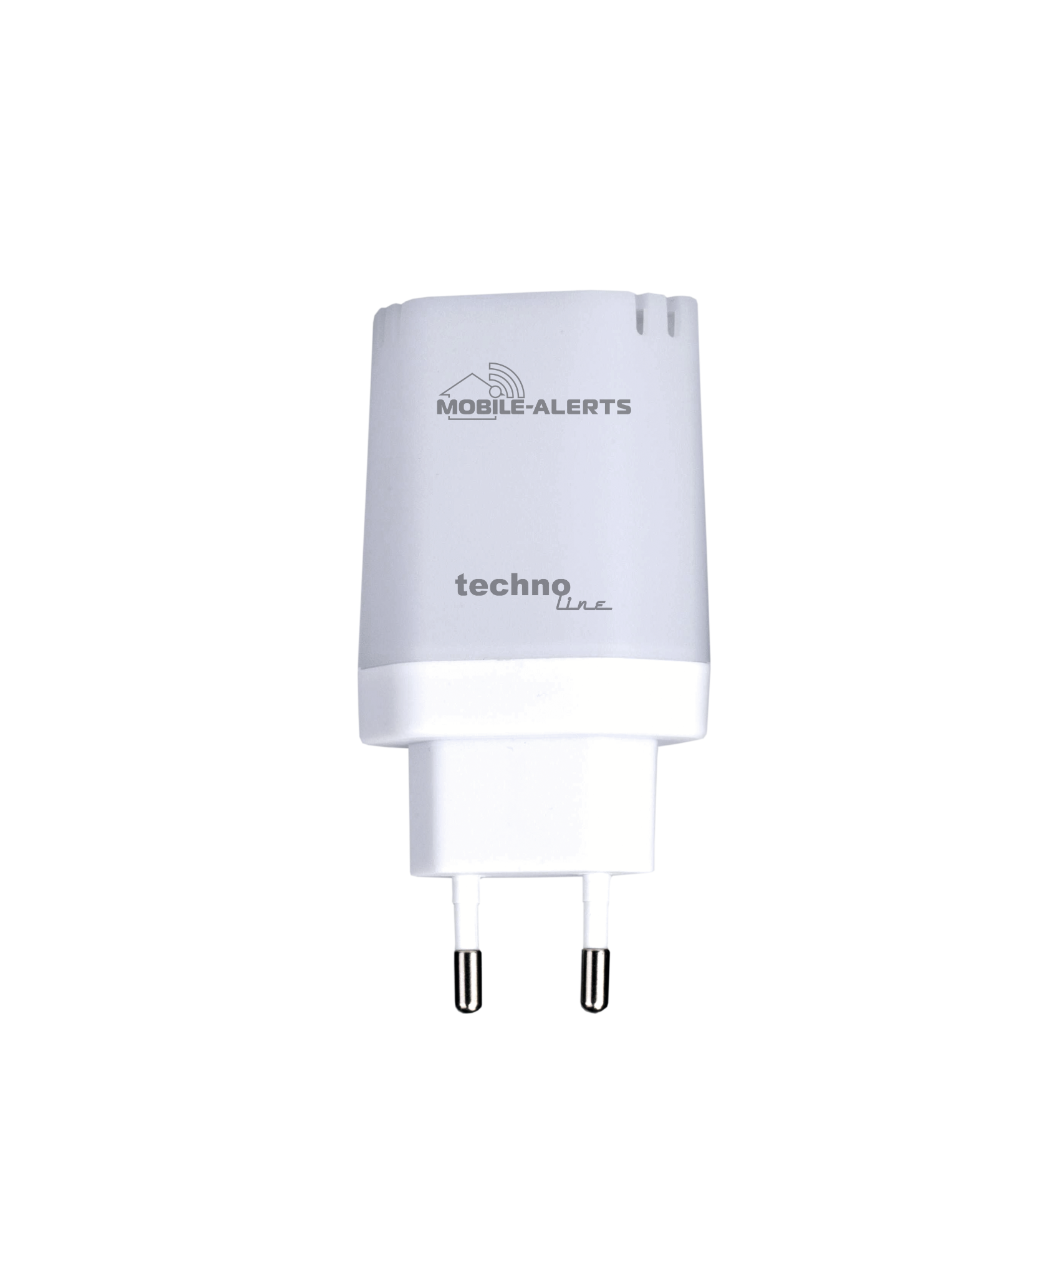
1. Connect the Gateway

Connect the supplied AC adapter to the gateway. Then connect the included LAN cable with the gateway and your router. After about 10 seconds, the Gateway is operational. The LED will turn static green. Important: The Gateway should always be put into operation before starting the sensors!
If no DHCP server is available in your network, you can configure the gateway in the app under the point settings manually.
2. Start the sensor

Open the battery compartment of the sensor and put in the batteries with correct polarity. The sensor starts to send his measurements for several times in short intervals, later every 7 minutes.
3. Add sensor
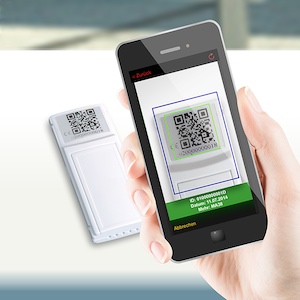
At first please open the app. The dashboard is displayed. The sensor Hannover is only for testing and can be deleted later. Now please tap "Add new sensor" and scan the QR code on backside of the sensor. For an easy reference we recommend to set a name for the added sensor. To rename the sensor select it and then tap on the left area of the pencil icon in the upper right.
4. Read measurements
Now you can read the measurements on your mobile phone.
Installation video
Gateway informations
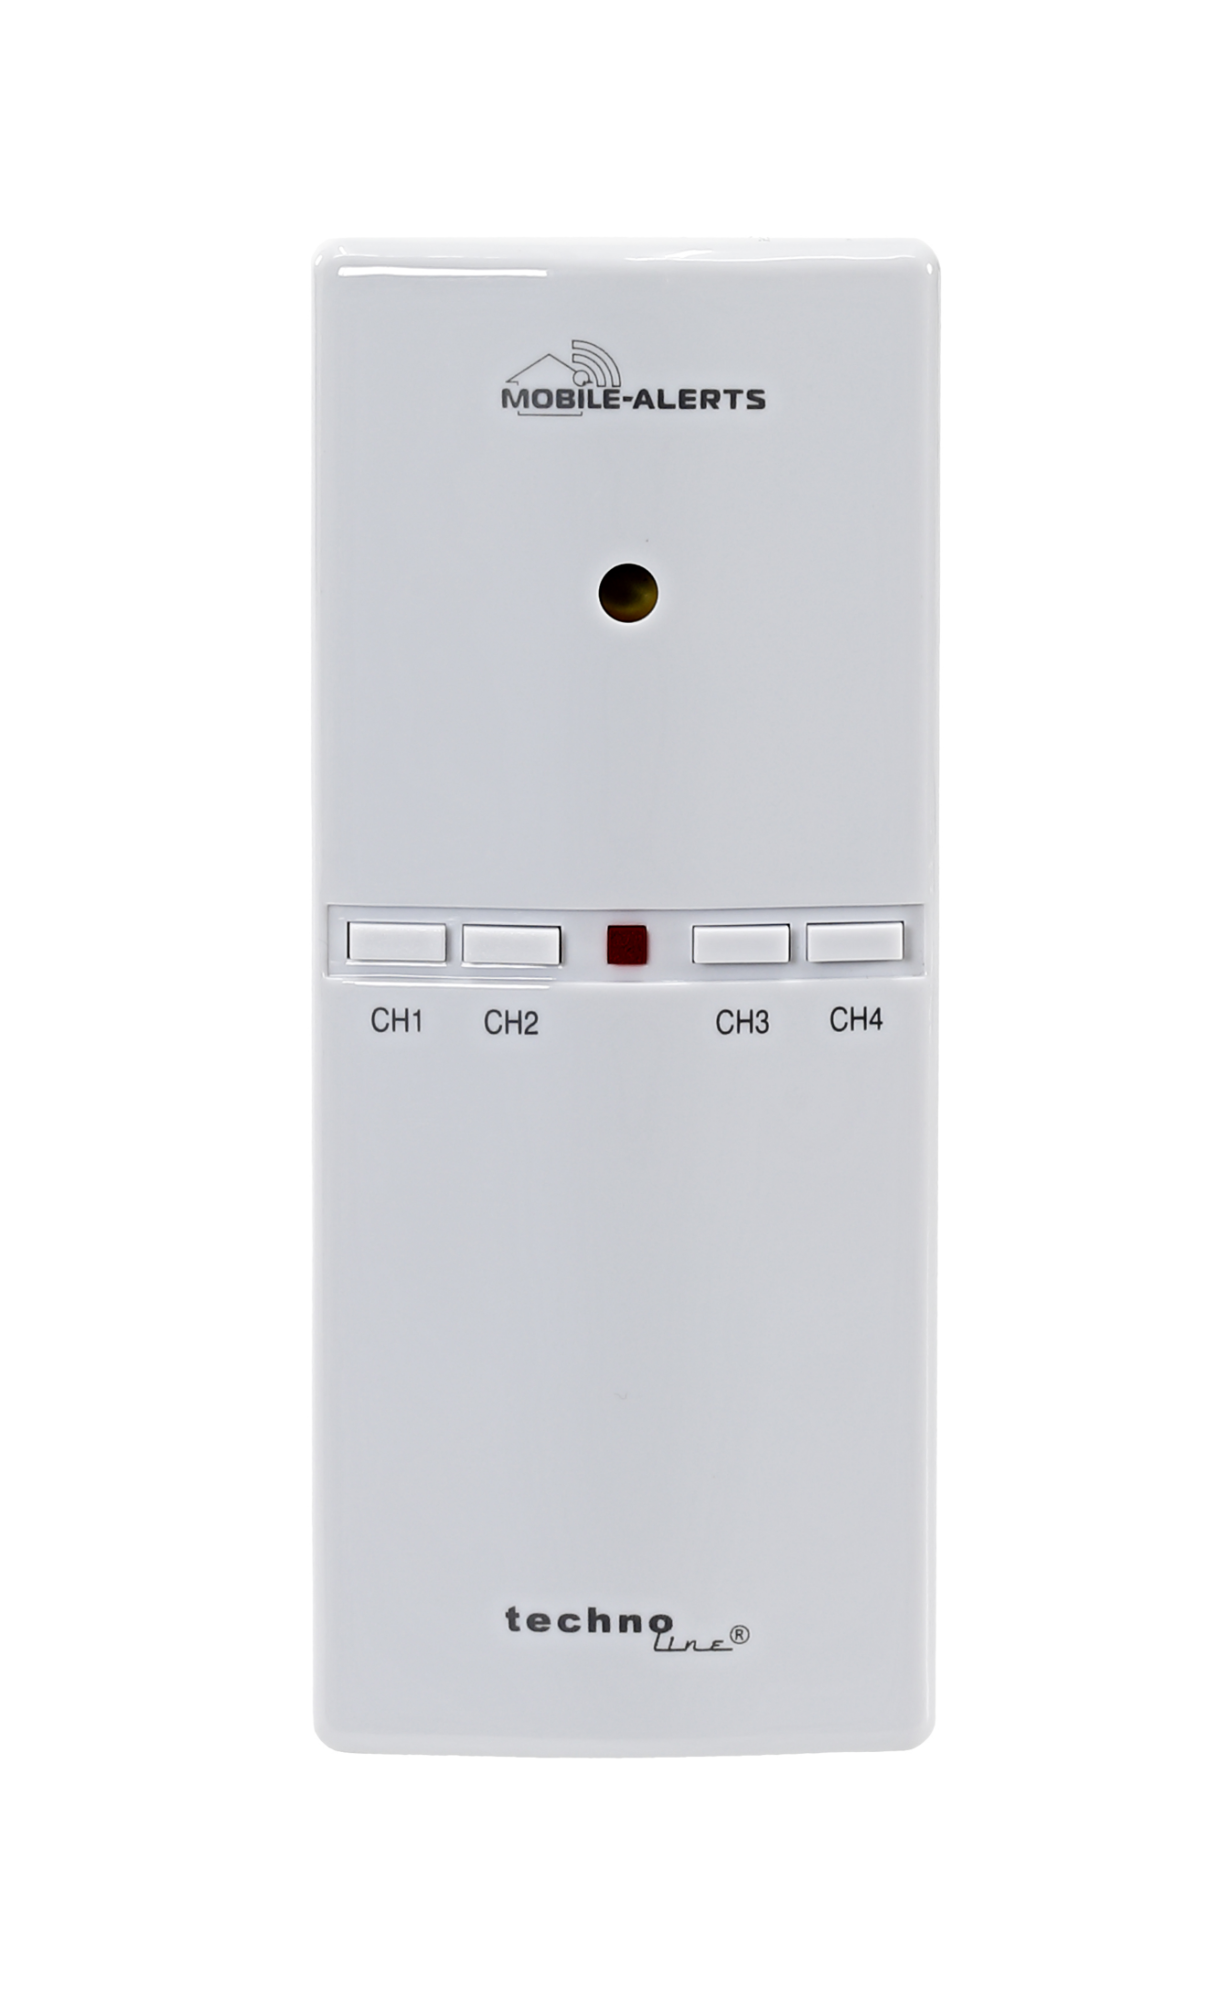
Red LED
The red LED flashes shortly when switching on and during the communication with the sensors.
Green LED
The Green LED indicates the operating state of the gateway by its flashing rhythm. When the green LED is permanently lit, there is a successful connection to the Mobile-Alerts server. The following flashing states are given by the green LED:
- LED flashes slowly
Ethernet cable is not connected or hub / switch or router are off. - LED flashes in groups of 2
Gateway is waiting for assigning a local IP address. - LED blinks in groups of 3
Gateway waits for name resolution for the server. - If the LED flashes permanently during normal operation, the gateway waits for a response from the server.
Normally, the transmission of data is completed by the gateway to the server within 3 to 10 seconds, but if the router or the internet is not in operation, it may continue to flash permanently for hours.
Incoming data from sensors will be saved by the gateway with the correct time stamp, but only as long as the gateway has not been disconnected from the mains and therefore the time has not been lost.
If the internet connection in running flawlessly, it occasionally helps to reset by shortly disconnecting the gateway from the power supply.
As a last resort for troubleshooting a factory reset can help. However, then all stored data are deleted.
Making the factory settings
The gateway can be reset to factory settings by the following steps:
- Unplug the AC adapter.
- Press and hold the button on the Gateway.
- Plug in AC power, hold the button on the Gateway for at least 8 seconds.
The memory of the gateway is cleared and initialized with the factory default values. If you manually assigned an IP address before, the old set up is deleted and must be reconfigured.
Other functions

If both LEDs flashs alternately, the Flash memory is searching for data.
When the button is pressed, all stored data will be transmitted to the server immediately. If simple sensors are used, they will not send with priority, the data will be stored until the end of a 7-minute interval.
Operation of the app
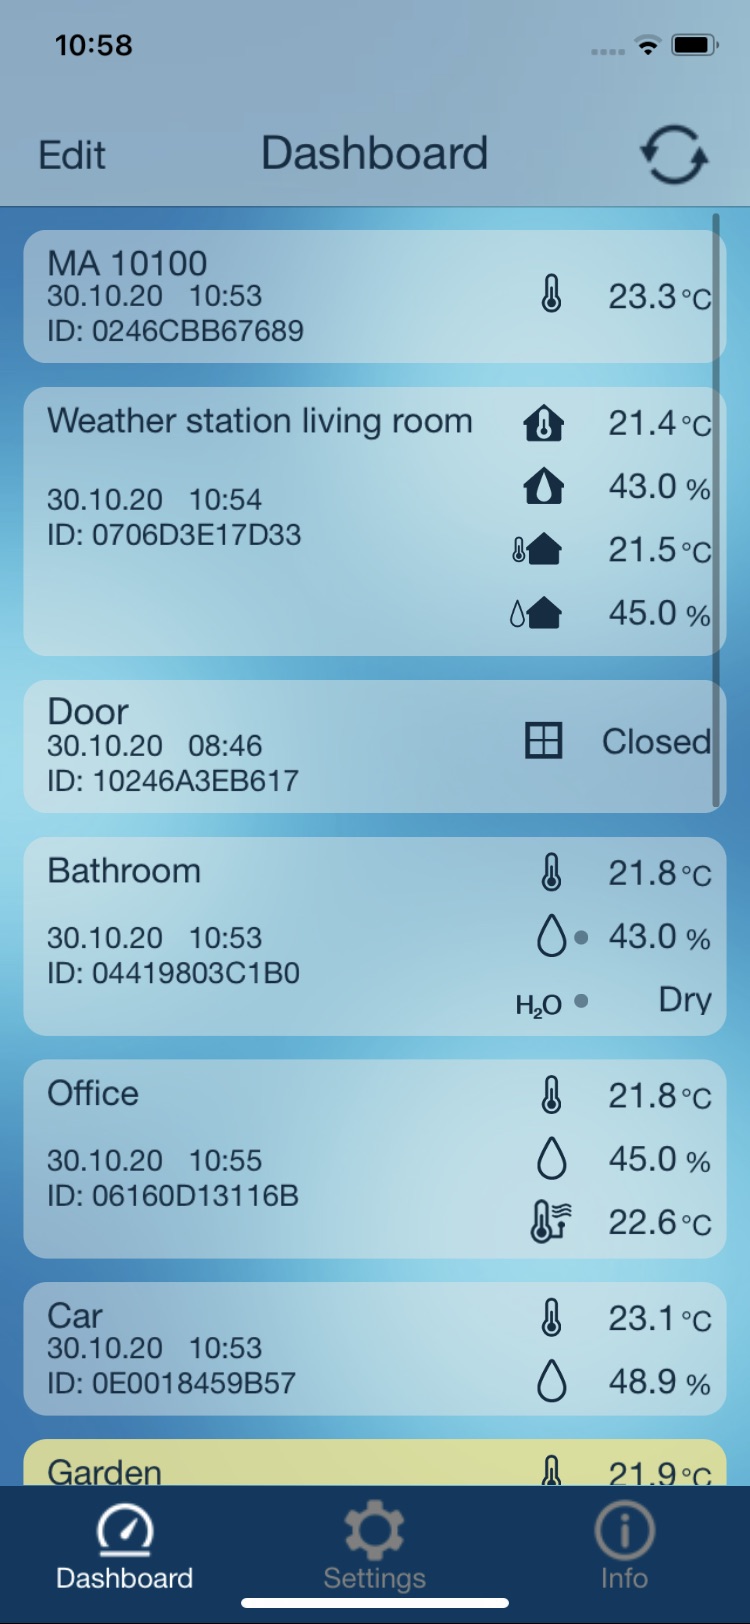
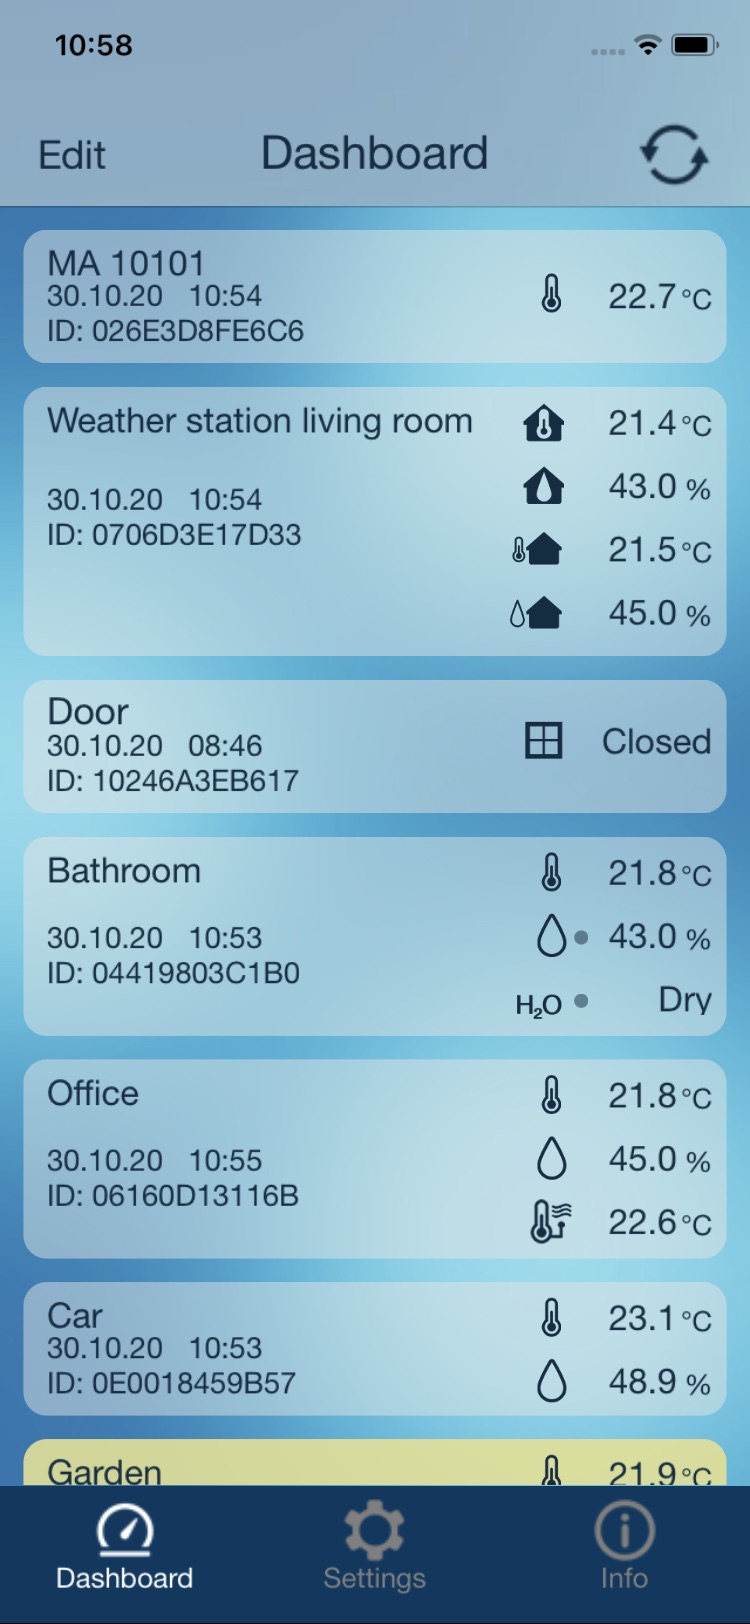
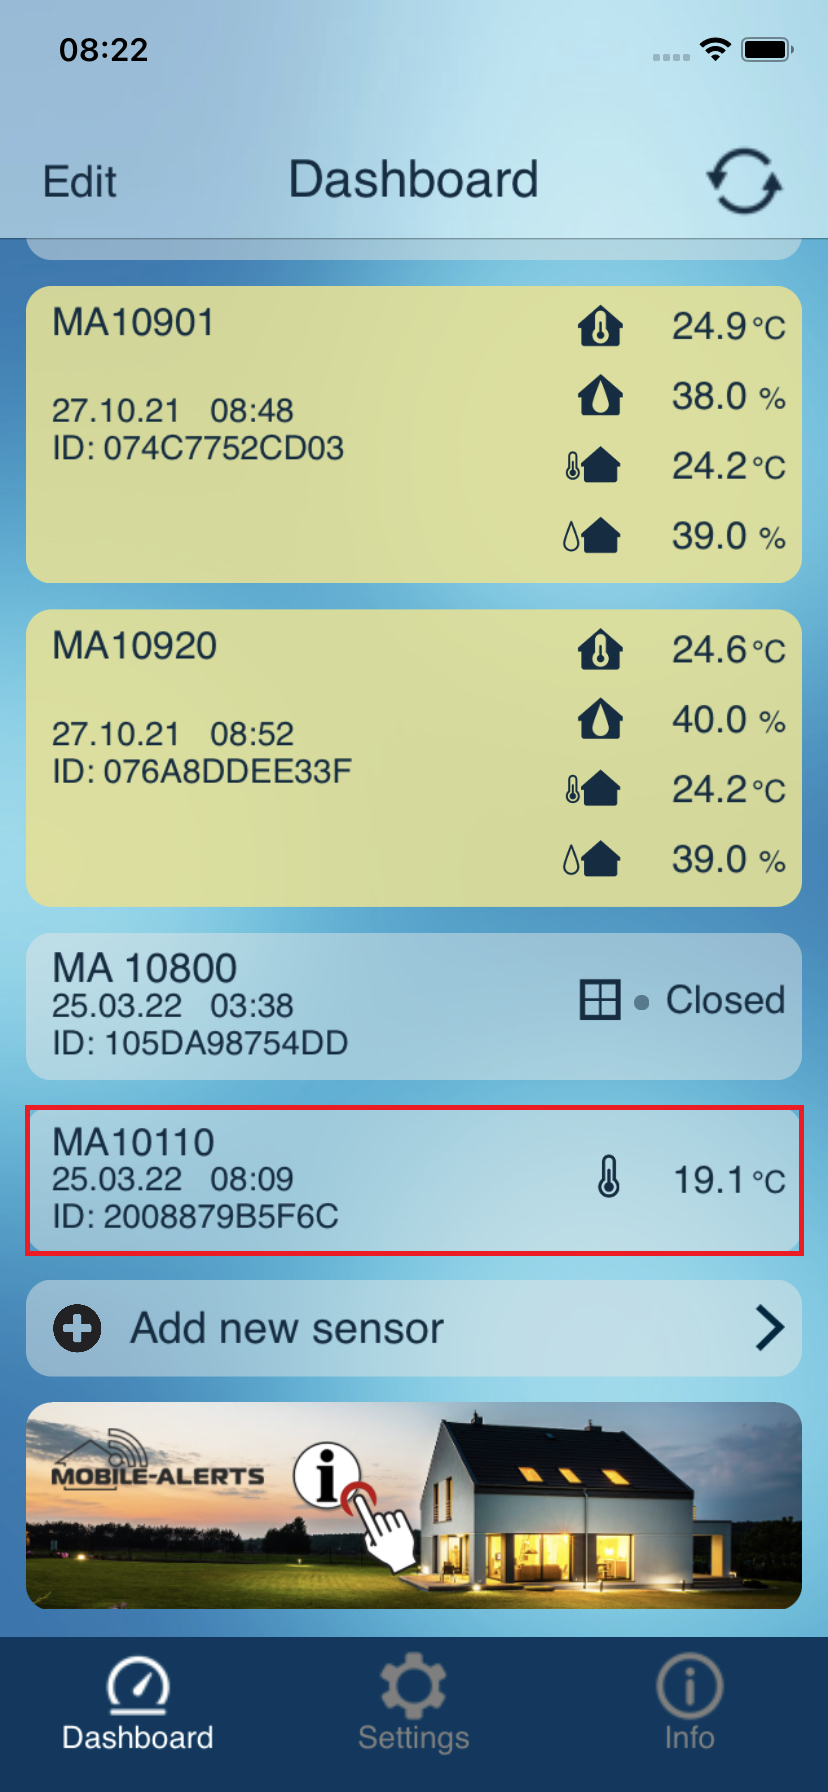
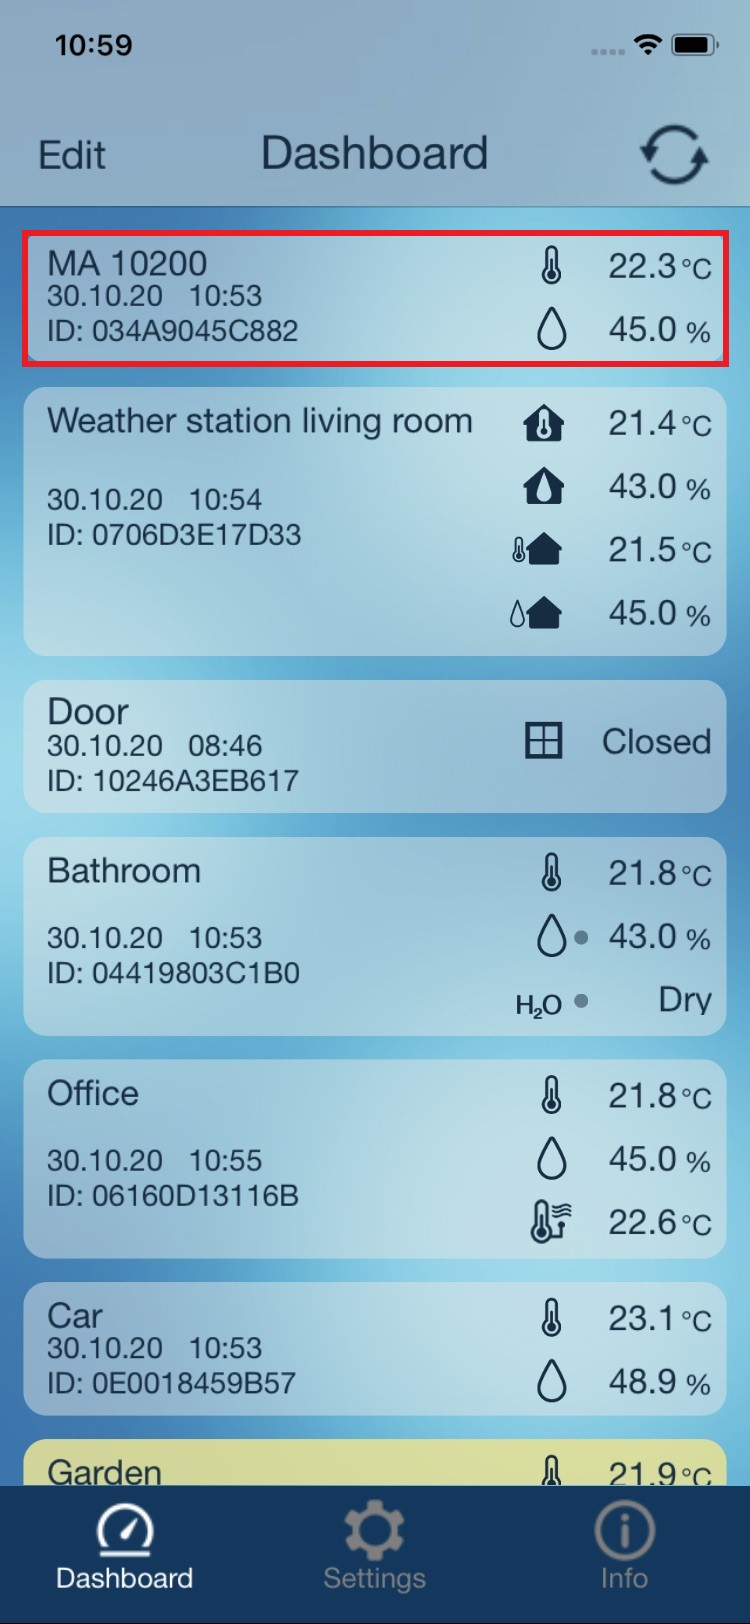
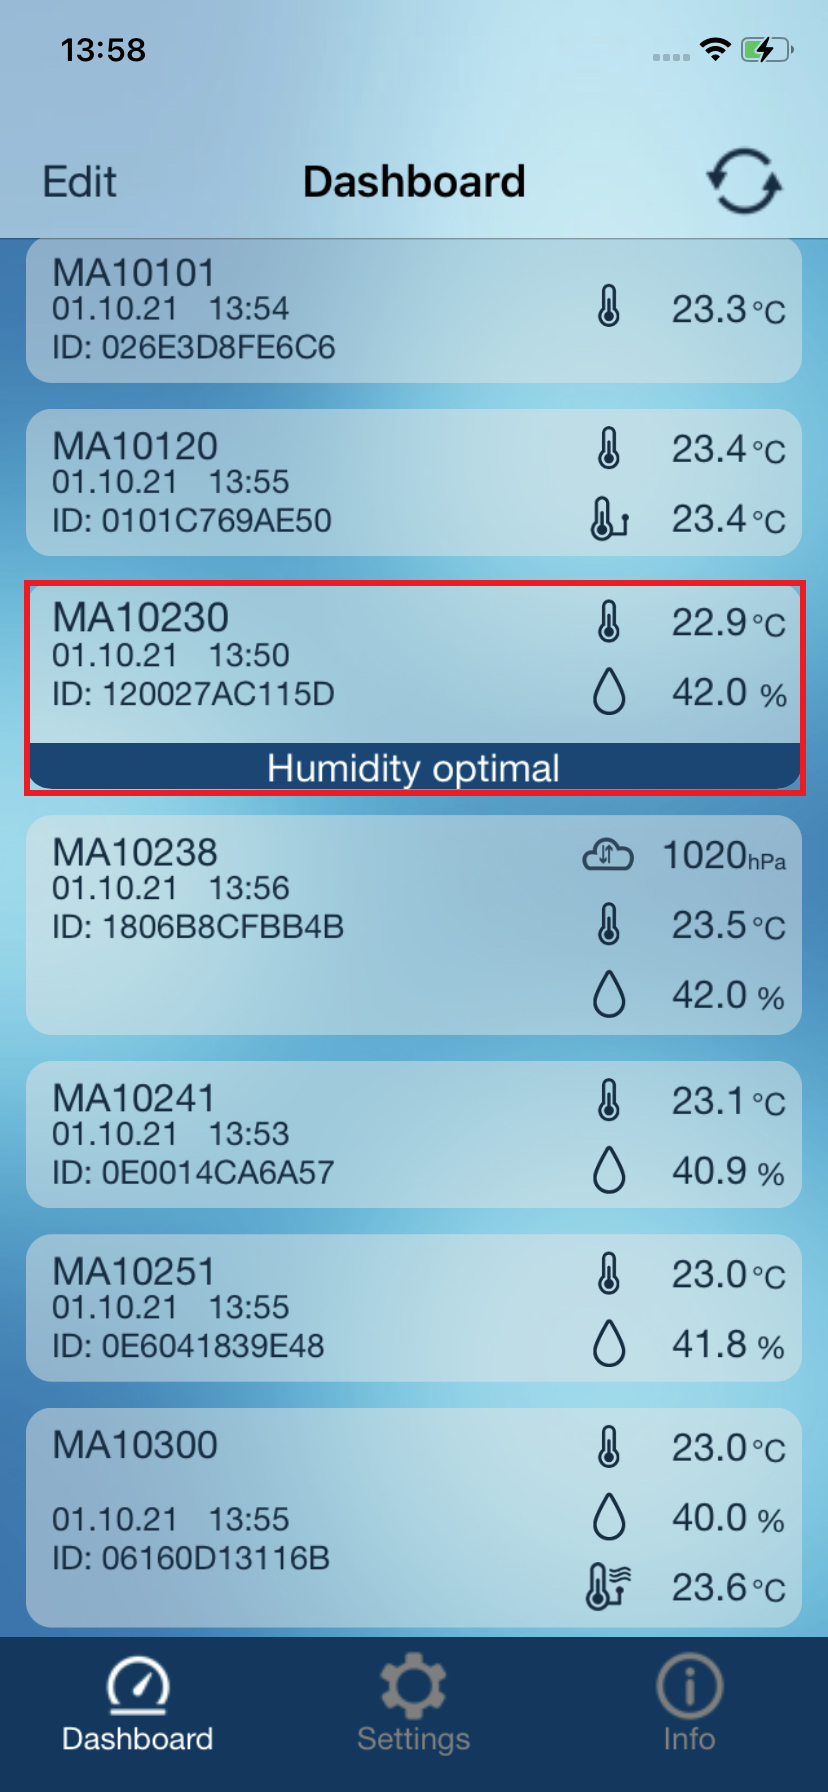
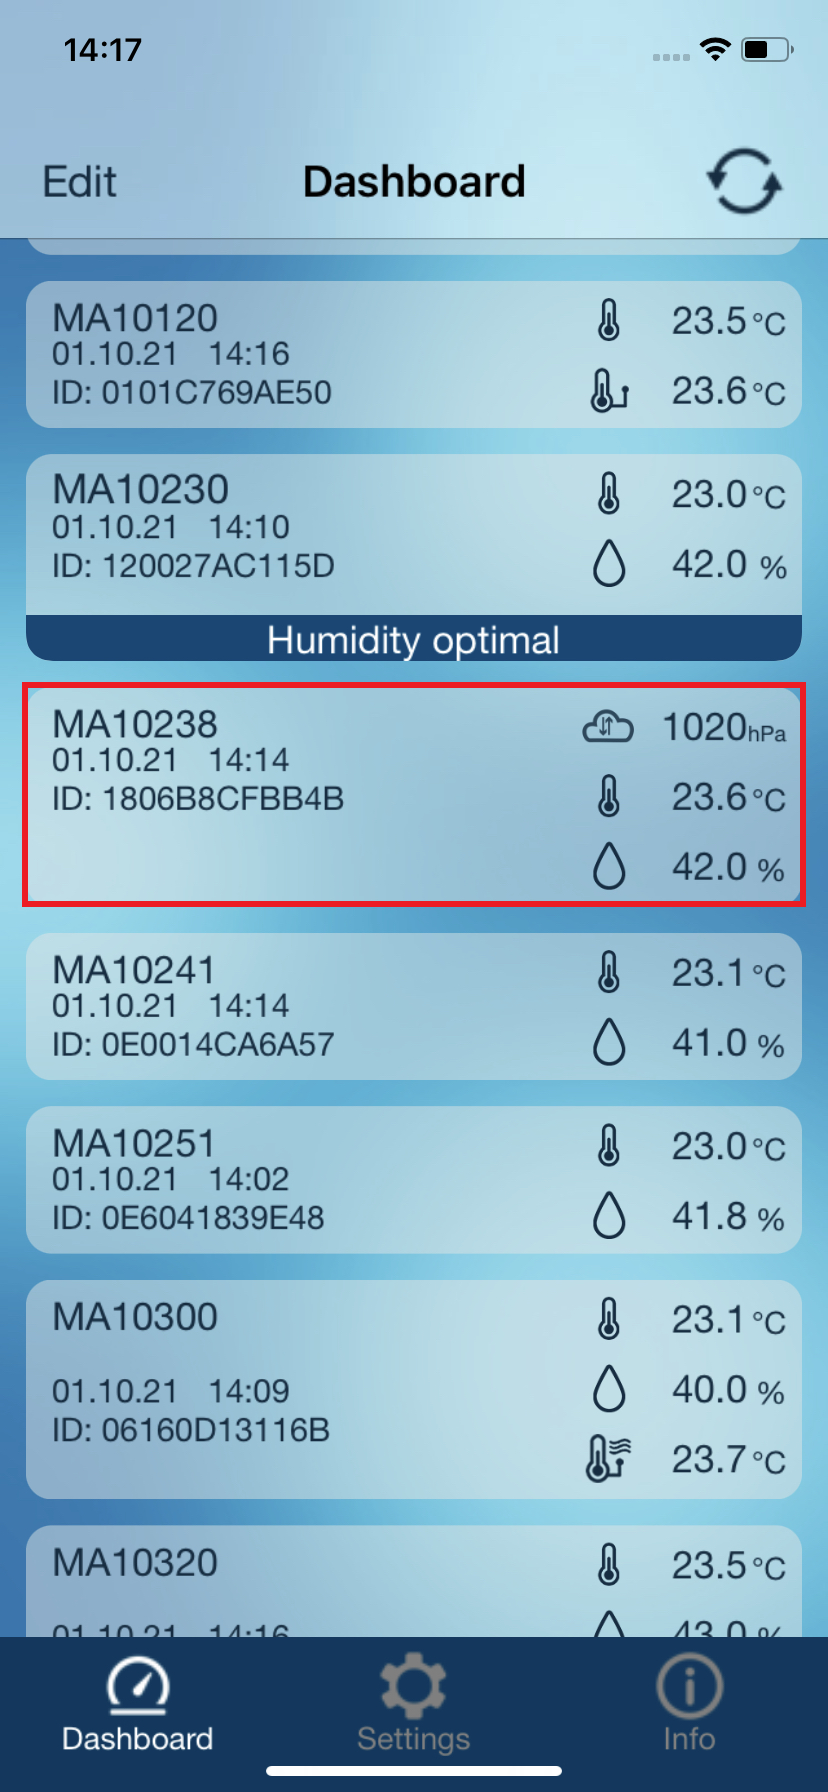
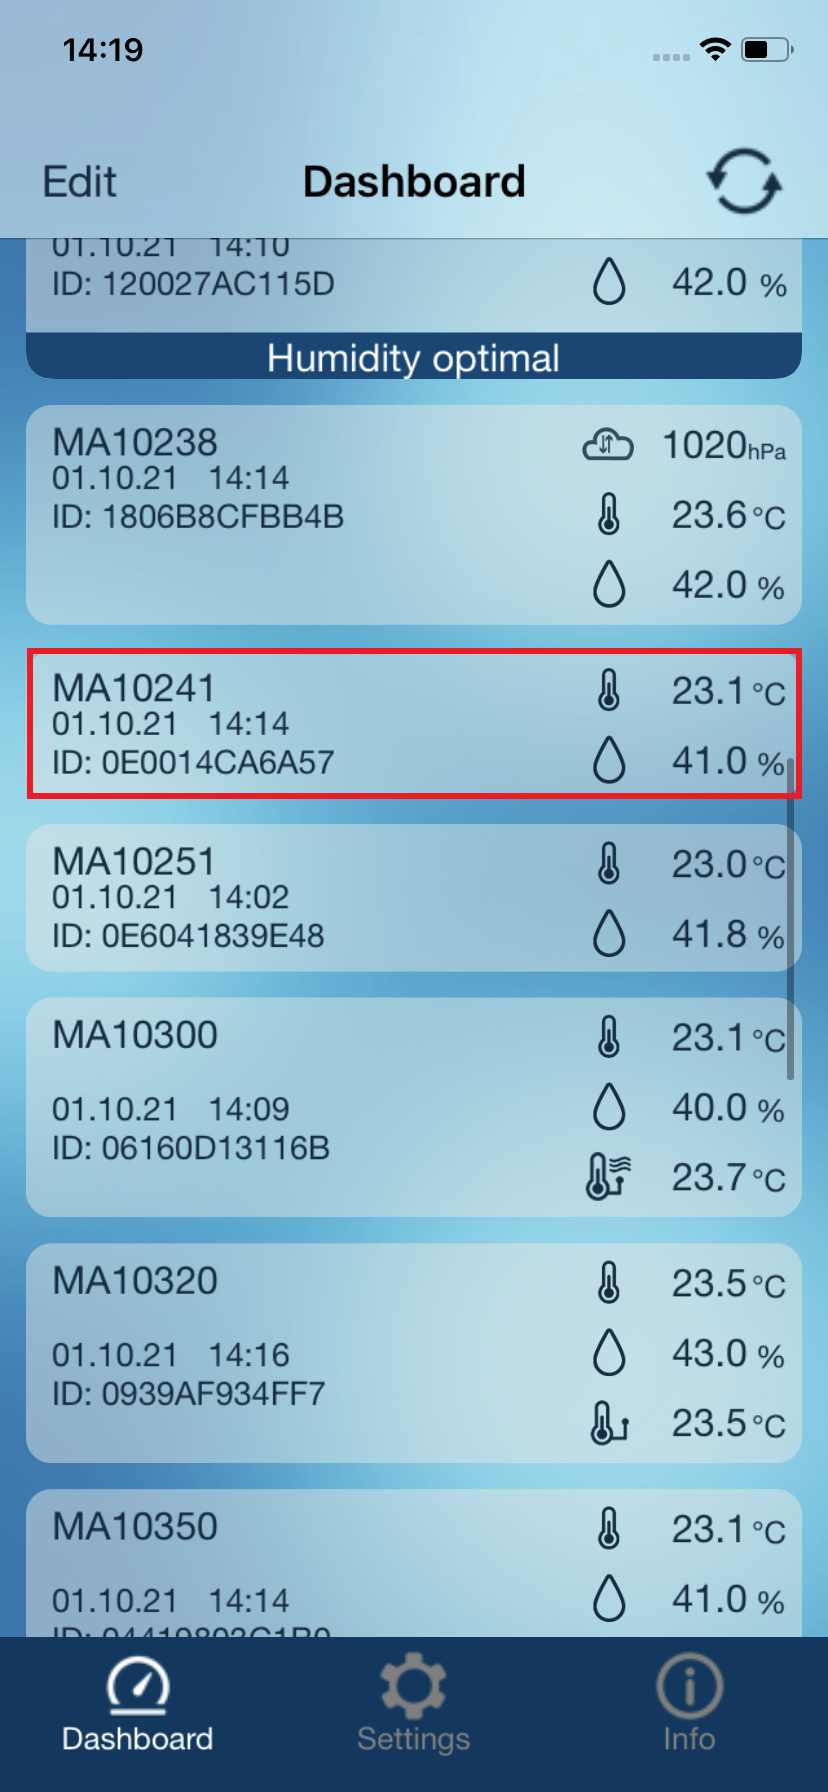
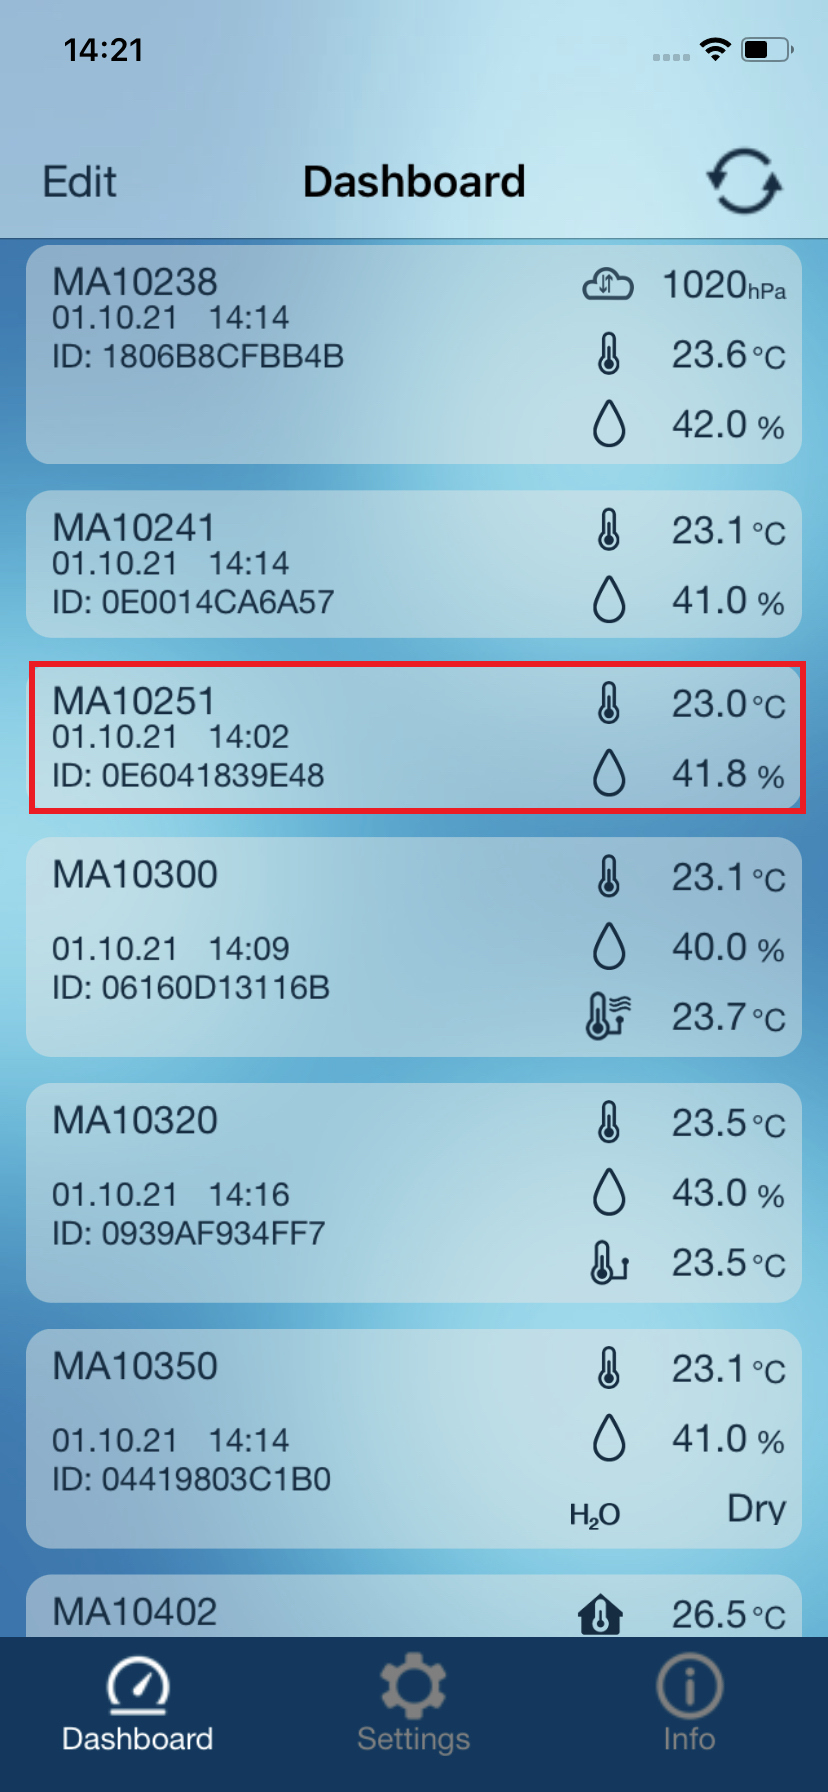
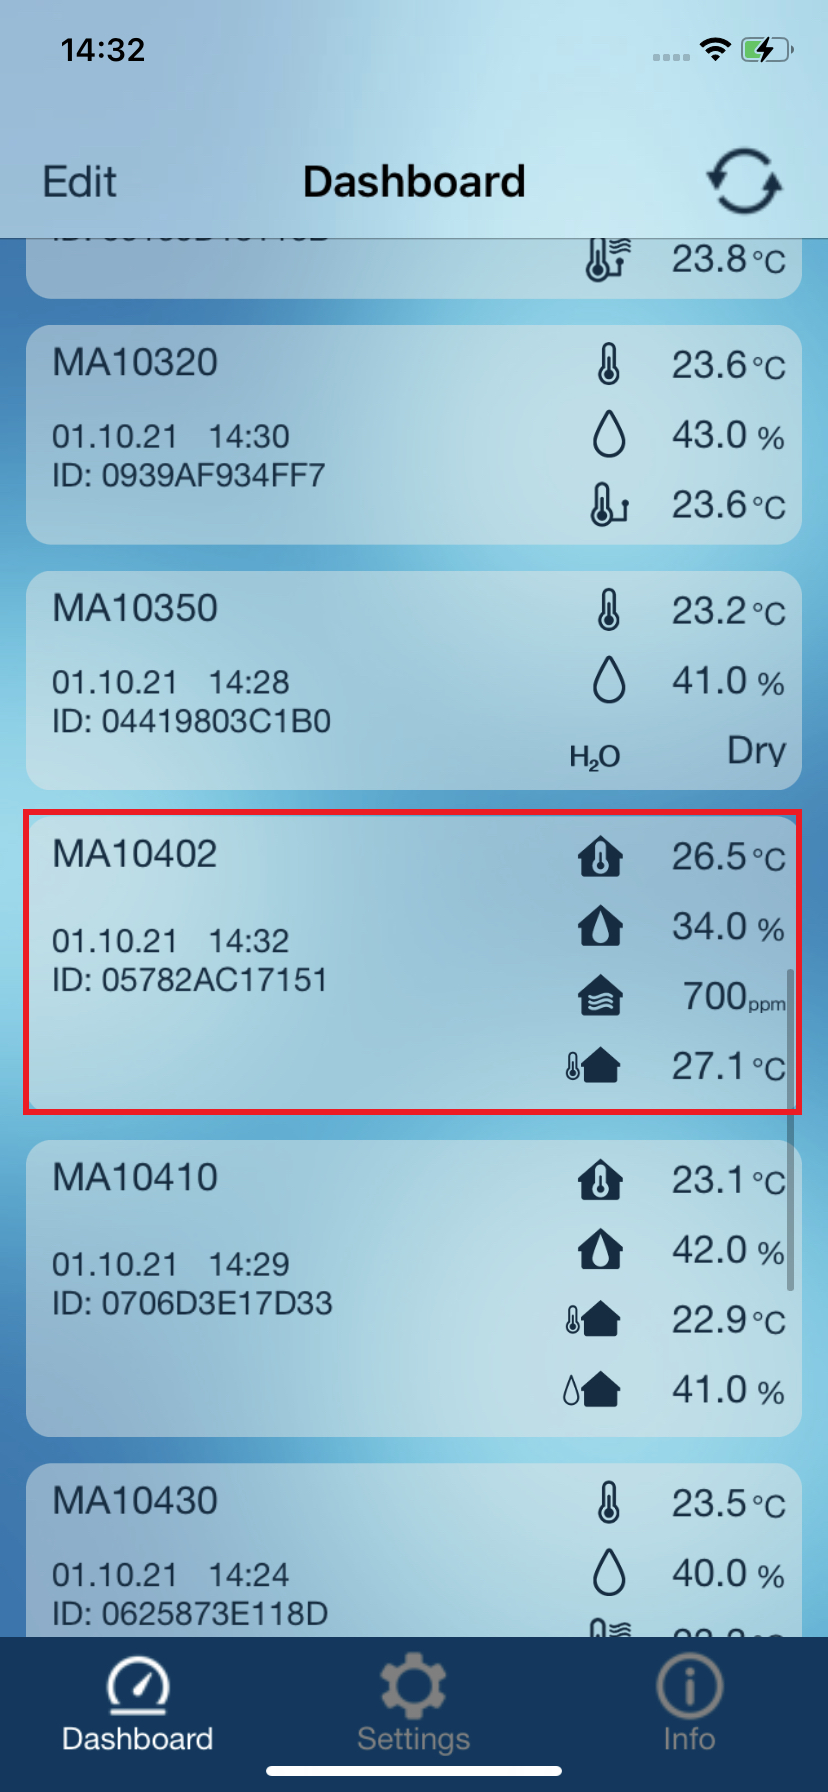
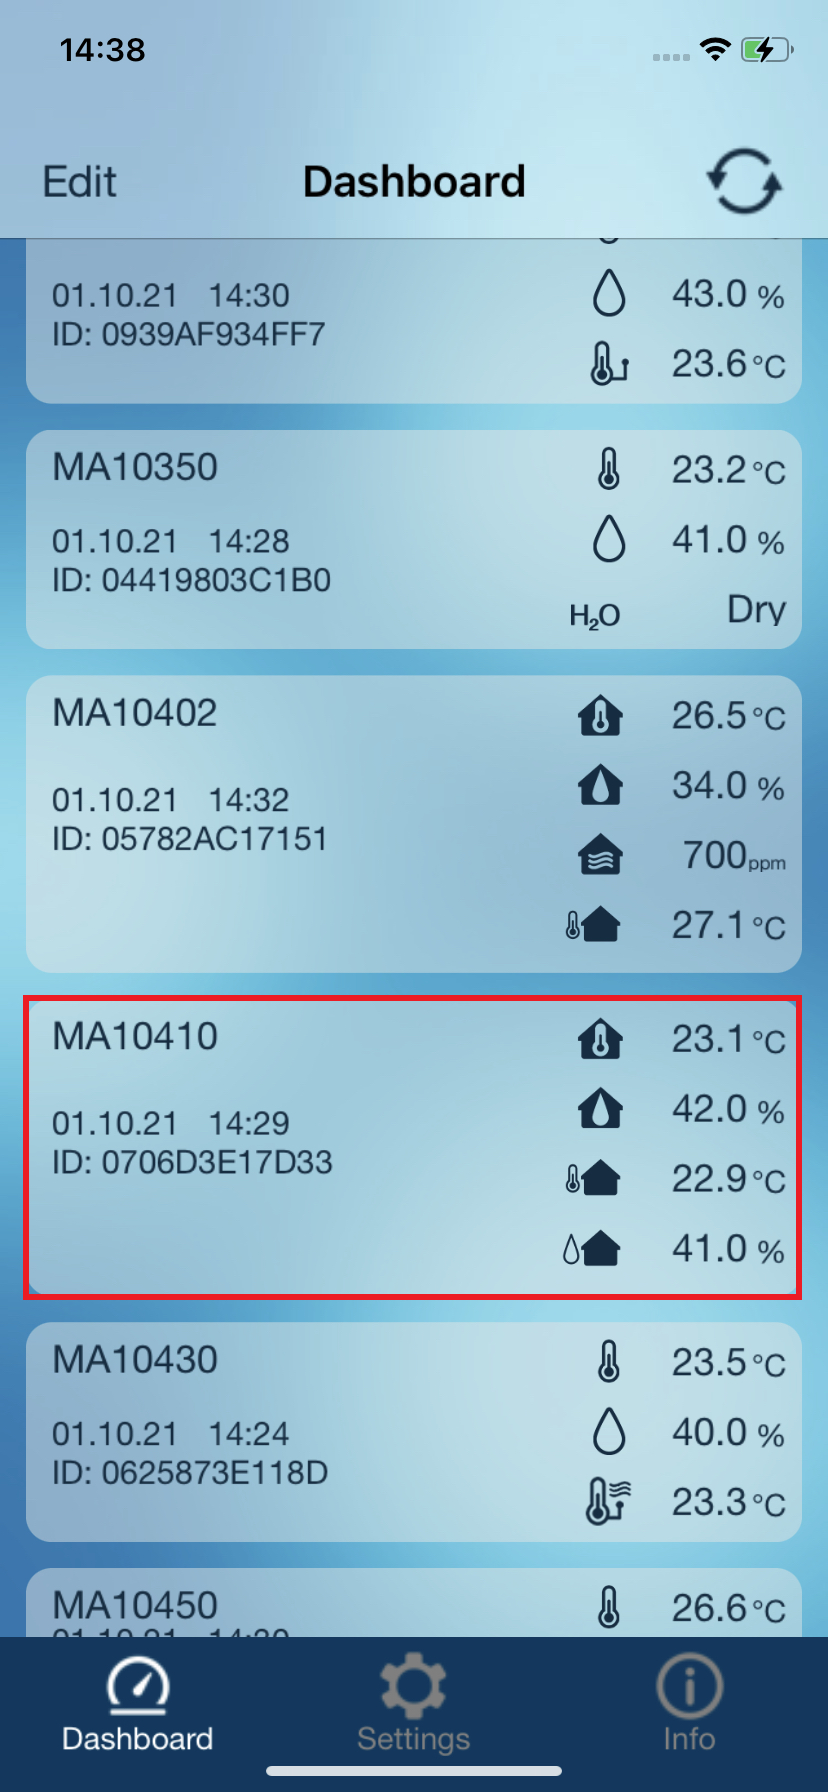
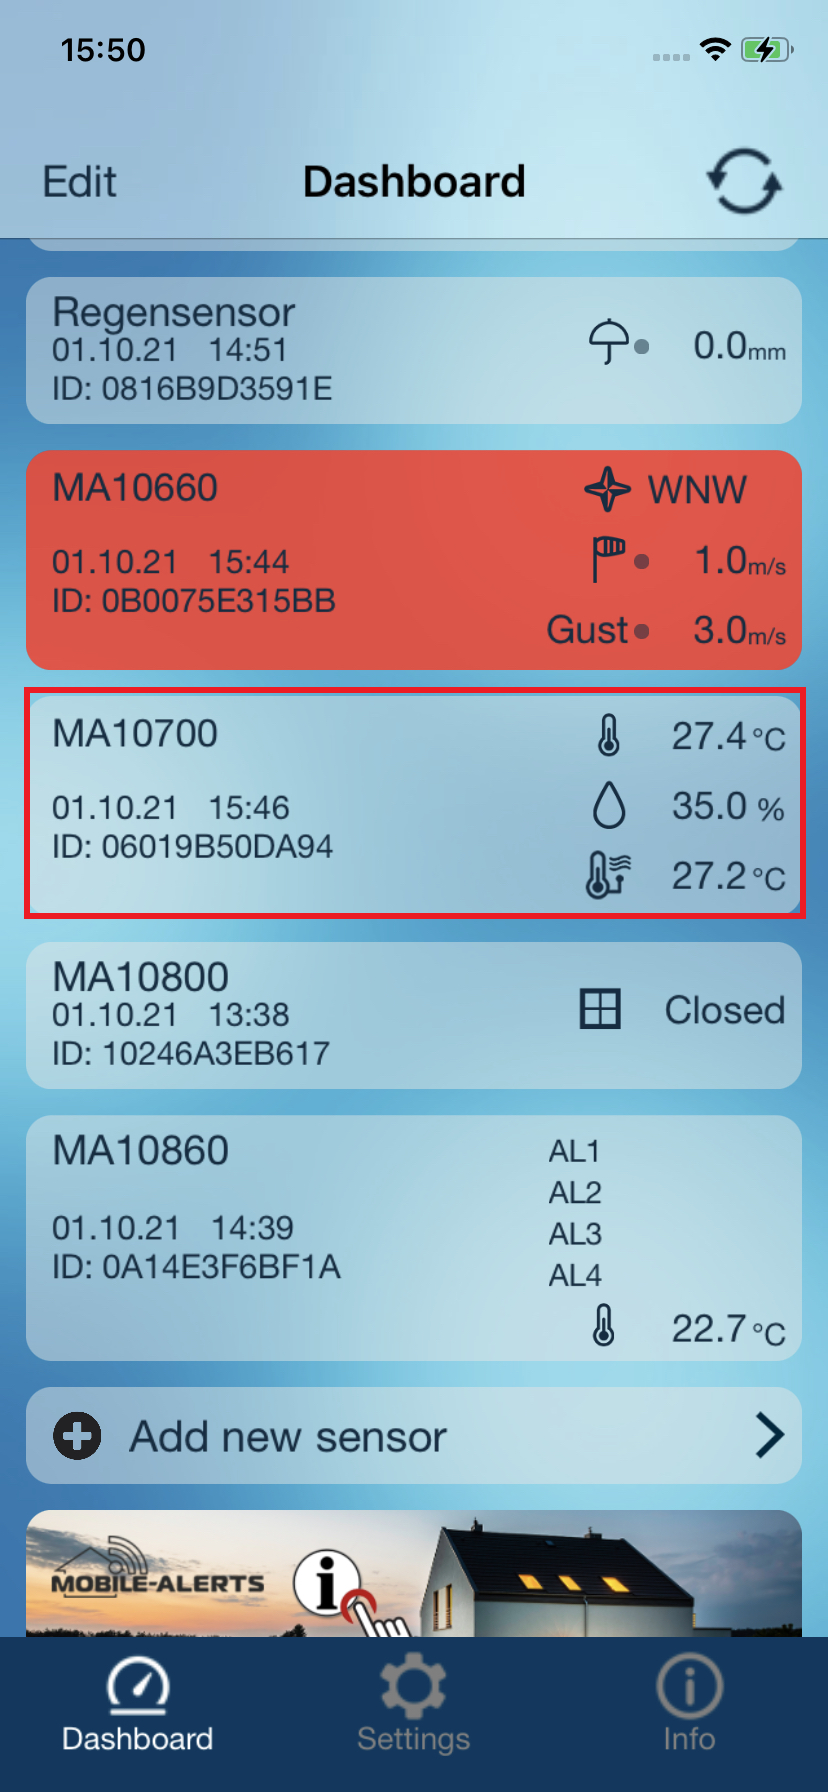
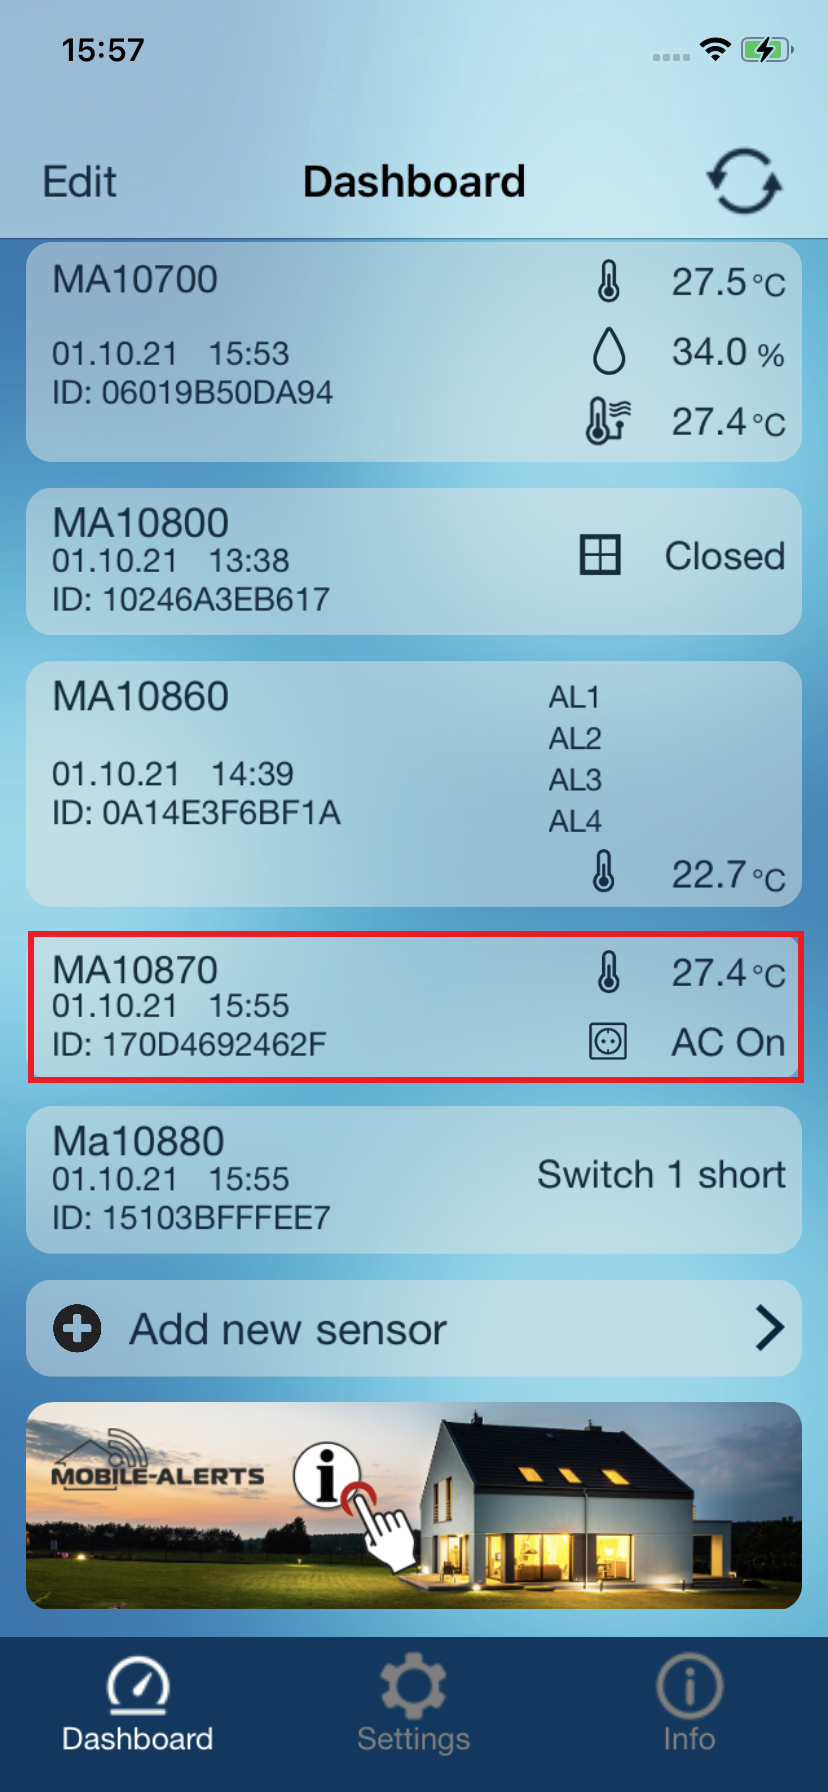
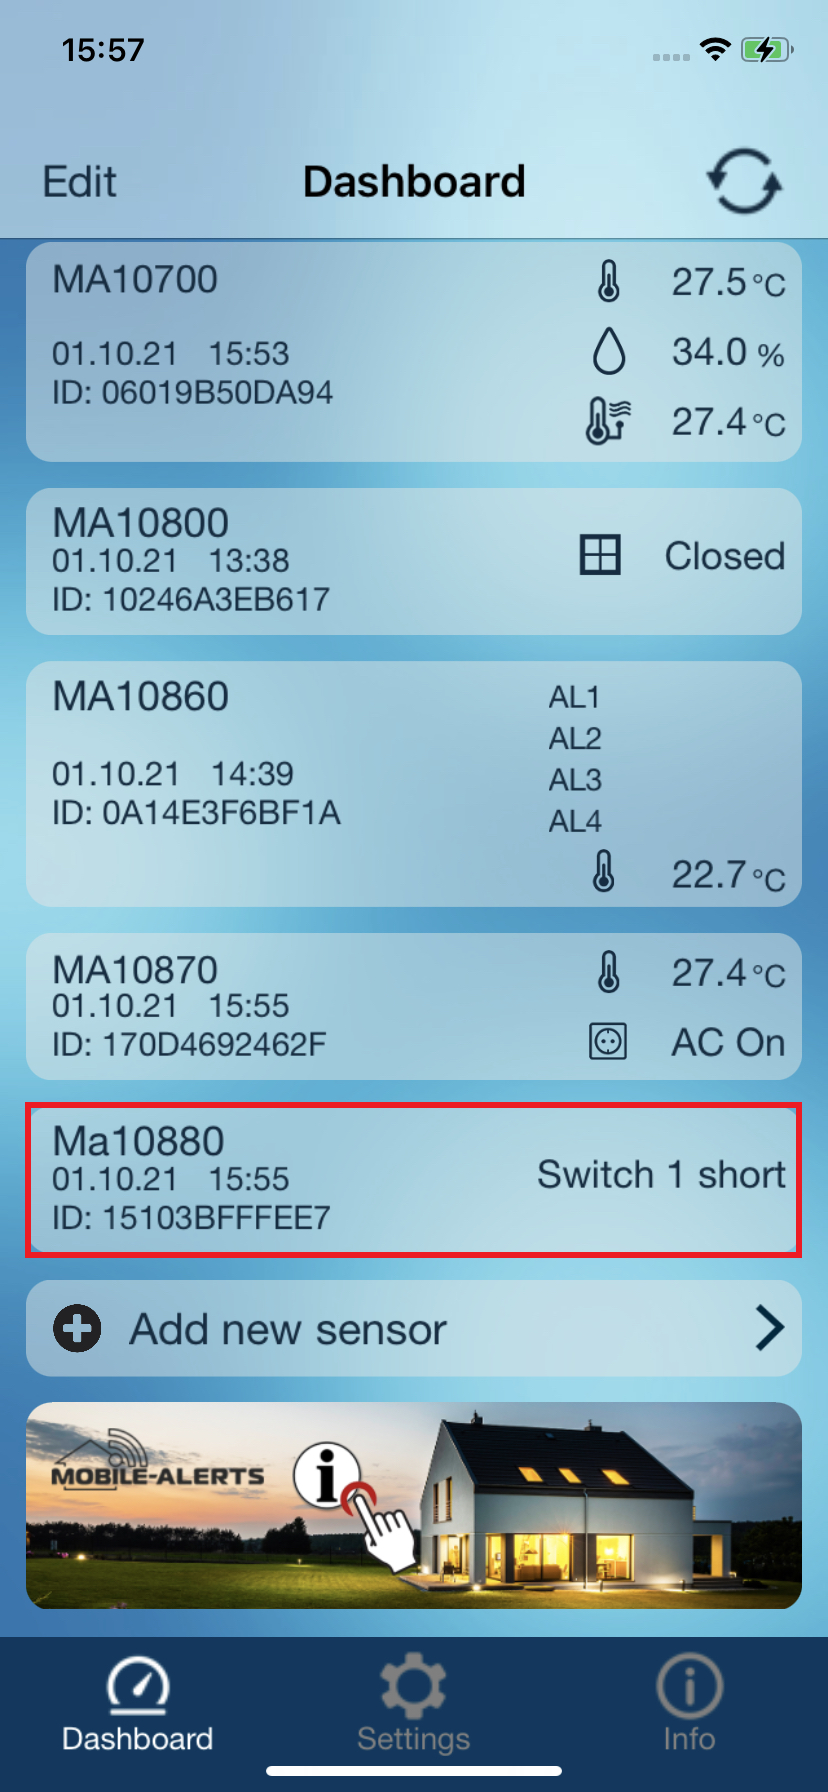
Overview / Dashboard
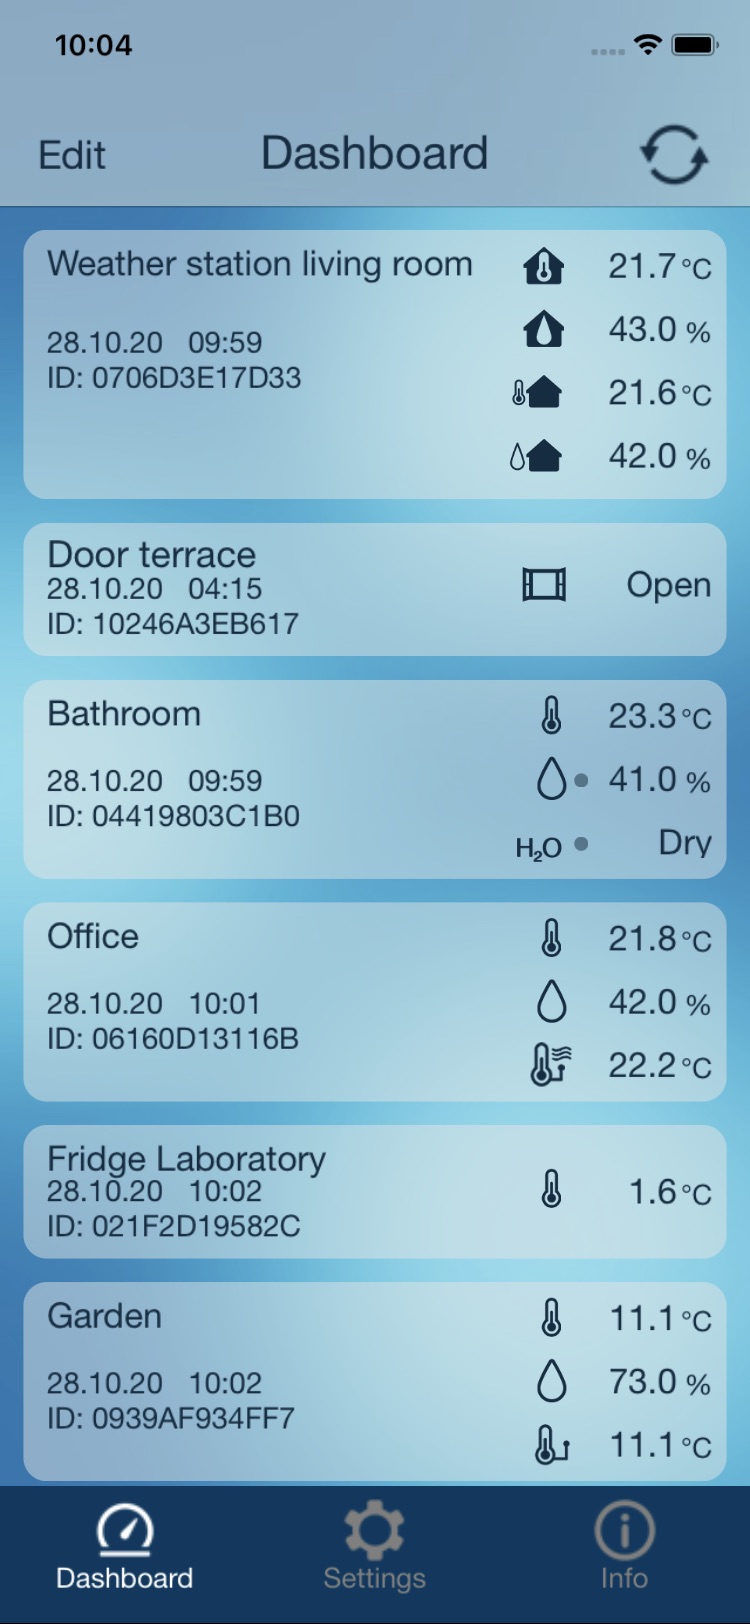
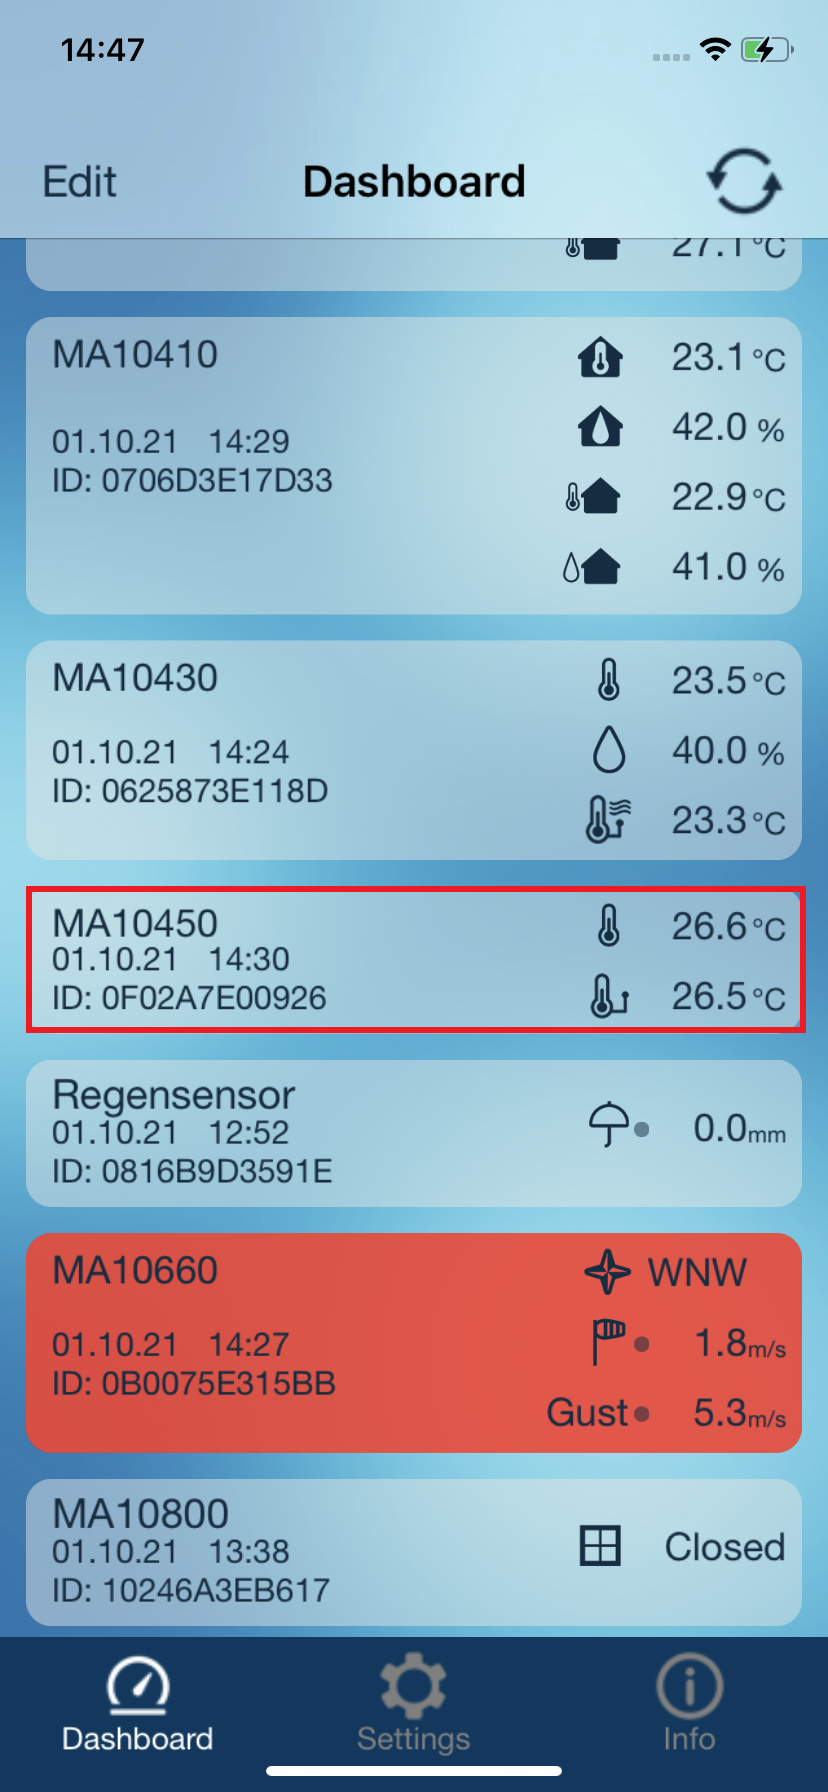
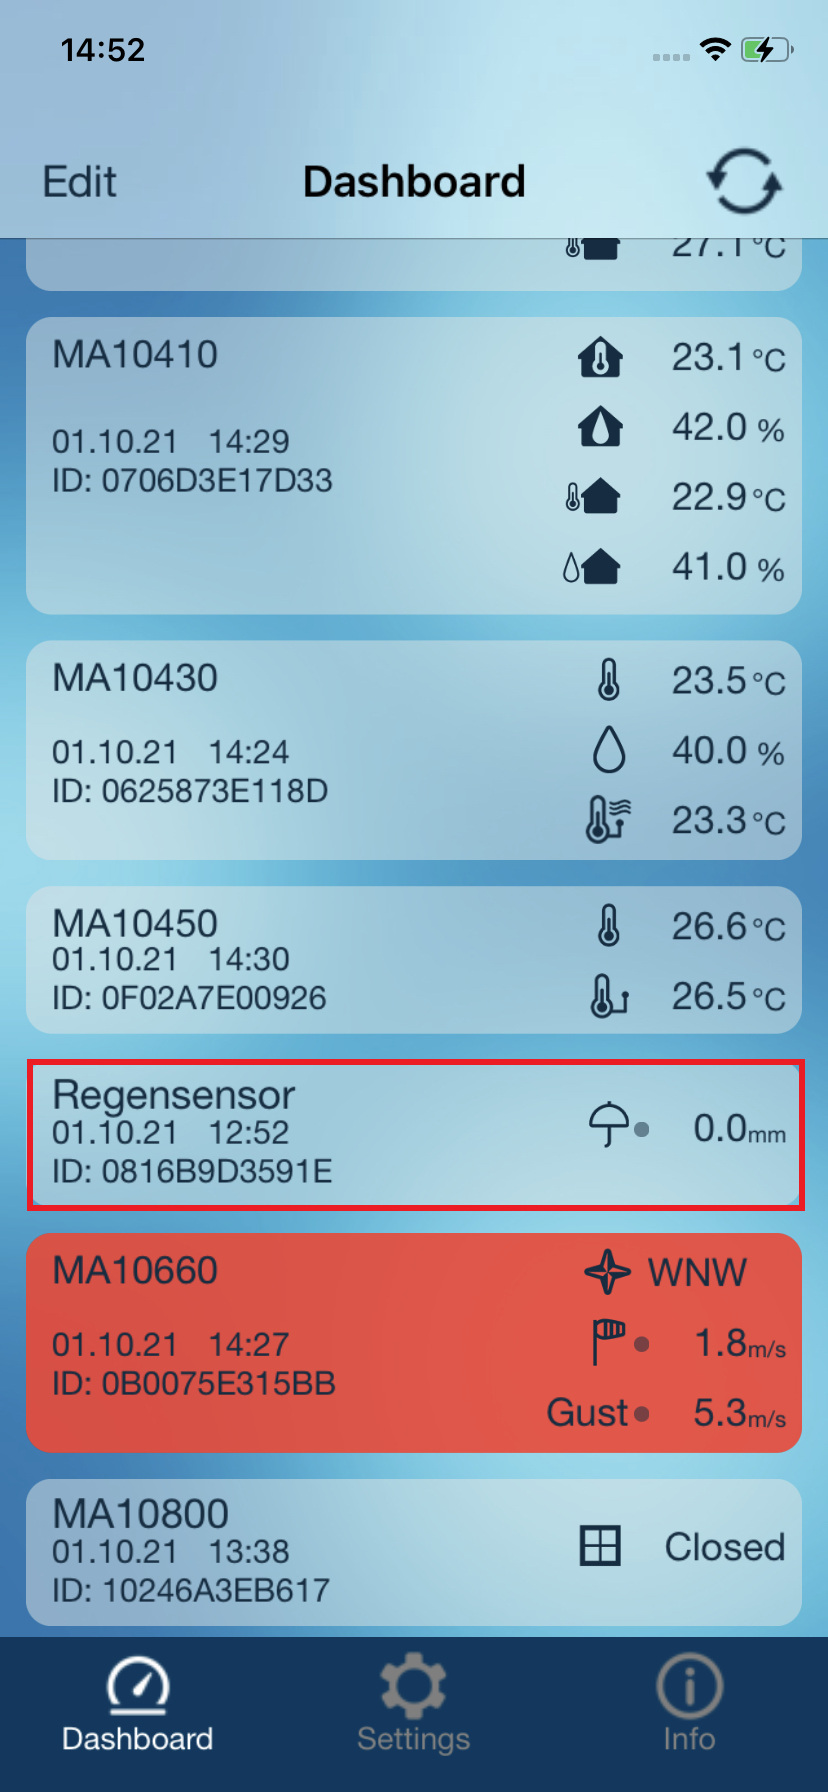
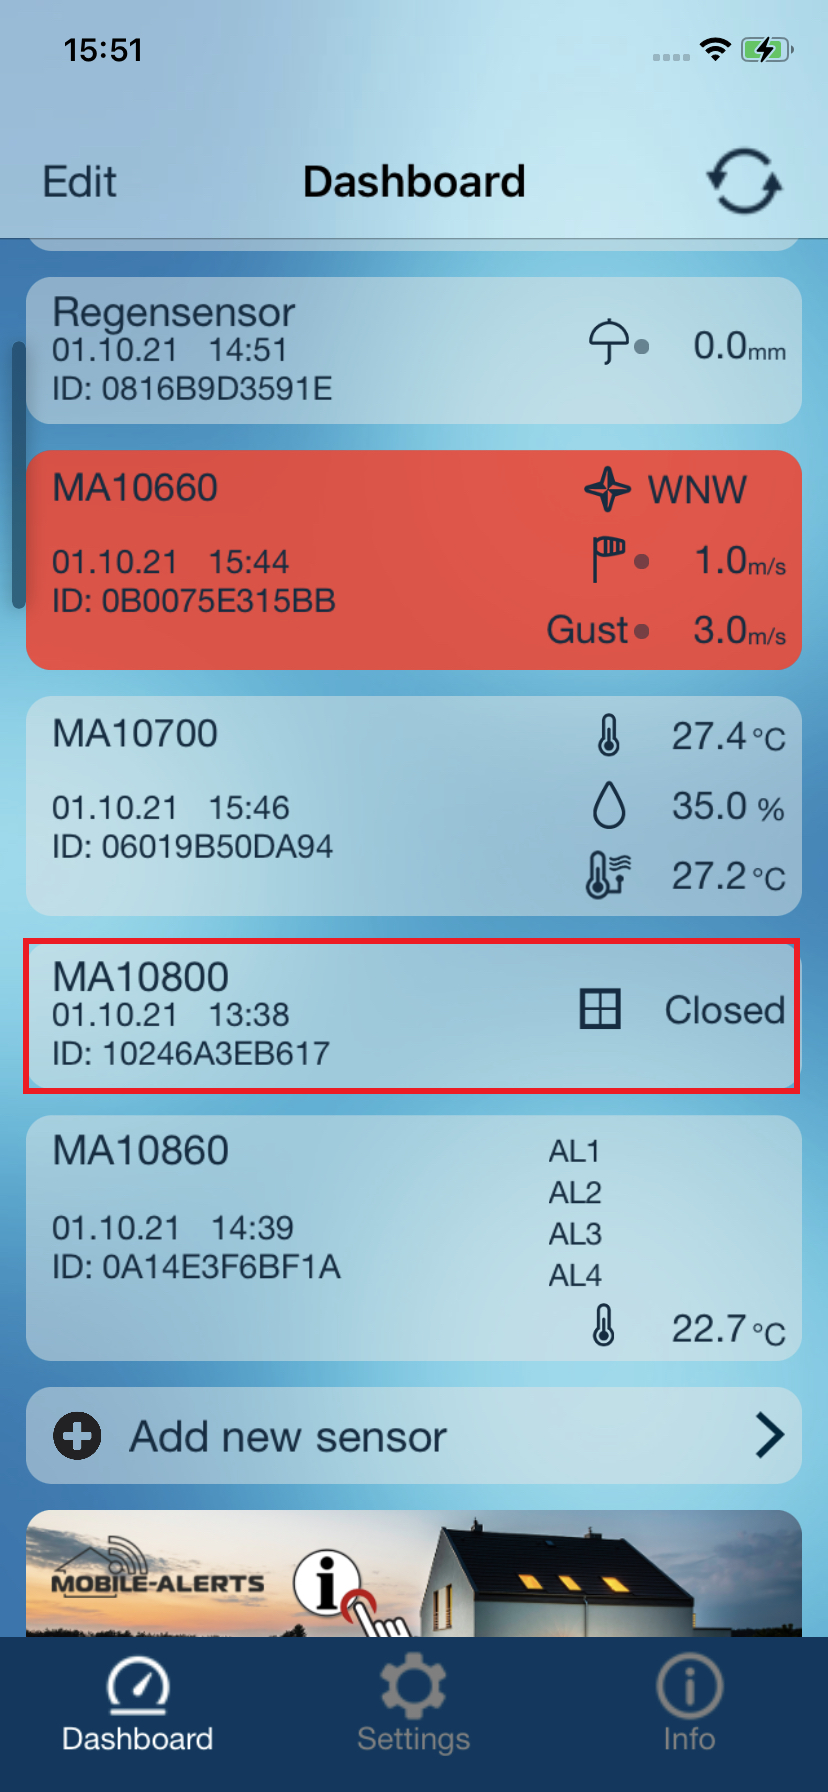
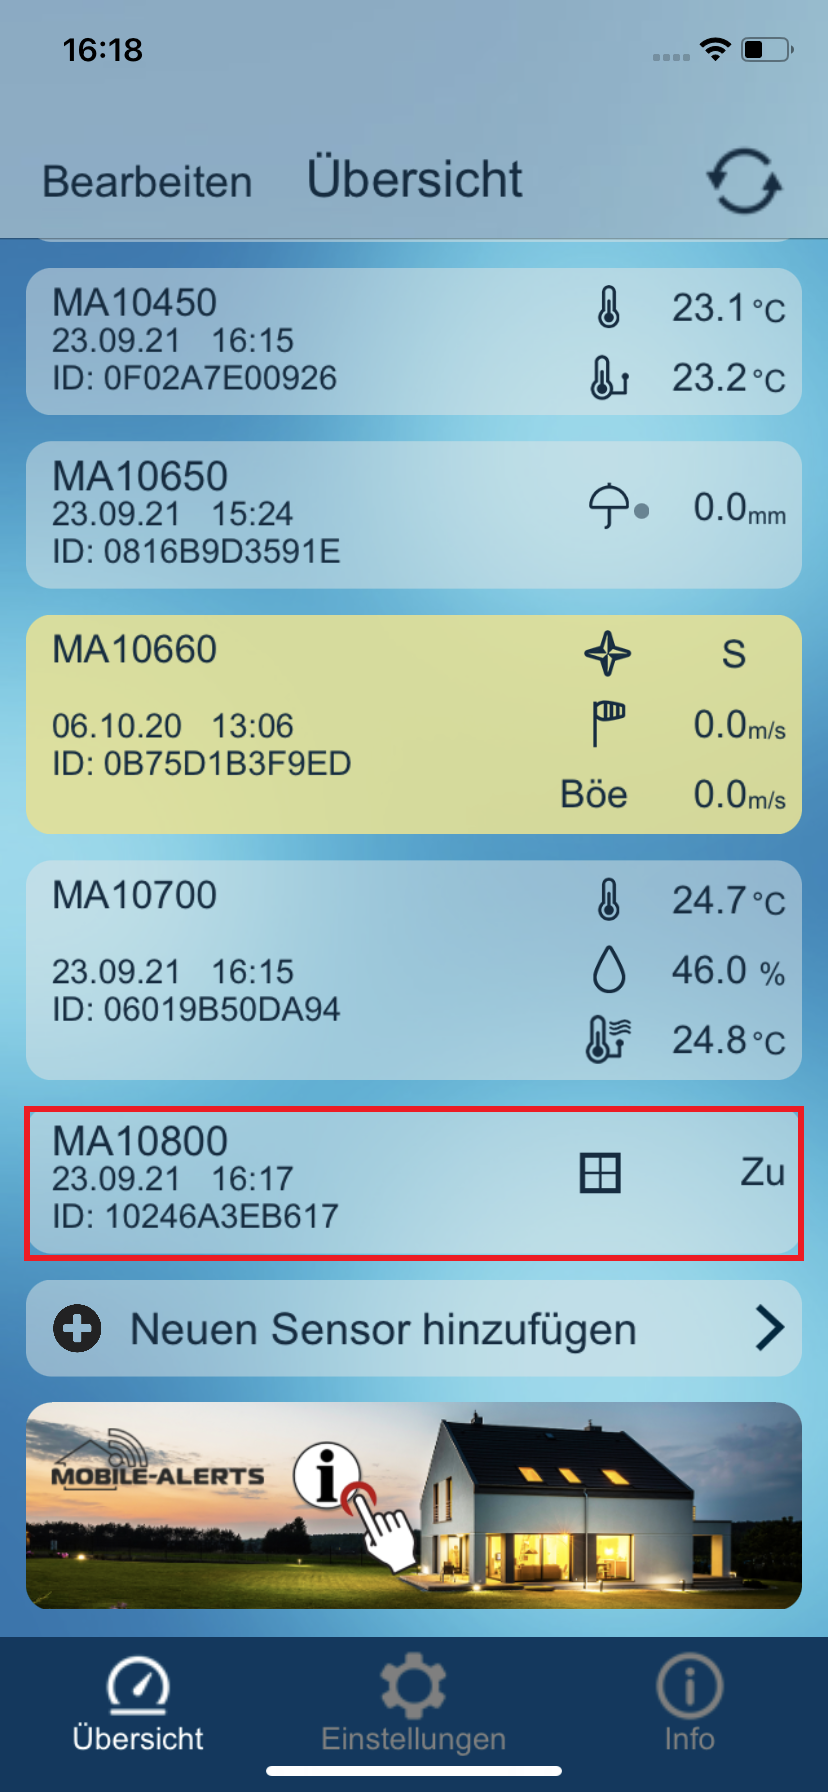
In the dashboard you can see all added sensors. Here you can select the different sensors to change the name, set custom alarms, delete a sensor or add a new one. In the lower area you will find settings and info.
If an alarm is set for a sensor, a dot appears in the list on the right next to the sensor icon.
Yellow field in the dashboard
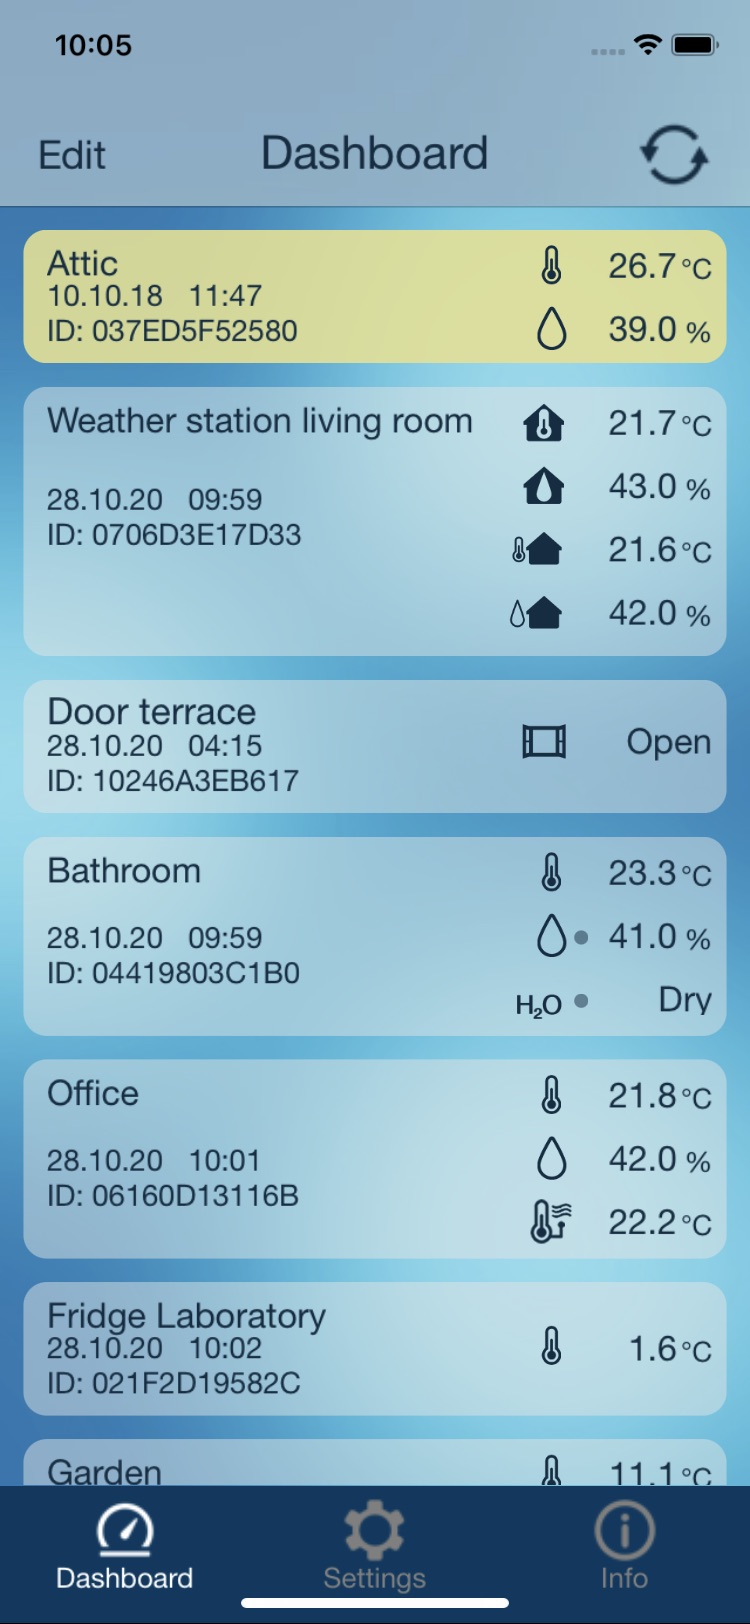
A sensor is indicated with a yellow field, when the battery of the sensor needs to be replaced or if the server has not received data from the sensor for more than 15 minutes.
Red field in the dashboard
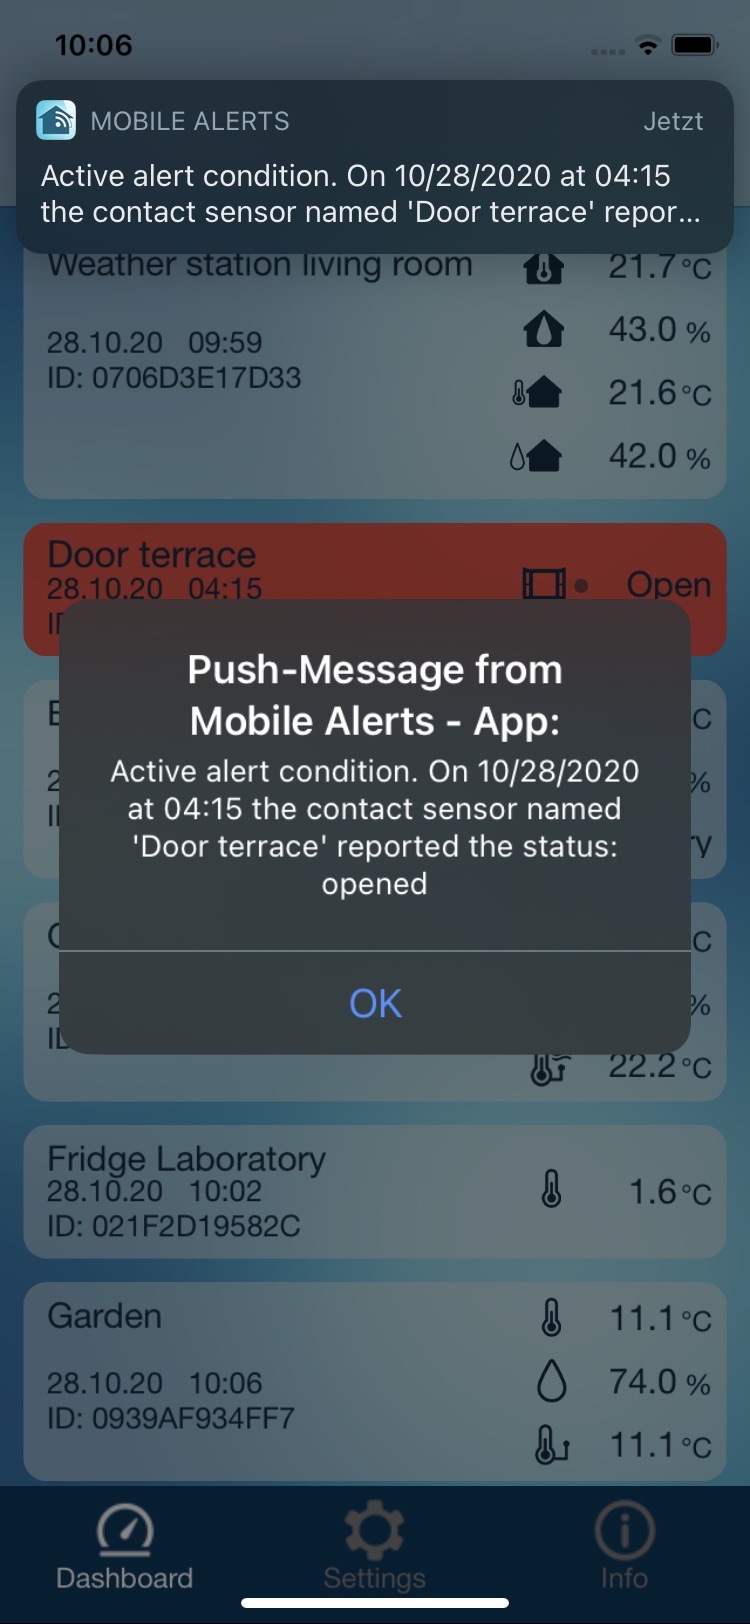
A sensor is indicated by a red field, when at one or more of the measured values the active alarm is present.
Orange field in the dashboard
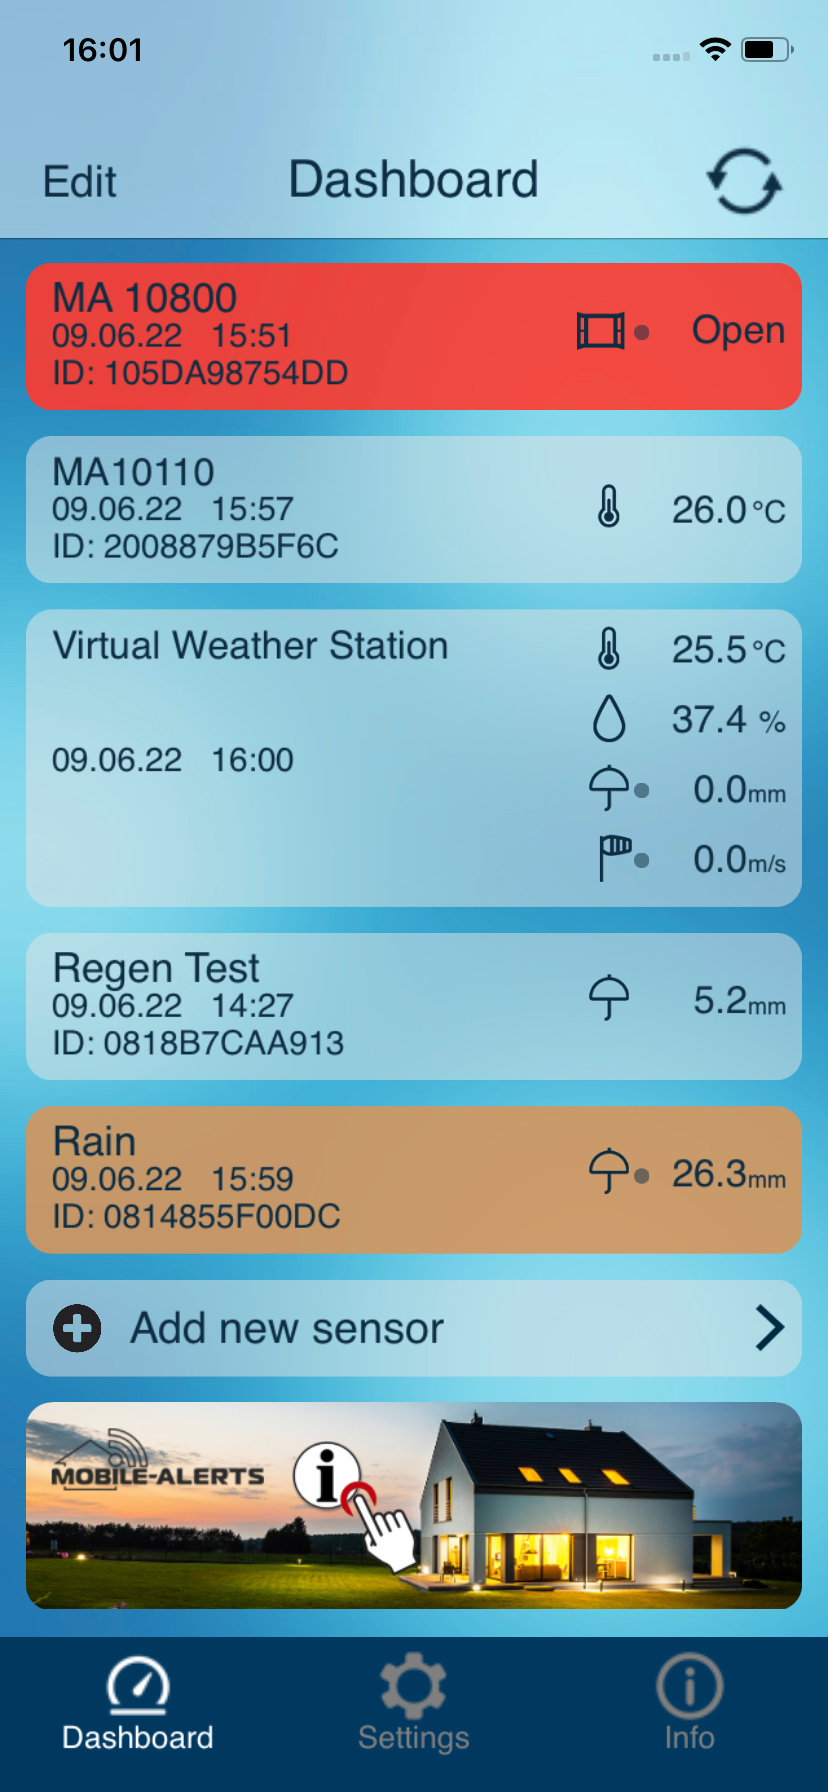
If an alarm is triggered due to the alarm settings of the sensor and the alarm condition is no longer met (measured data are back in the normal range) after the last update of sensor data, the sensor in question is represented by an orange box.
In addition, the deactivation of the alert is notified via push notification.
Push notifications
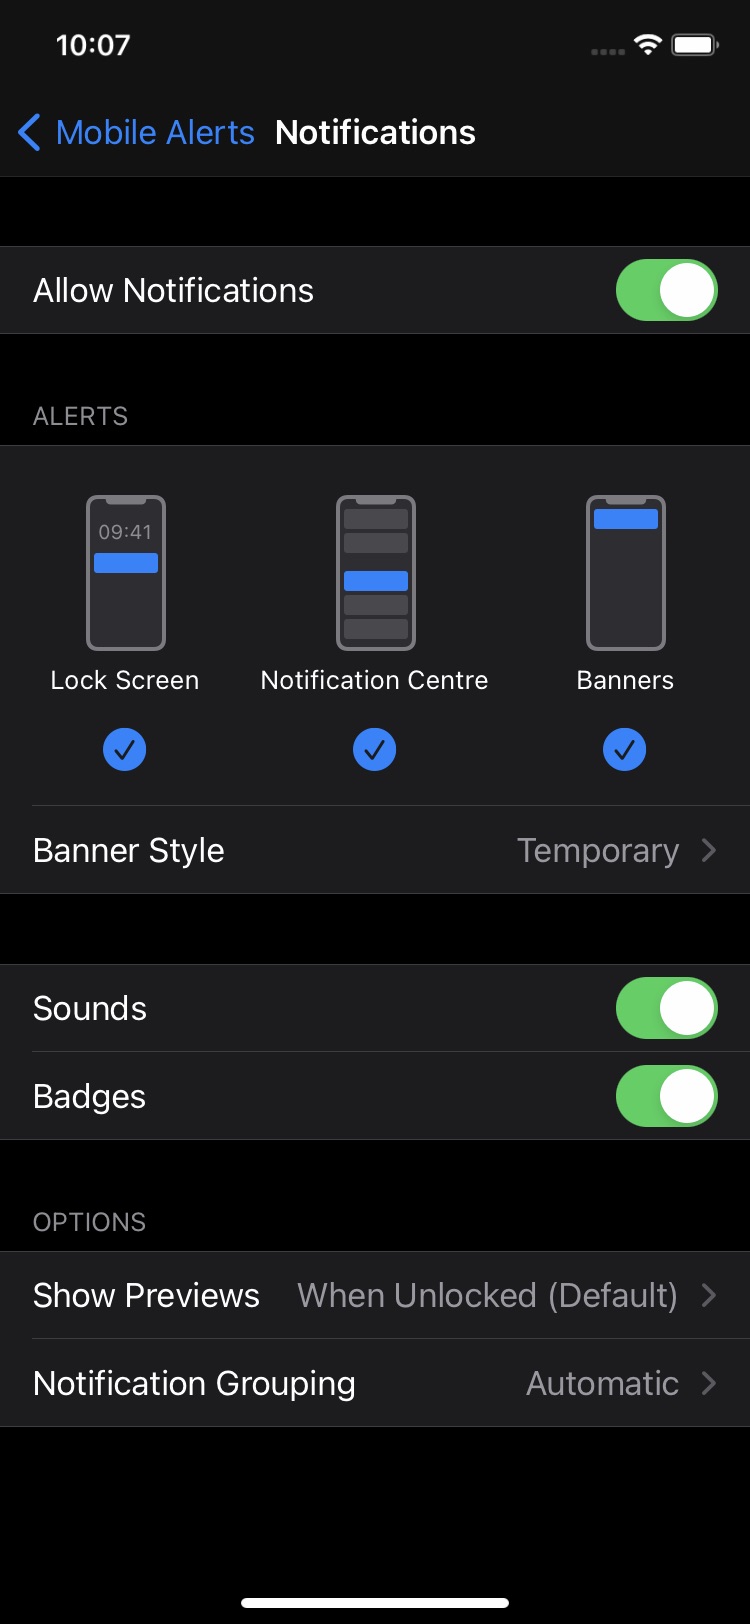
To receive push notifications you have to allow them under "Settings -> Messages".
Menu "Edit"
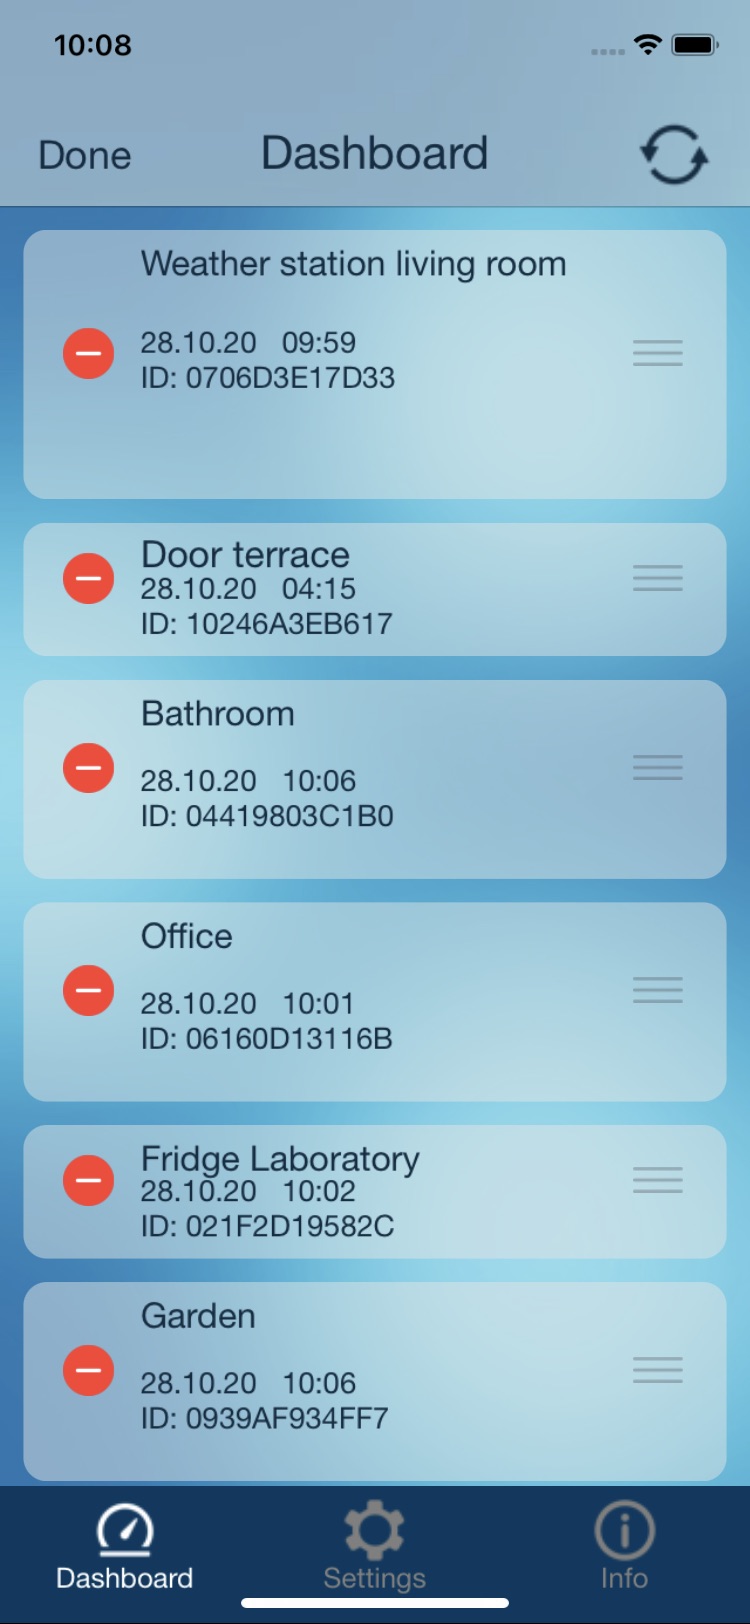
Touch the "Edit" button to enter the edit menu. After completion of the settings, touch the "Finish" button.
Add new sensor
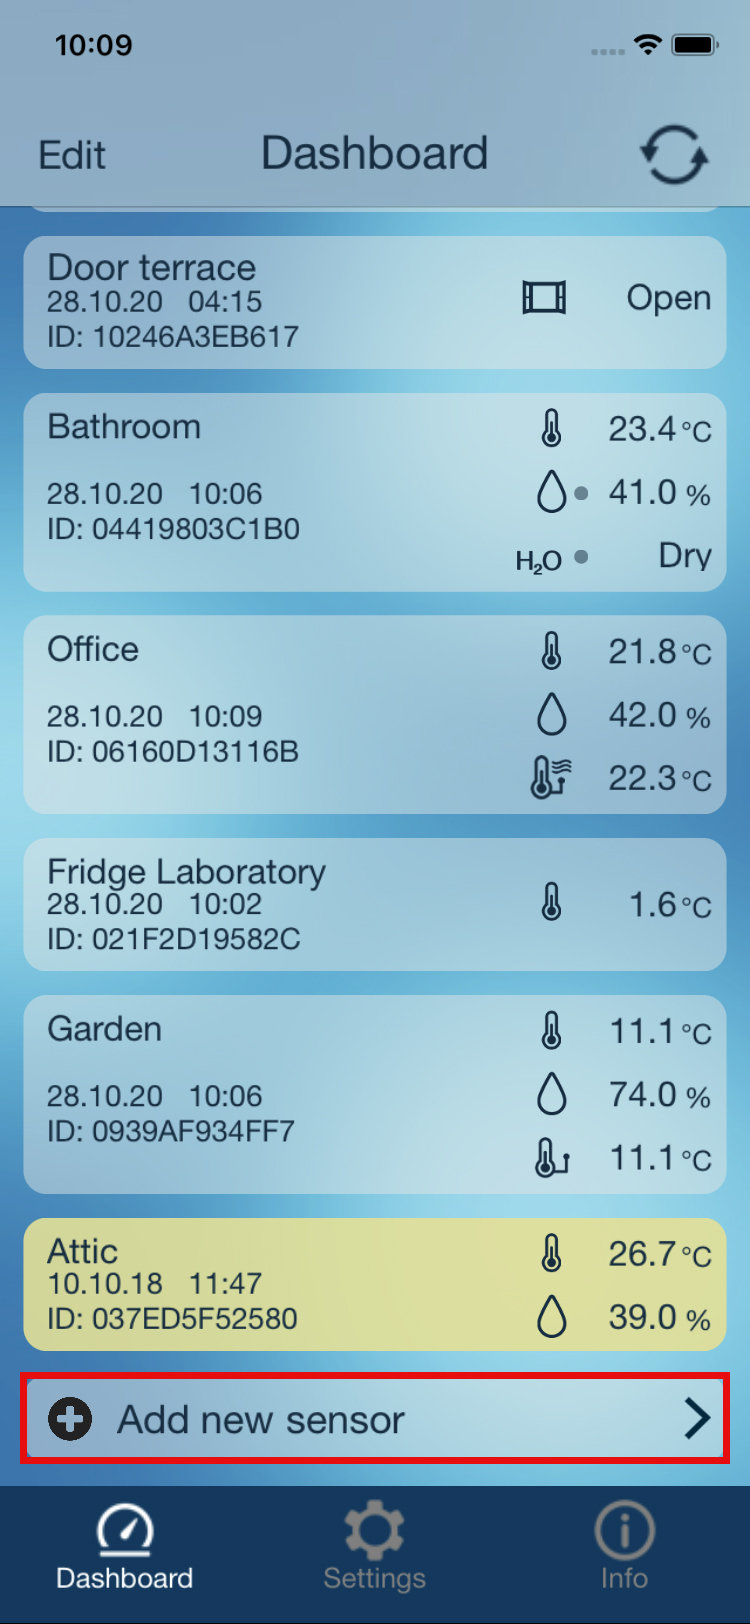
Tap "Add New Sensor", then scan the QR code on the back of your sensor.
Update sensor data
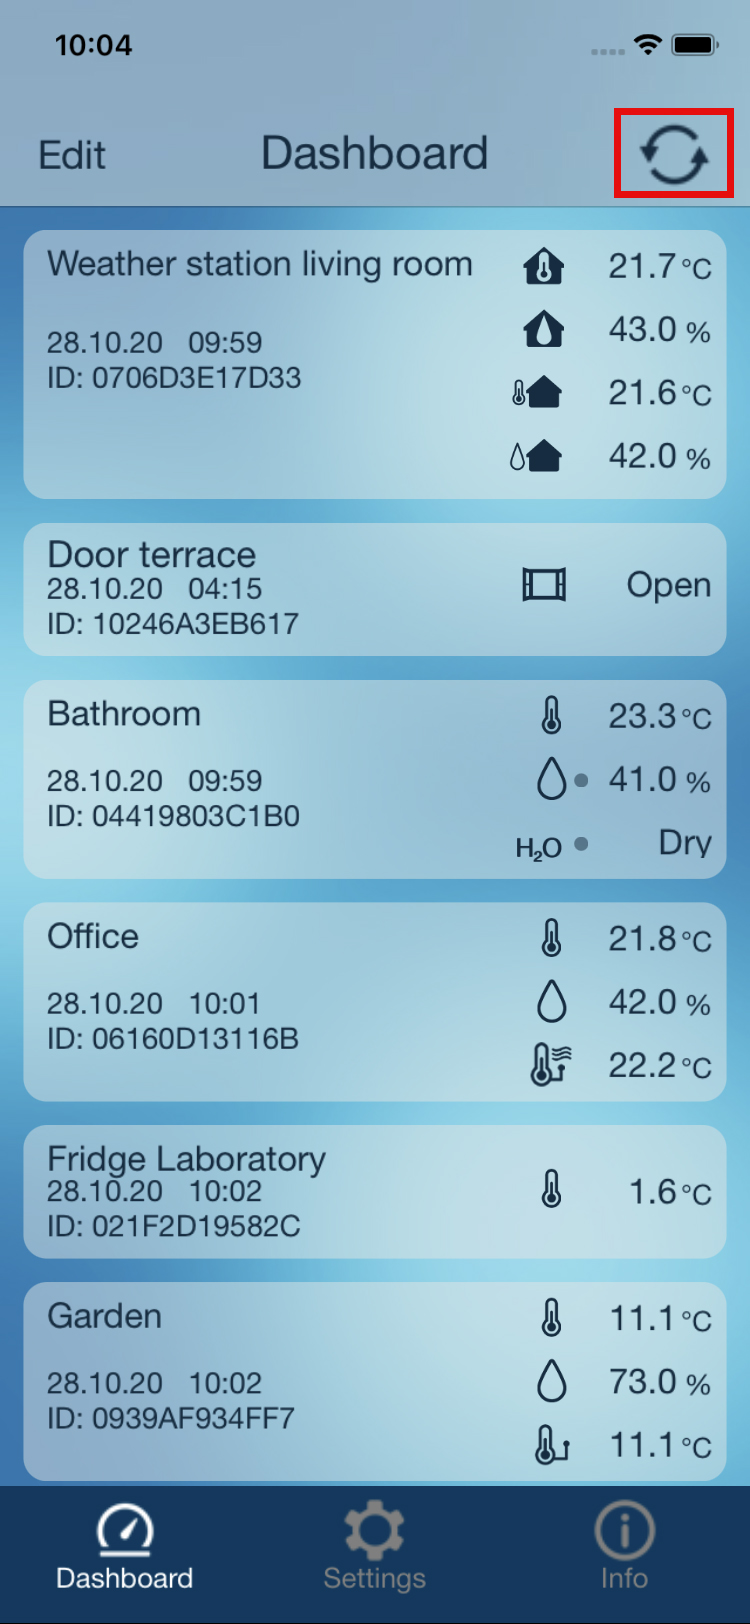
To update the sensor data, touch the box with the circular arrow which is located on the top.
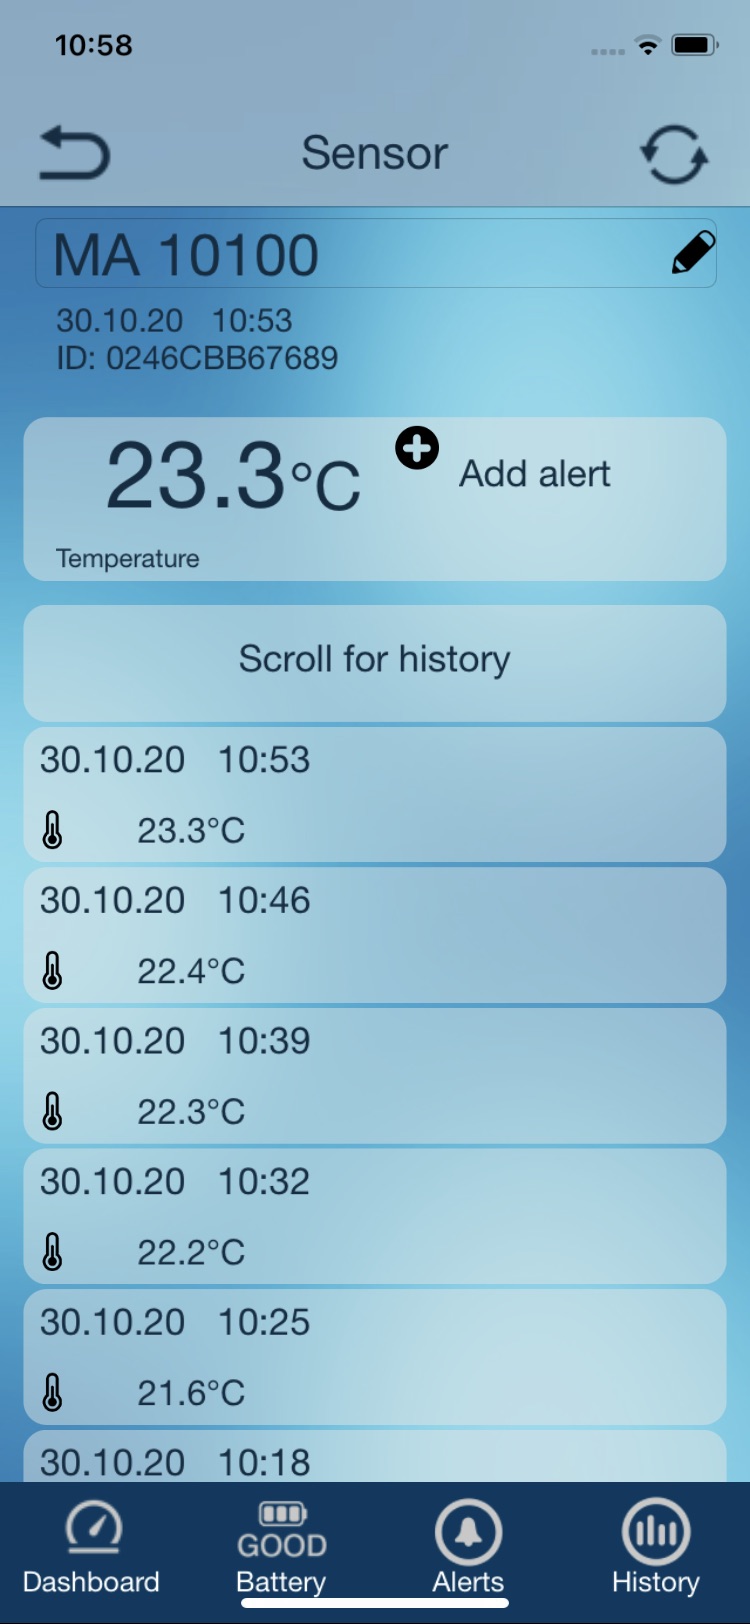
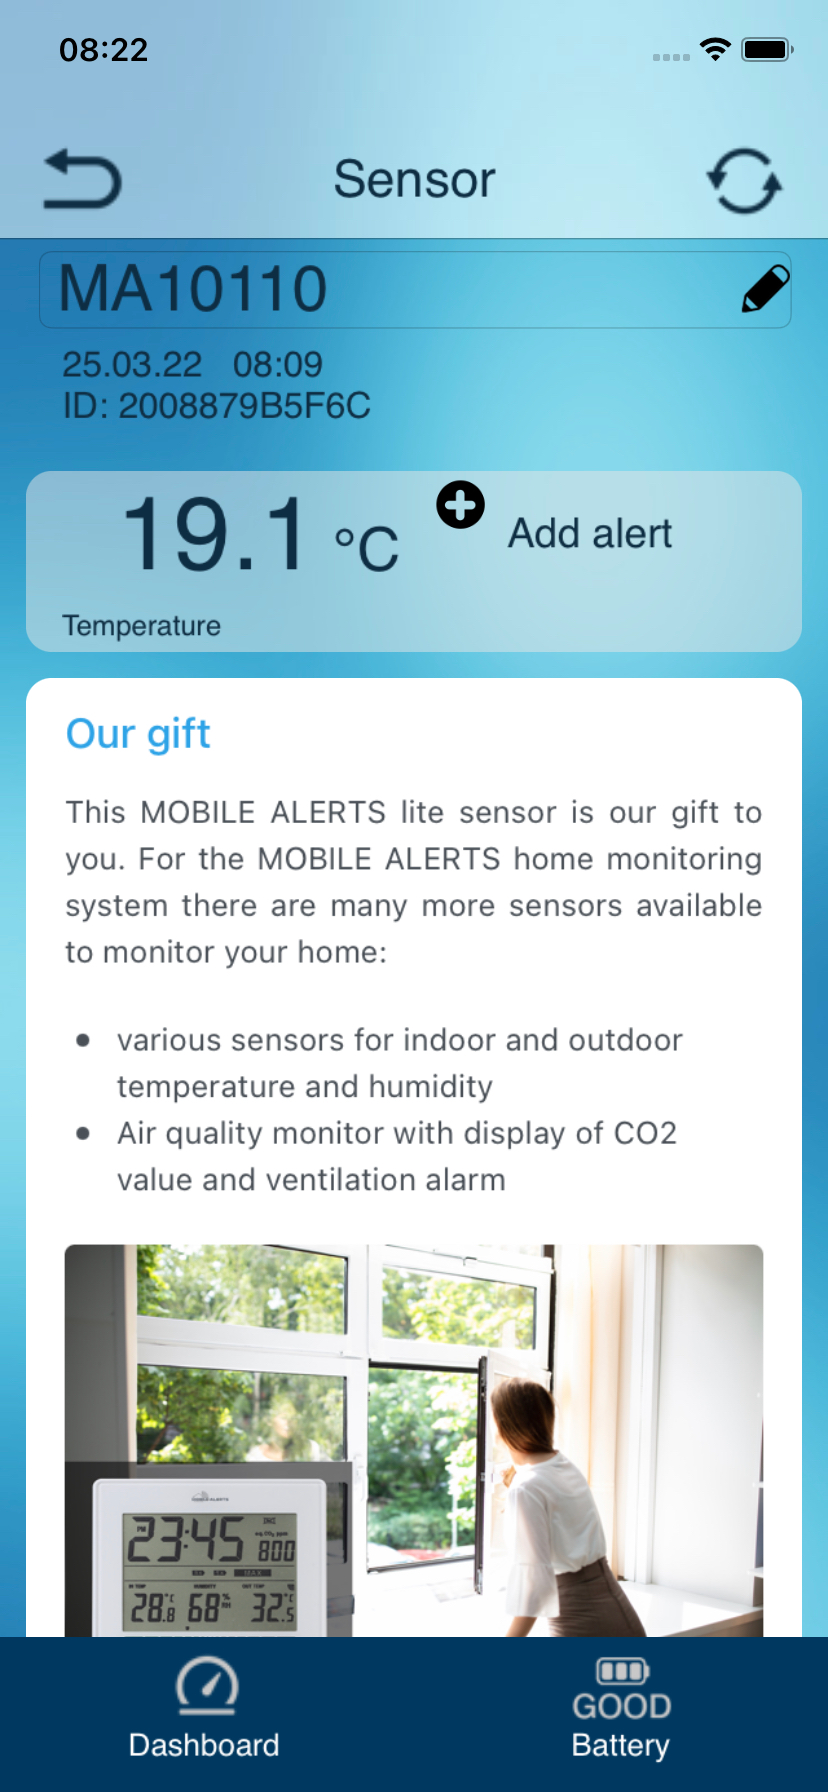
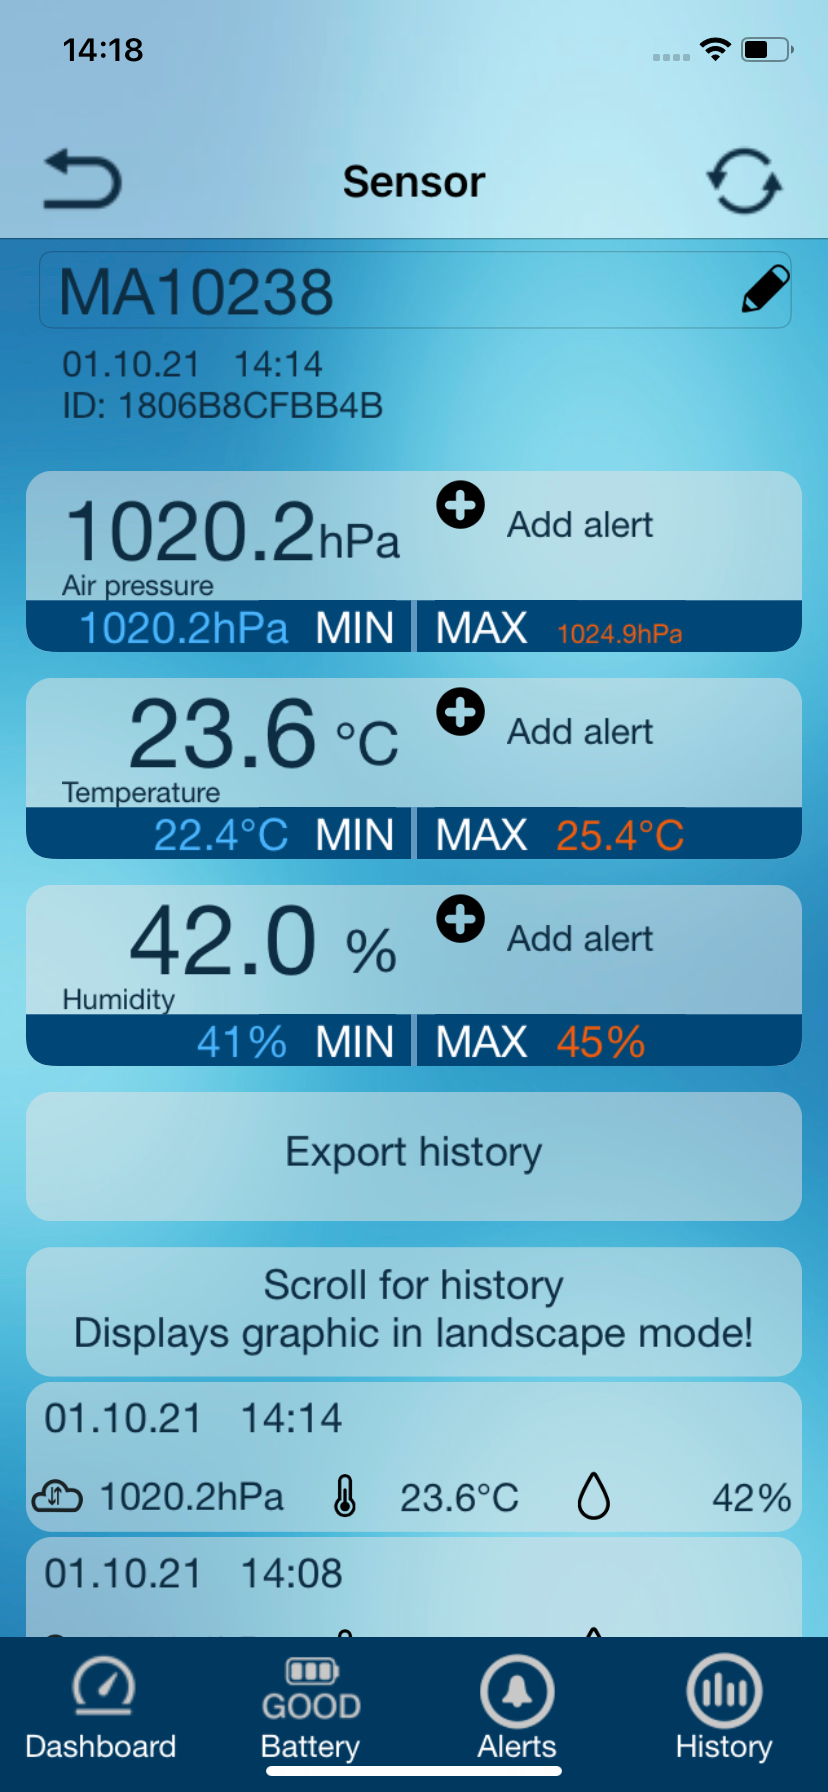
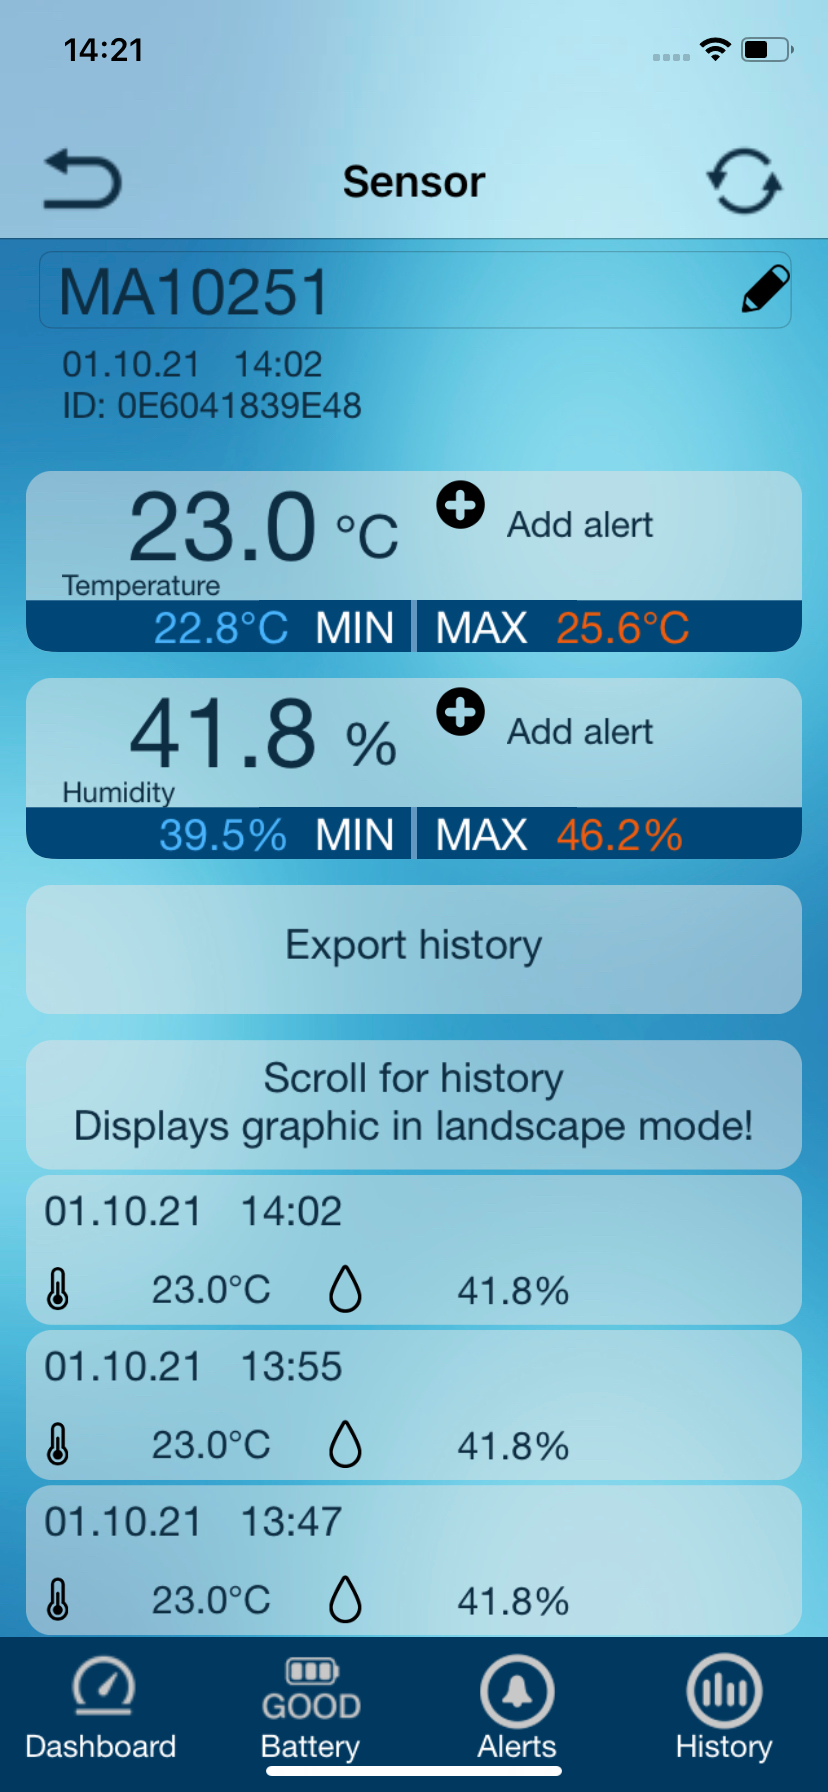
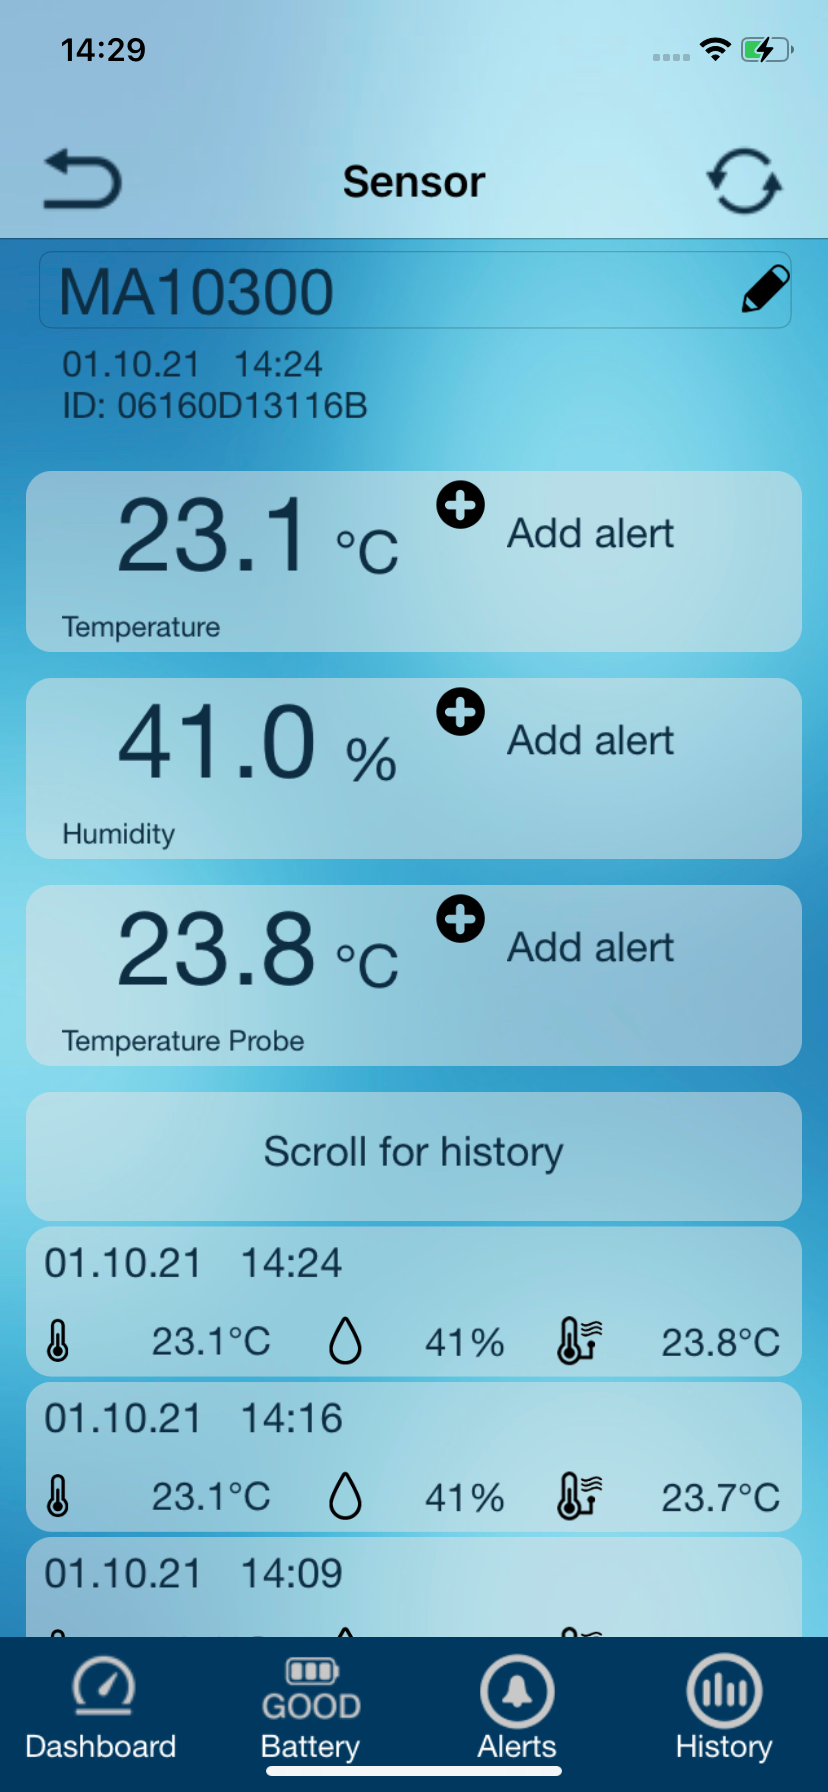
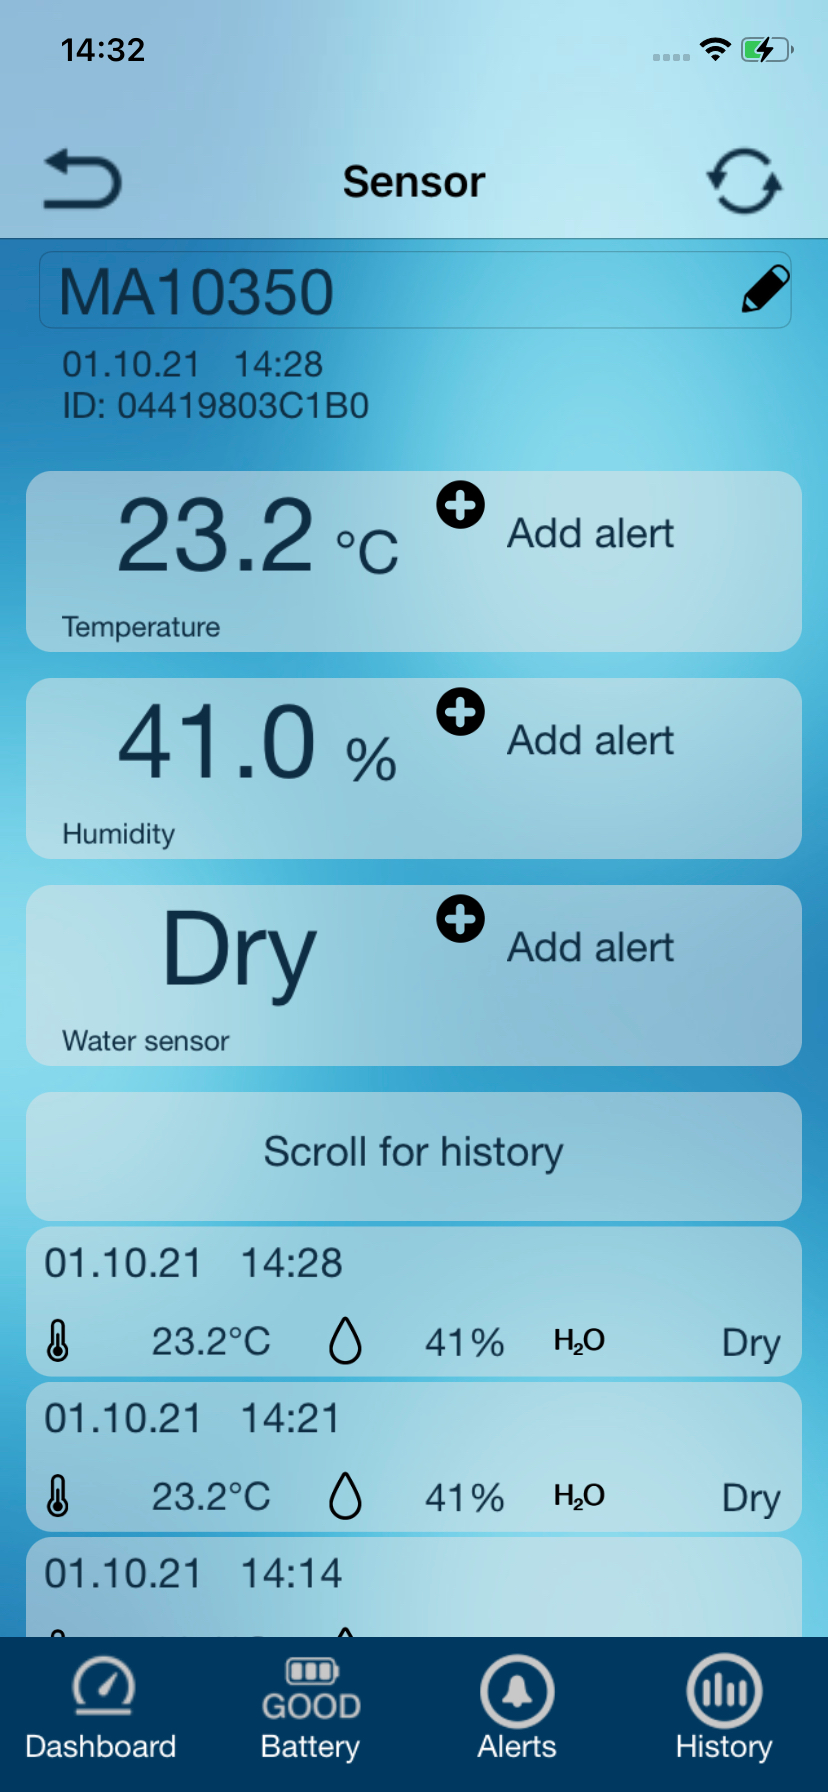
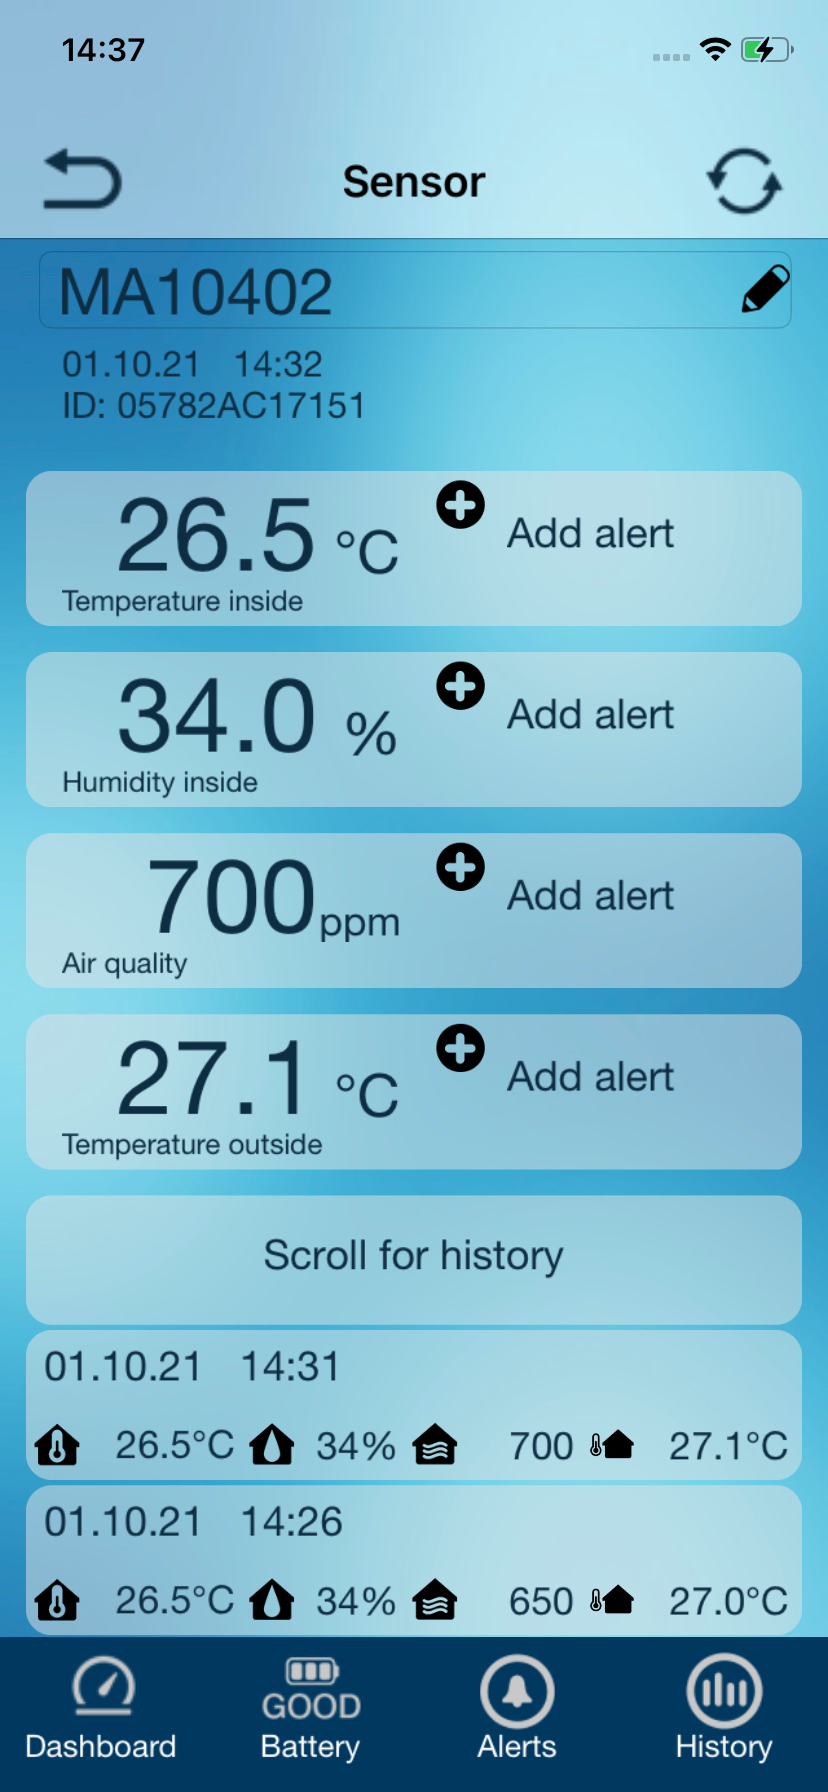
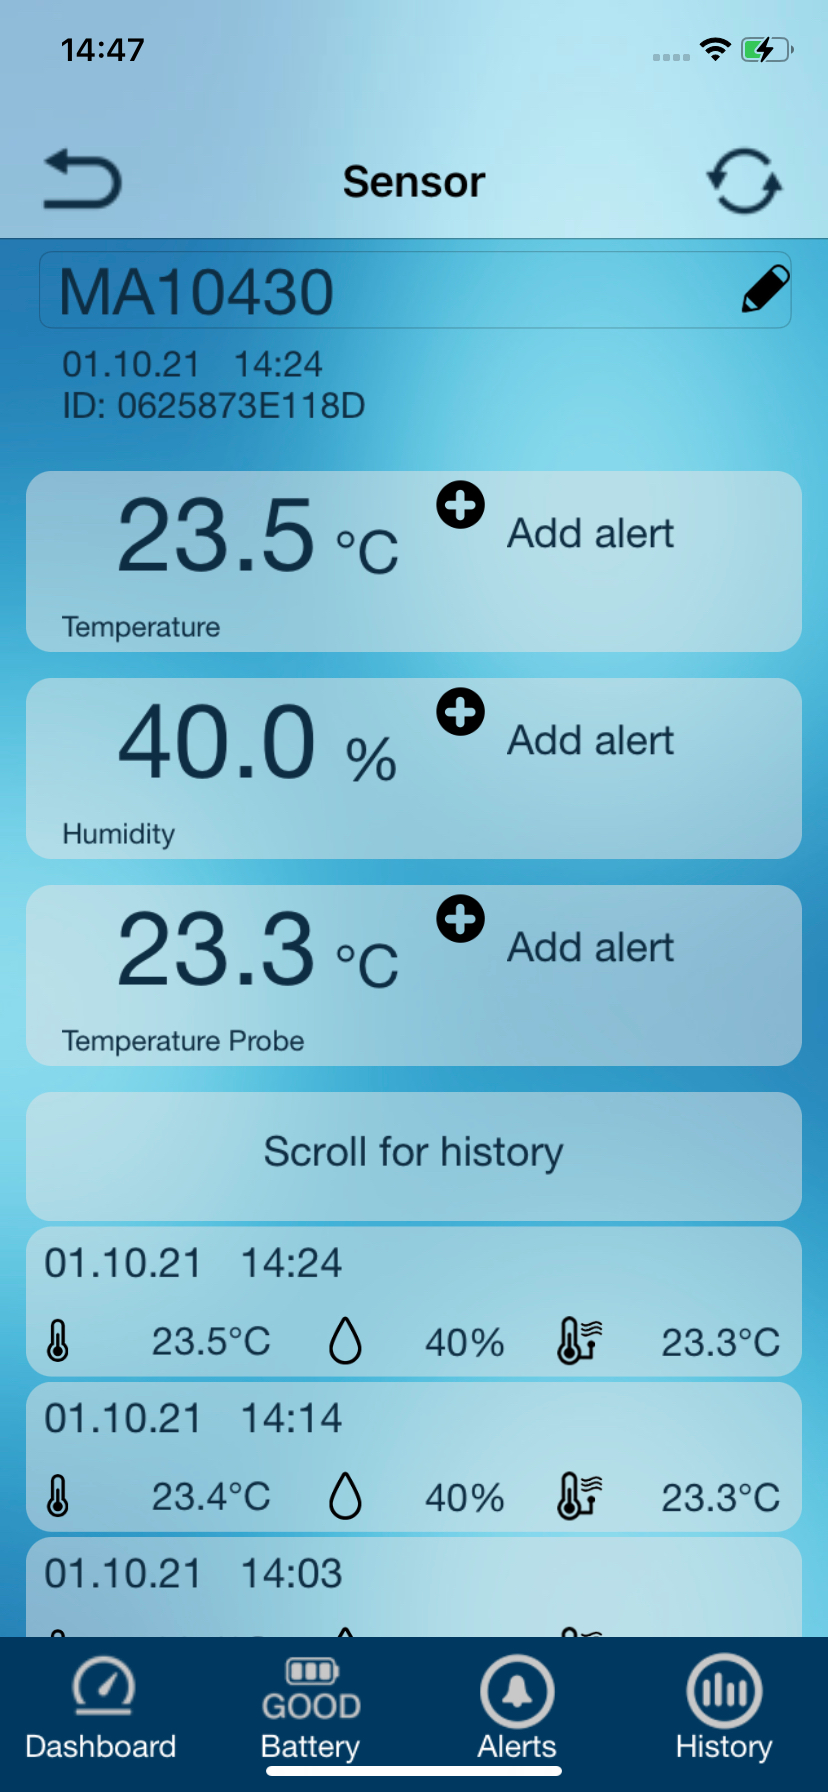
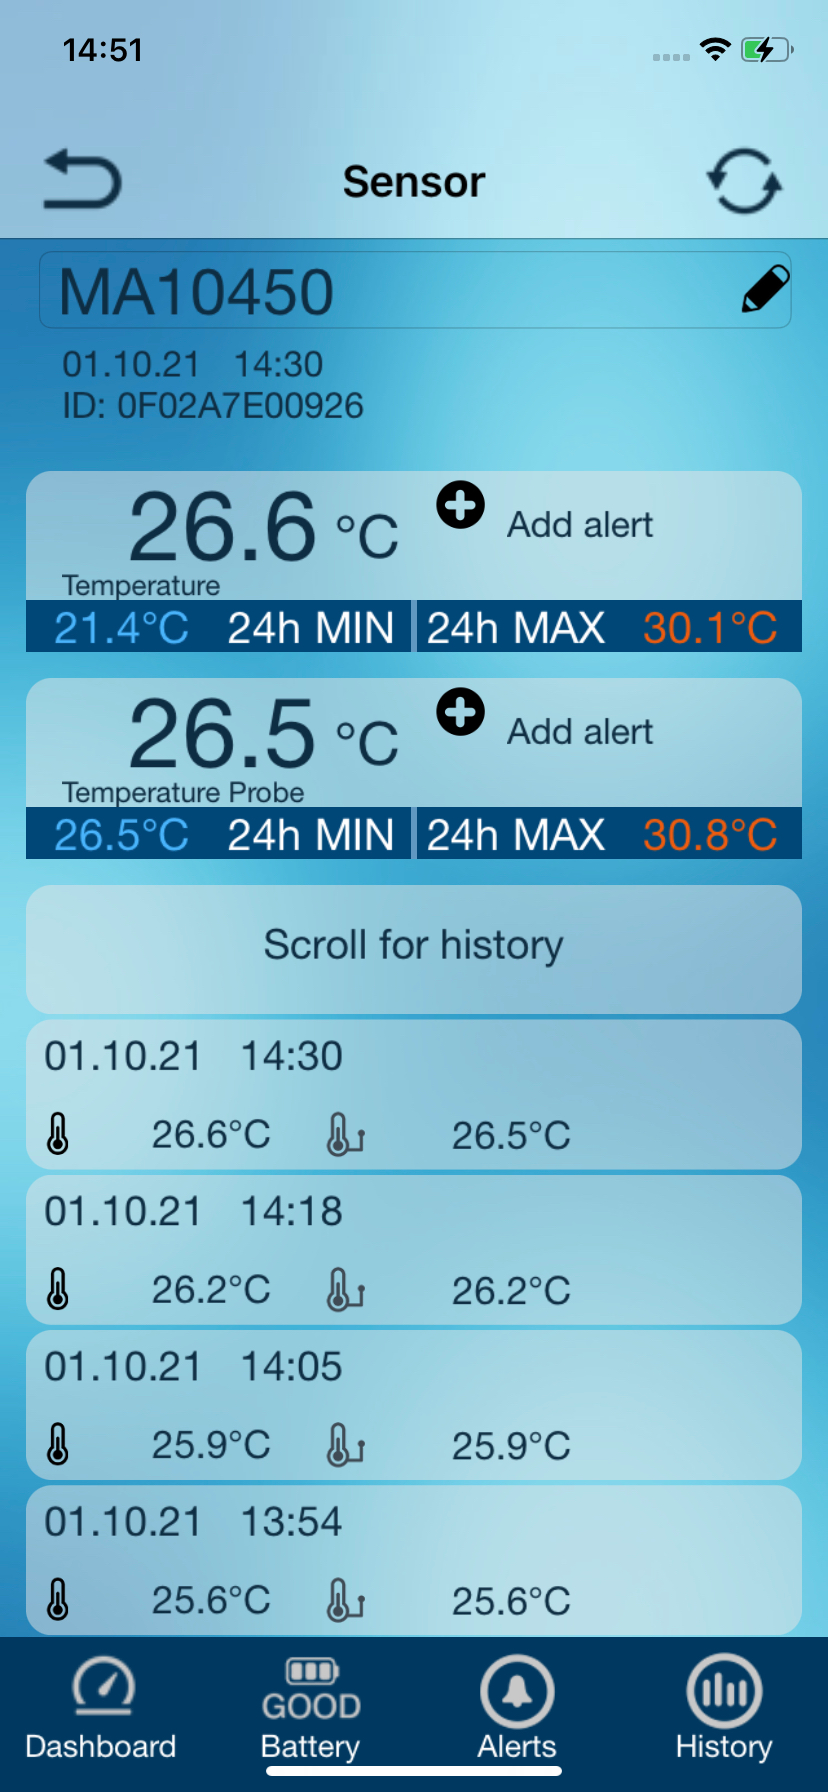
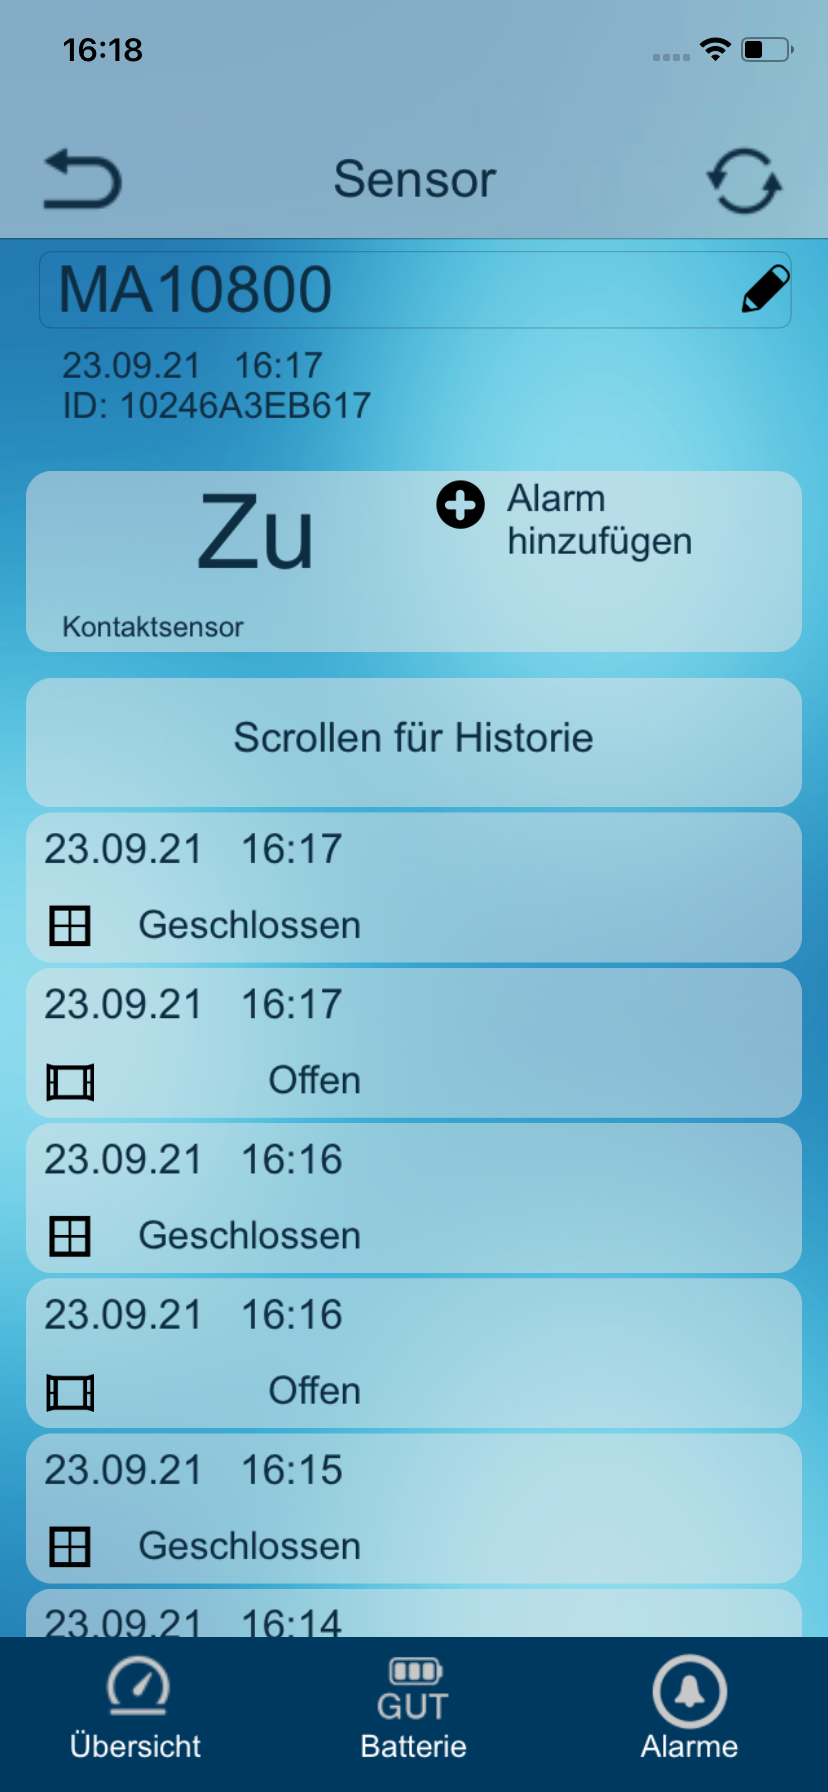
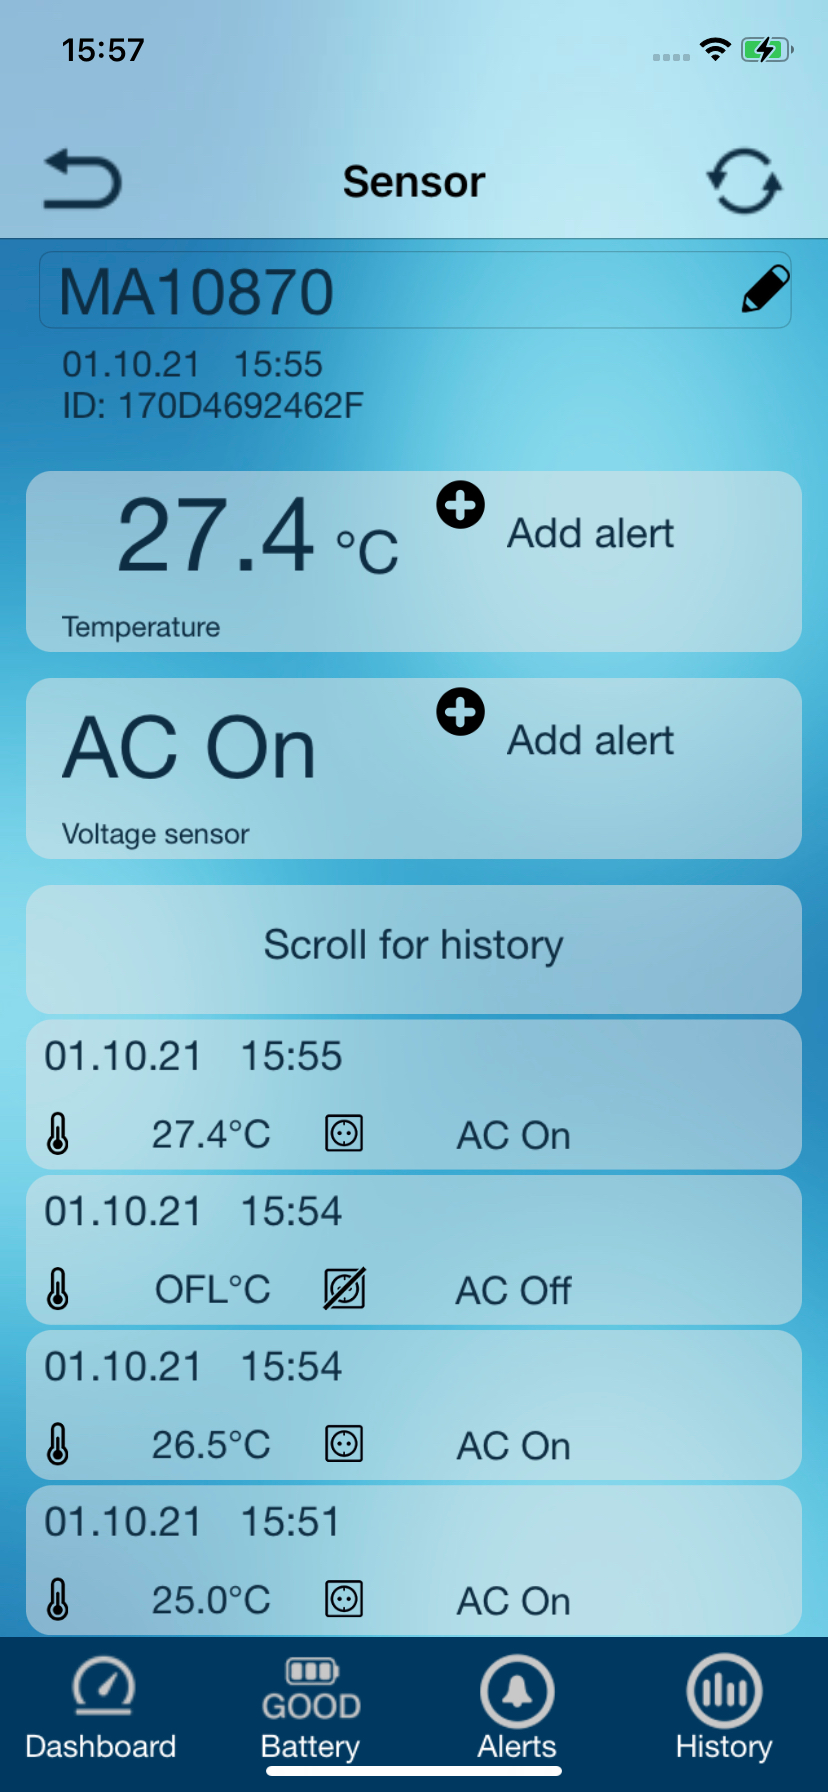
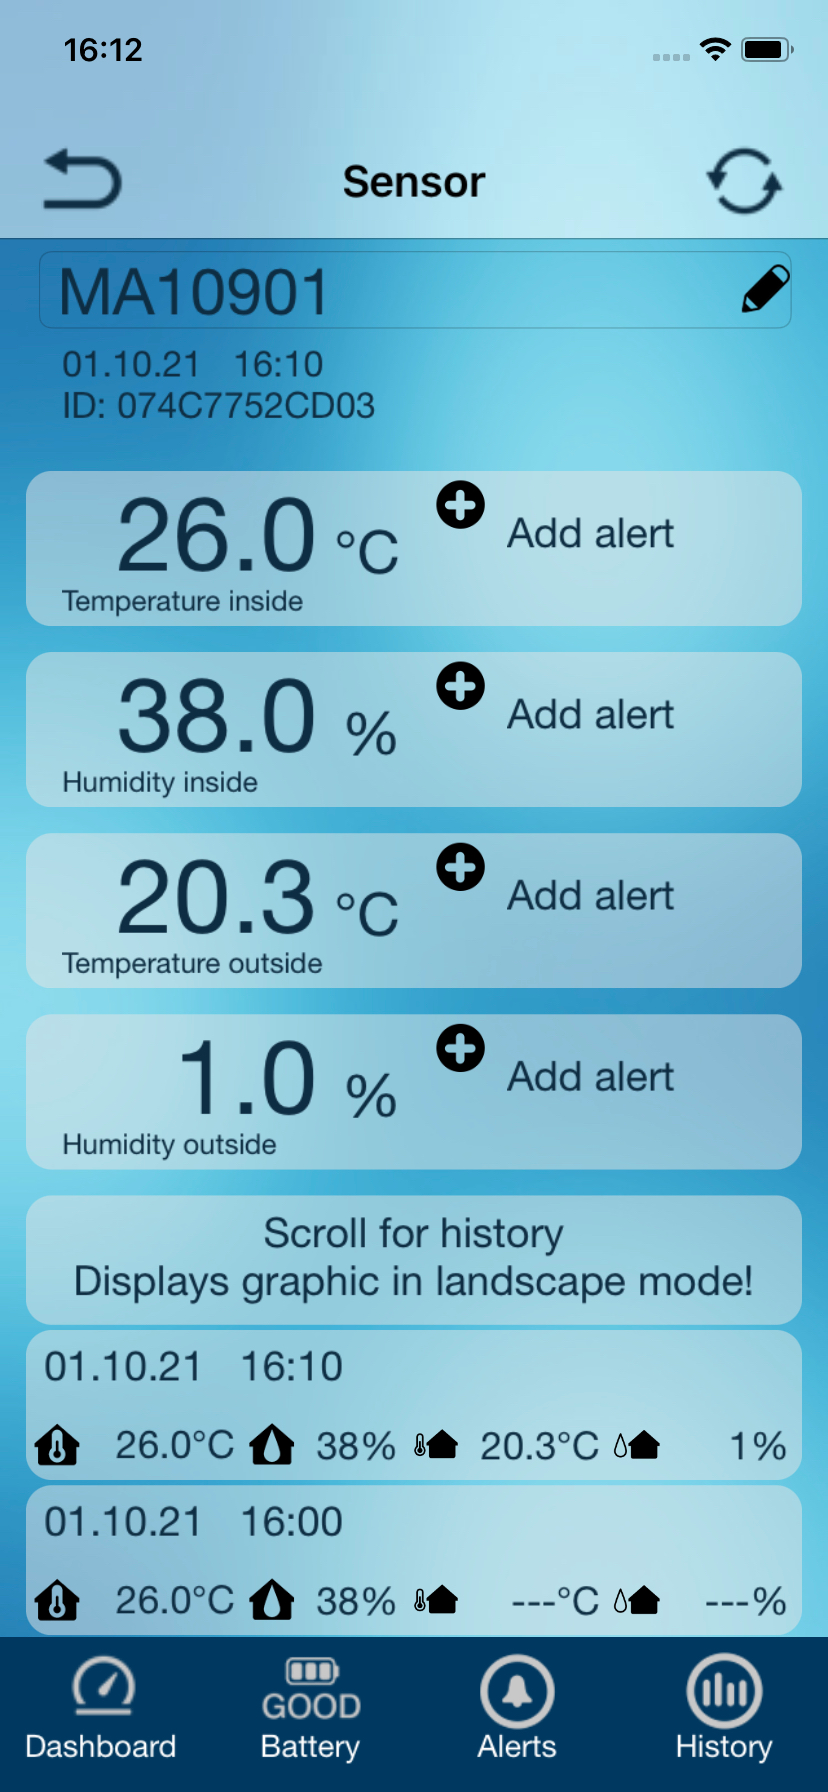
Menu "Sensor"
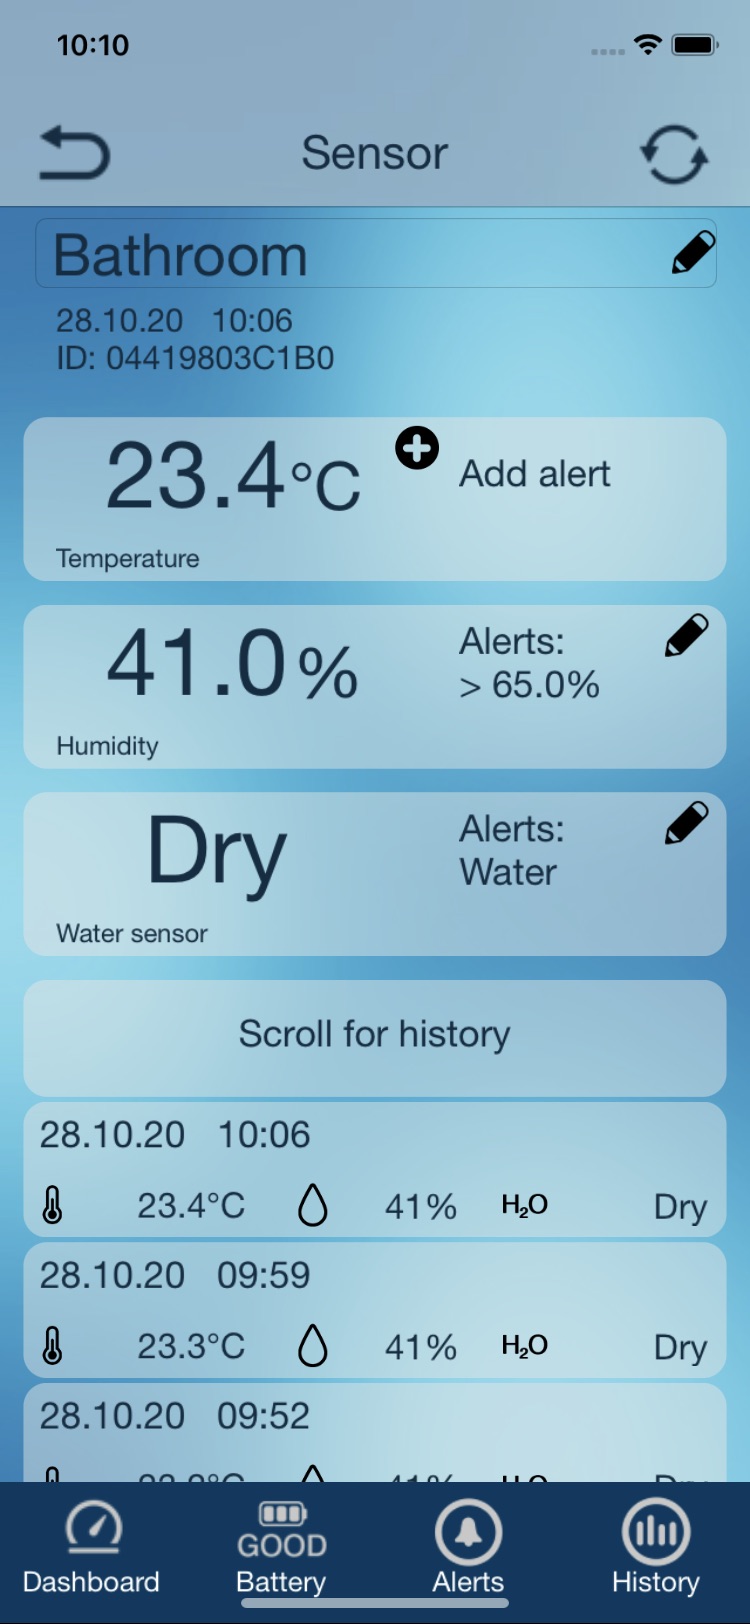
Touch one of the sensor fields to enter the sensor menu. After completion of the settings, touch the "Back" field or the "Dashboard" field.
History of recent values
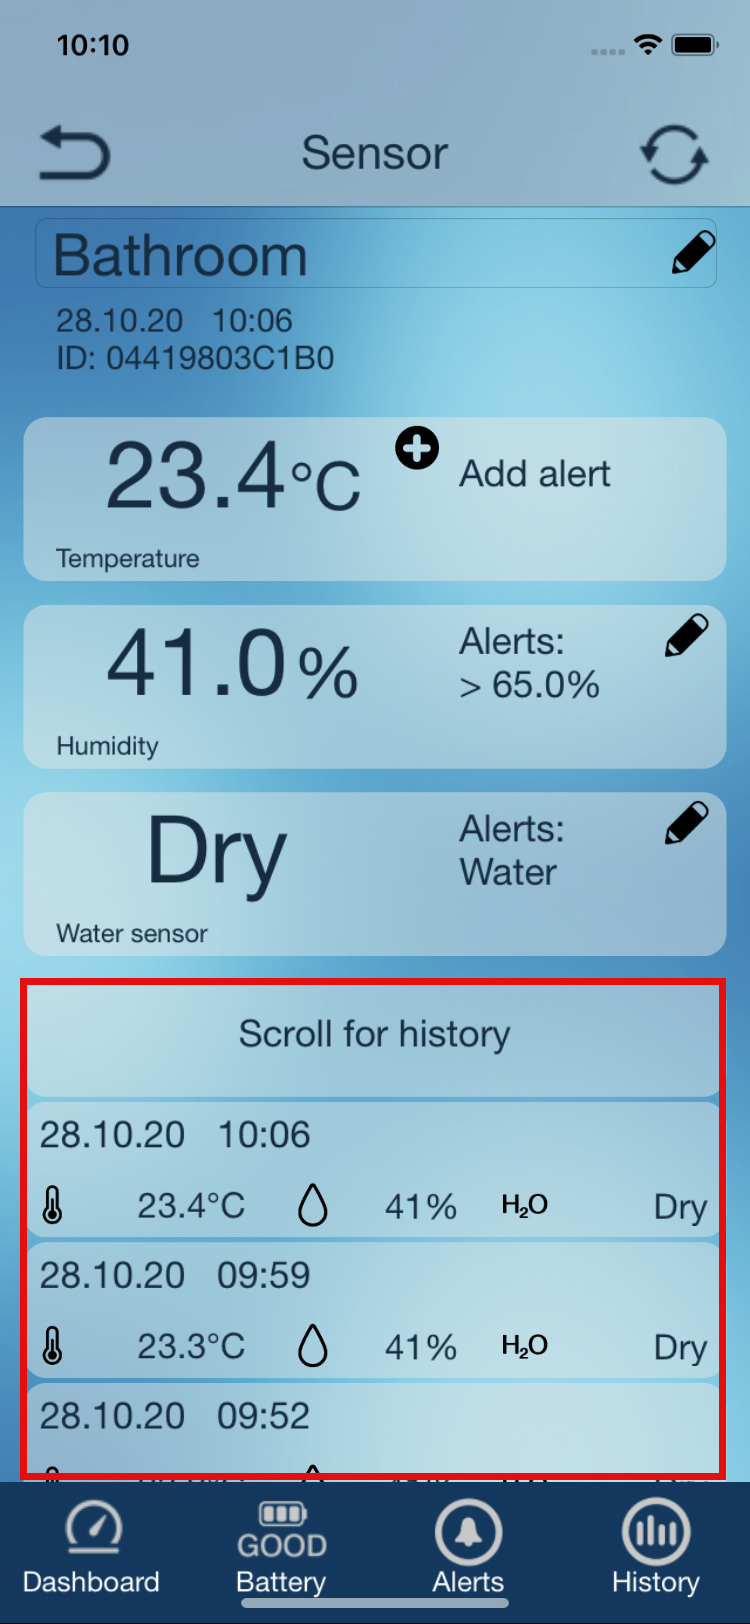
To view recent readings, please scroll down. For a complete history of one day of the last 90 days, touch the "History" field.
Battery status
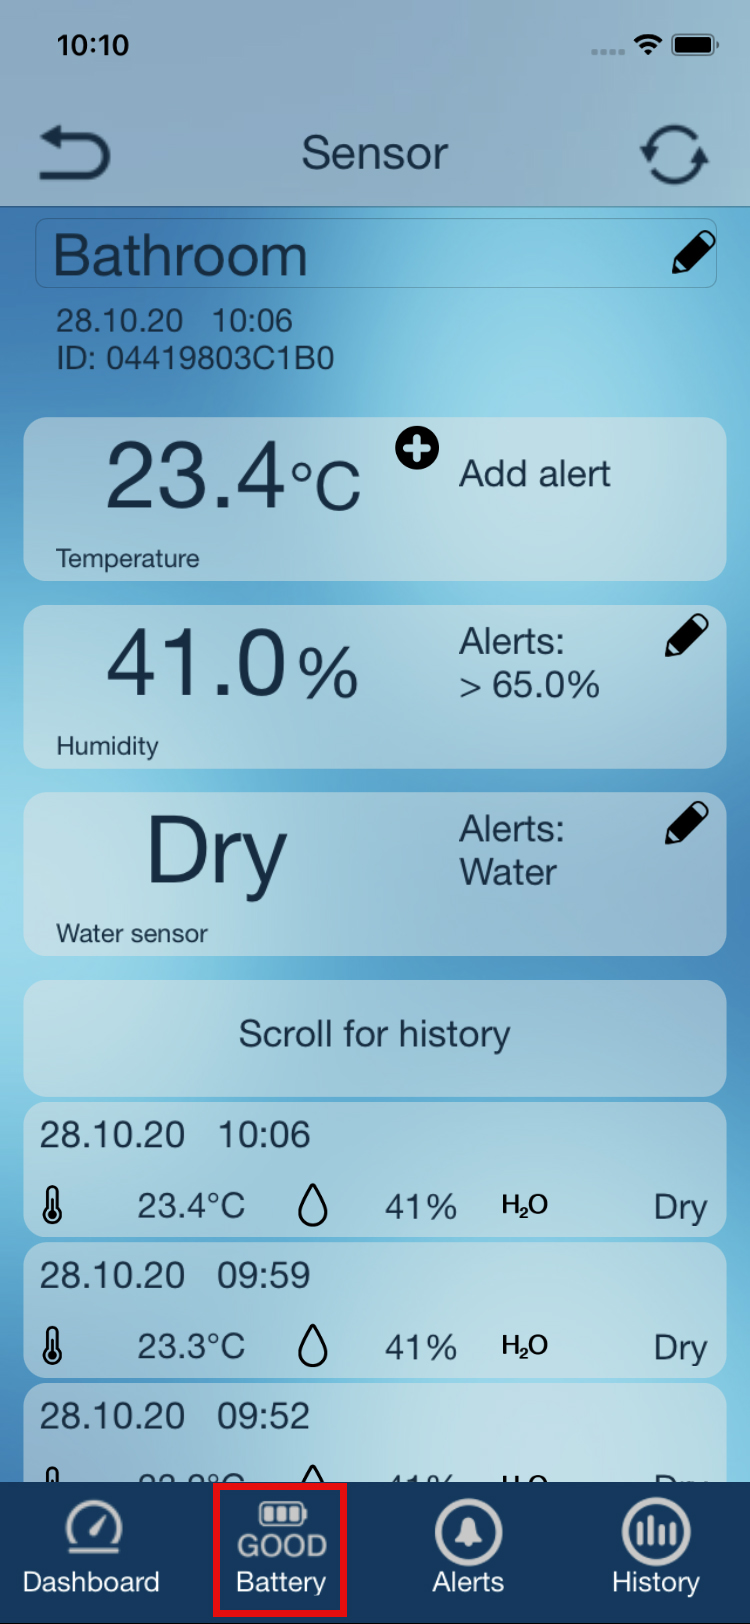
Above this field the current state of the battery of the selected sensor is displayed.
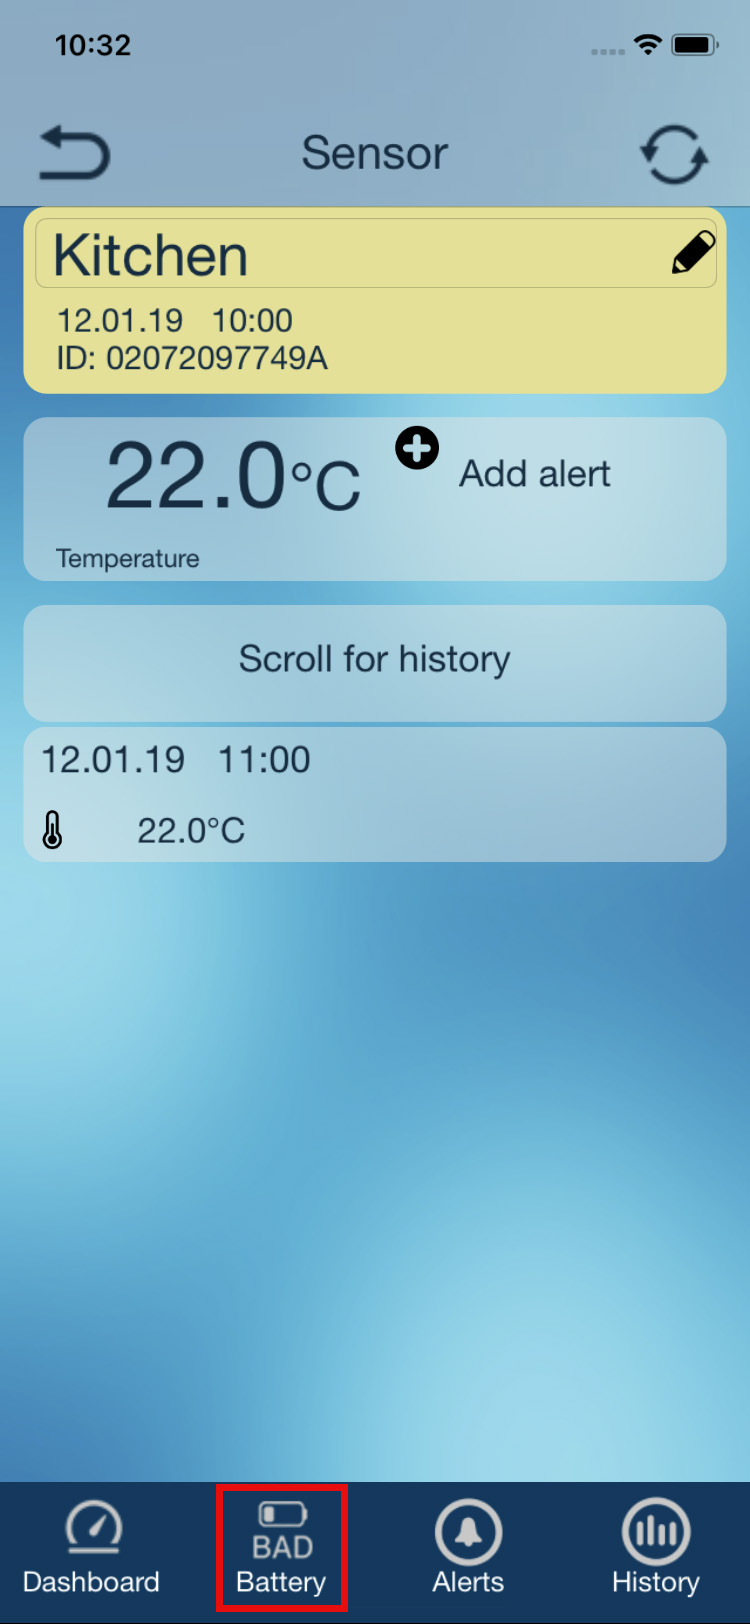
If the battery of the sensor needs to be replaced, the sensor in the overview is indicated with a yellow field and the status of the battery is marked with “Change”.
Alerts
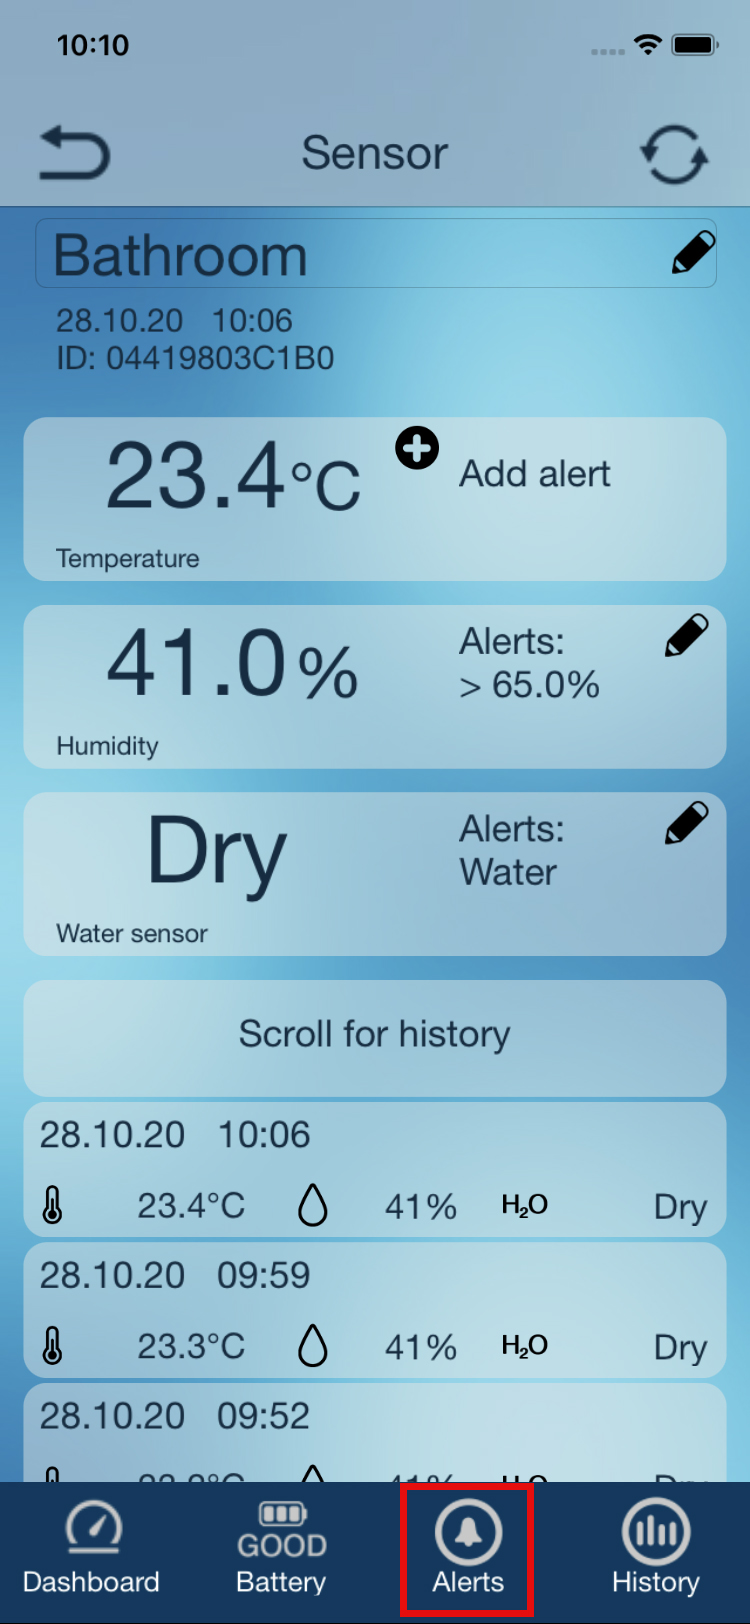
Touch the field to display recorded alarms.
Change the sensor name
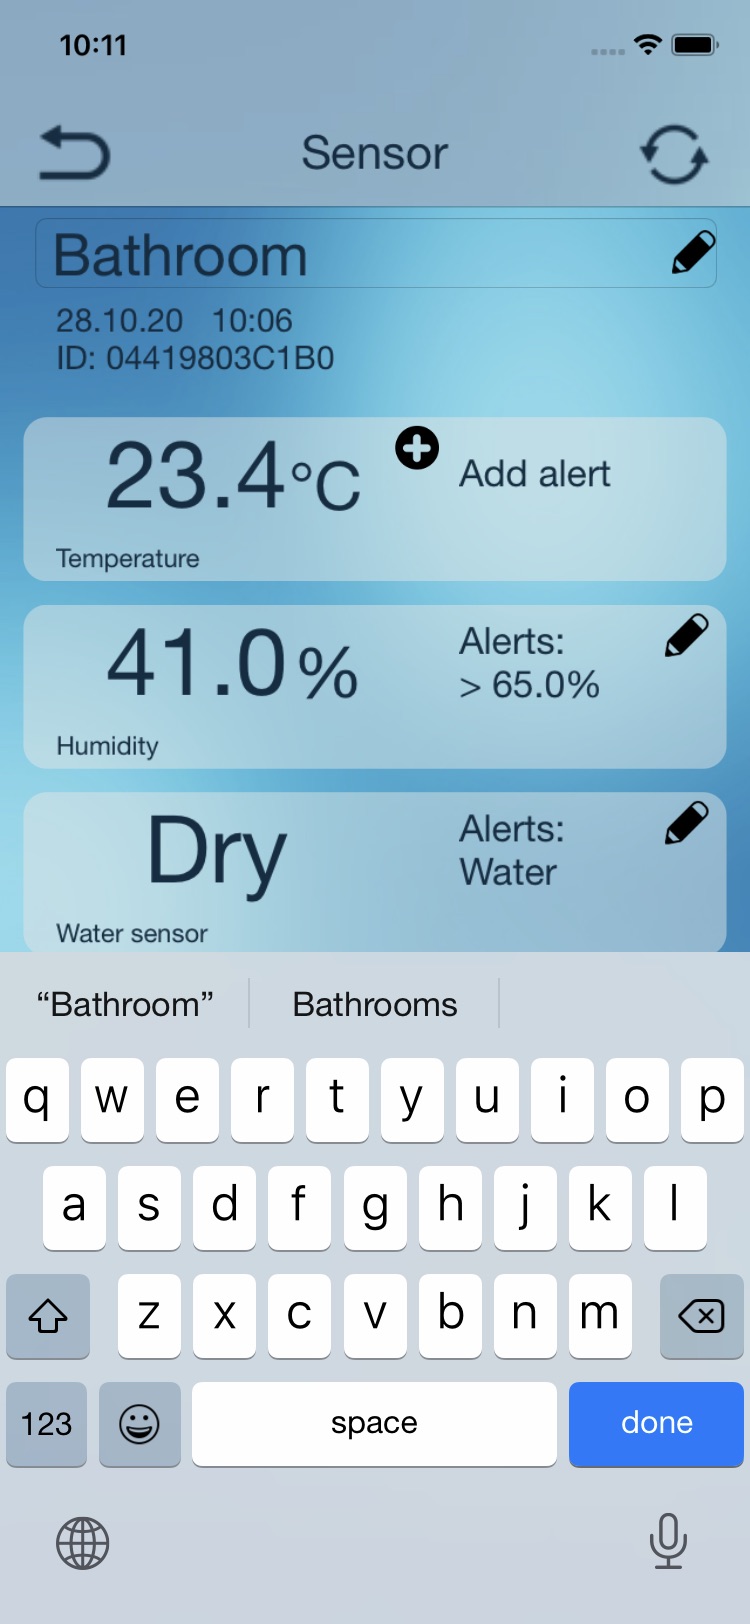
Touch the current label next to the pencil icon to change the name of the sensor.
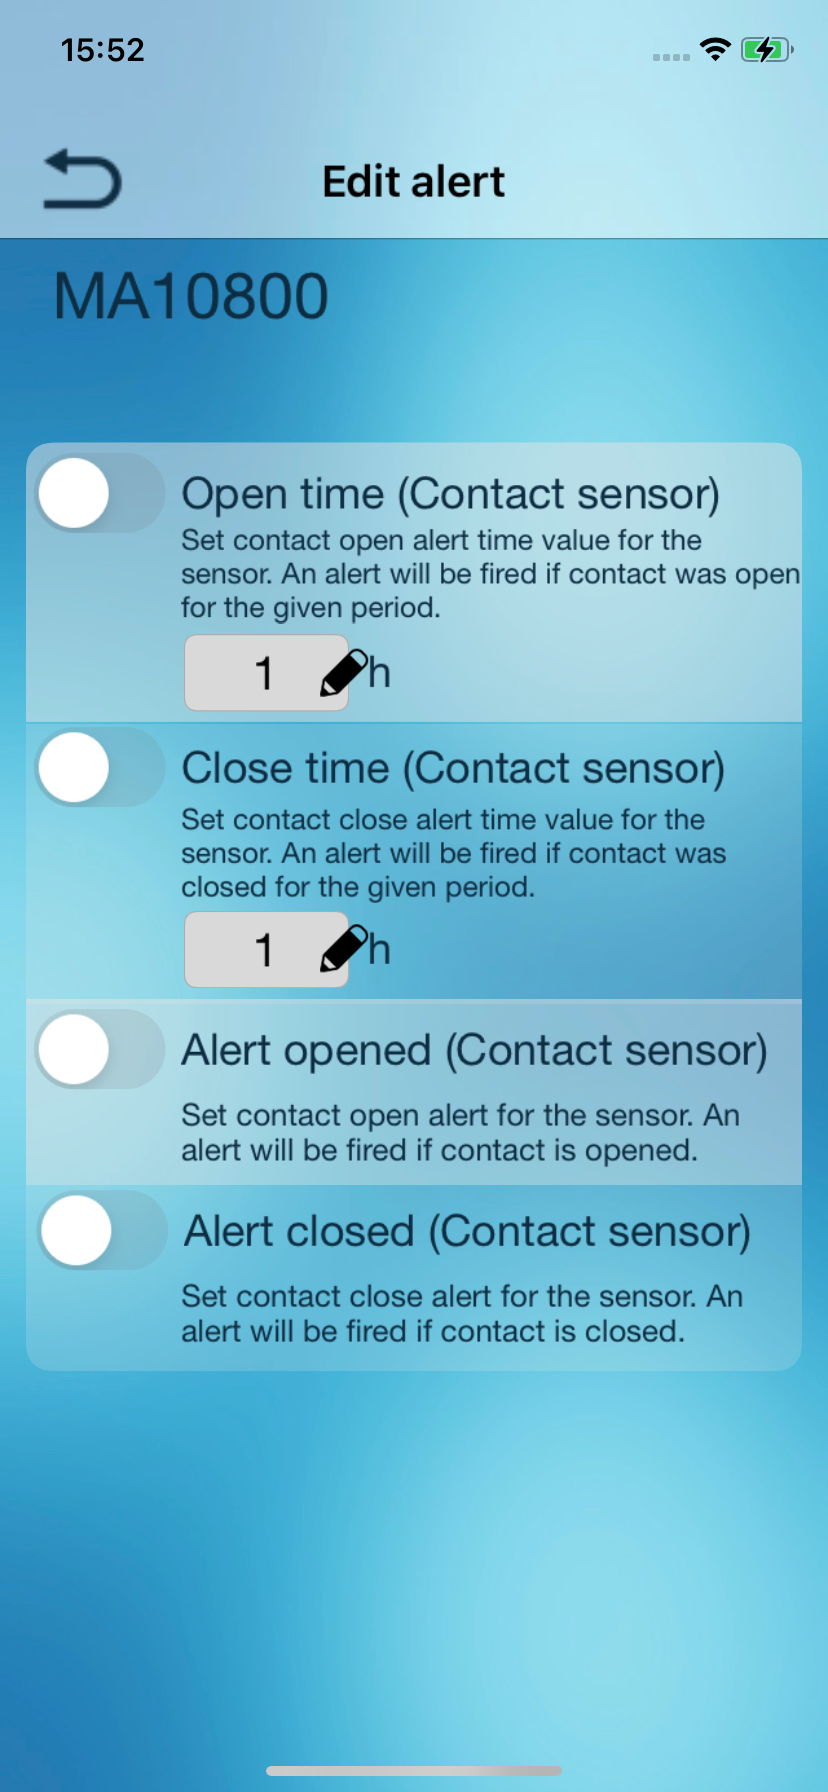
Add Alert
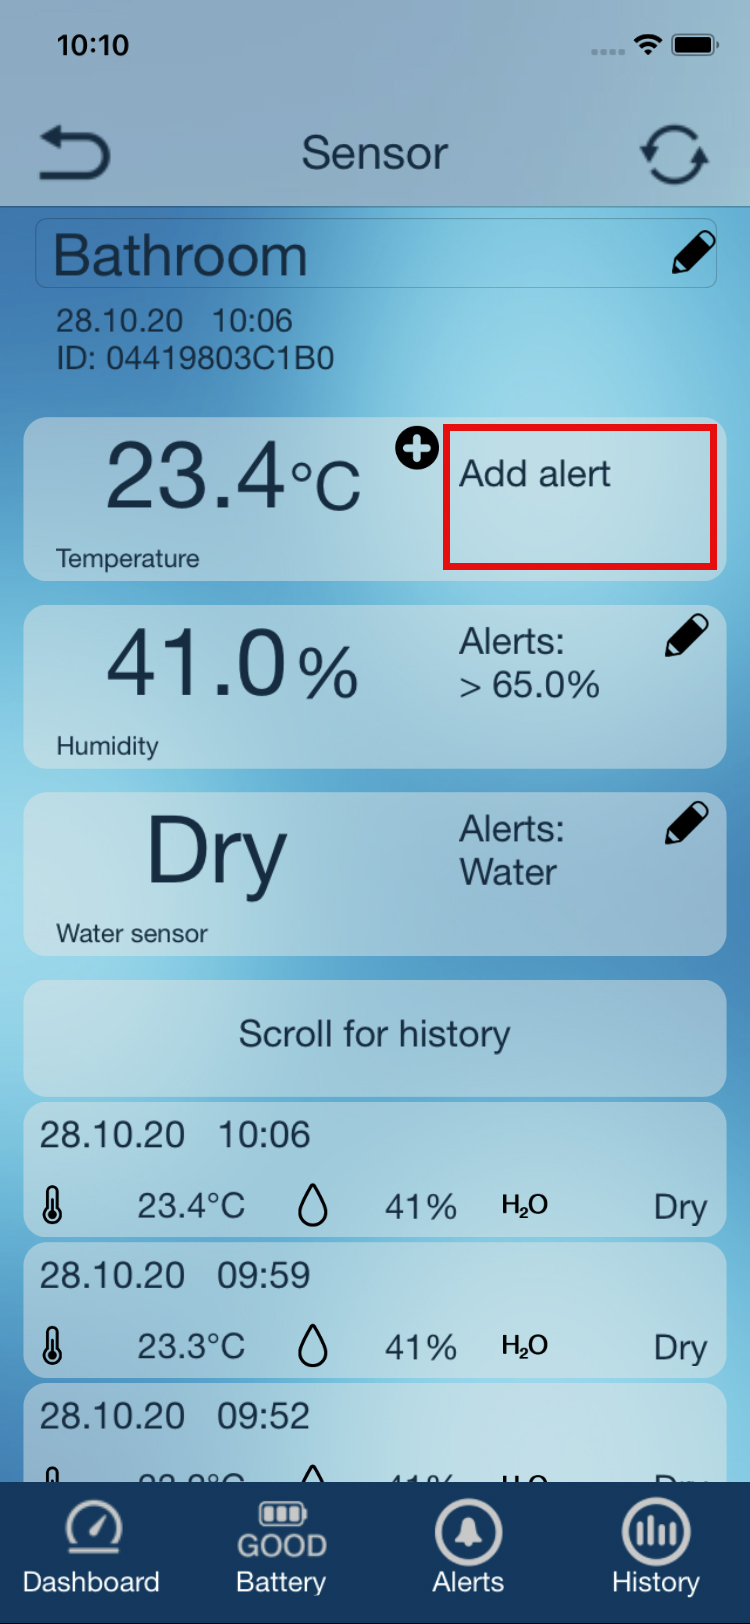
Touch “Add alert” to set an alert.
Alert settings
Alarm can be activated by touching the switch surfaces. The alarm is enabled when the switch is to the right and the switch background is green.

Touch the respective field next to the pencil icon to set the values of a temperature alert. The following alerts are possible:
minimum, maximum and range. Please note that it is not possible to activate more than one alert per sensor at the same time. Please use the alert "Range" if a maximum and minimum temperature is to be monitored simultaneously.
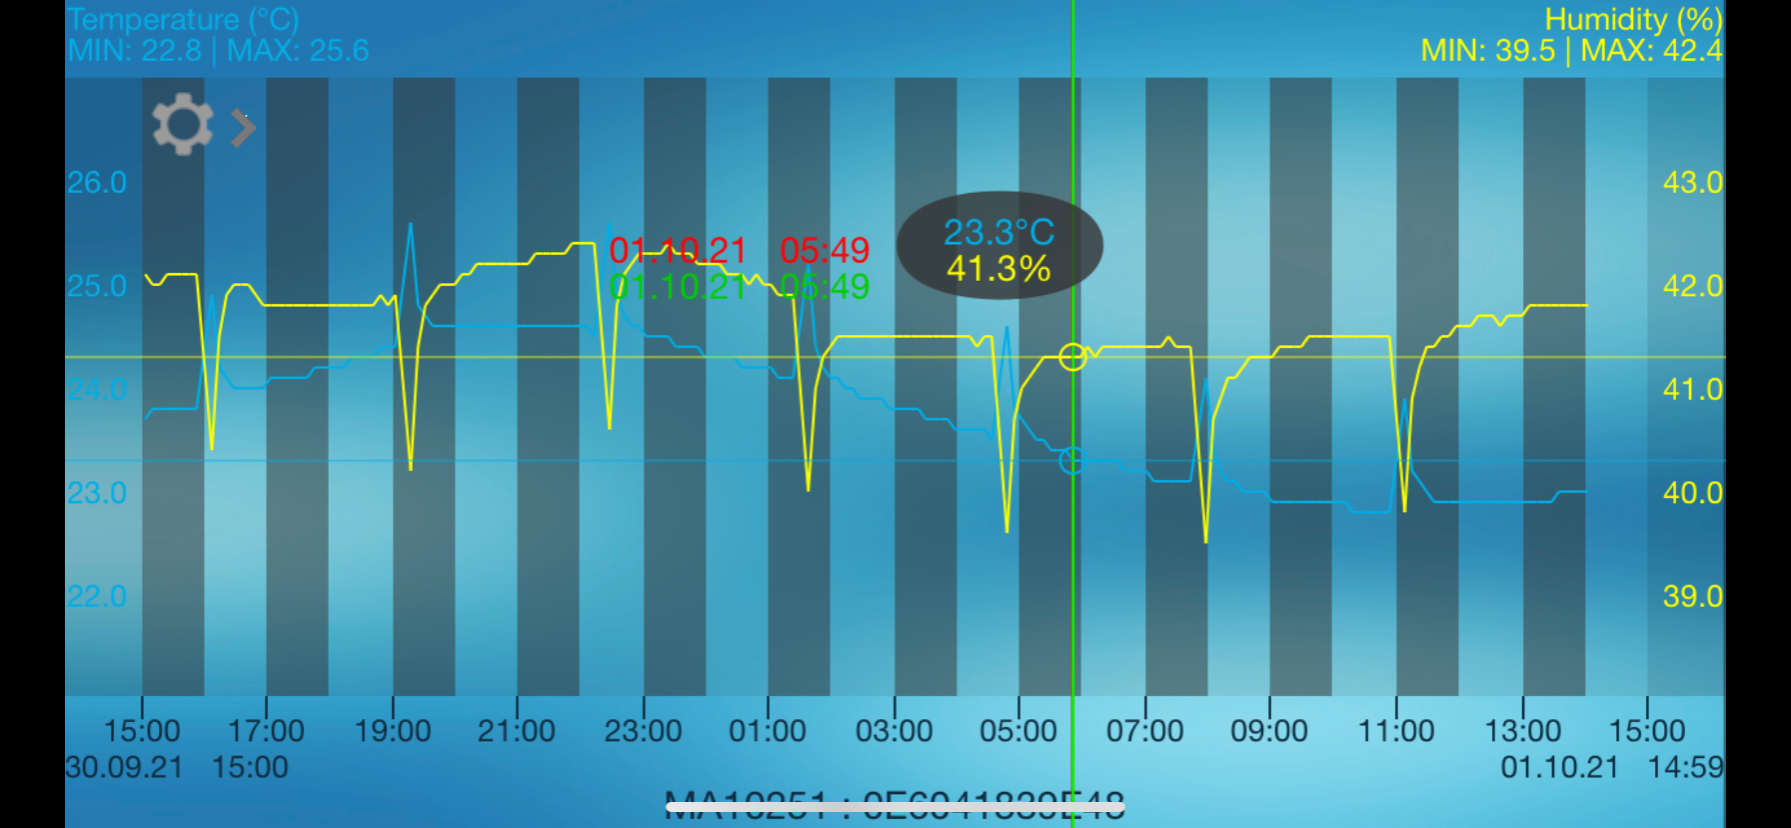
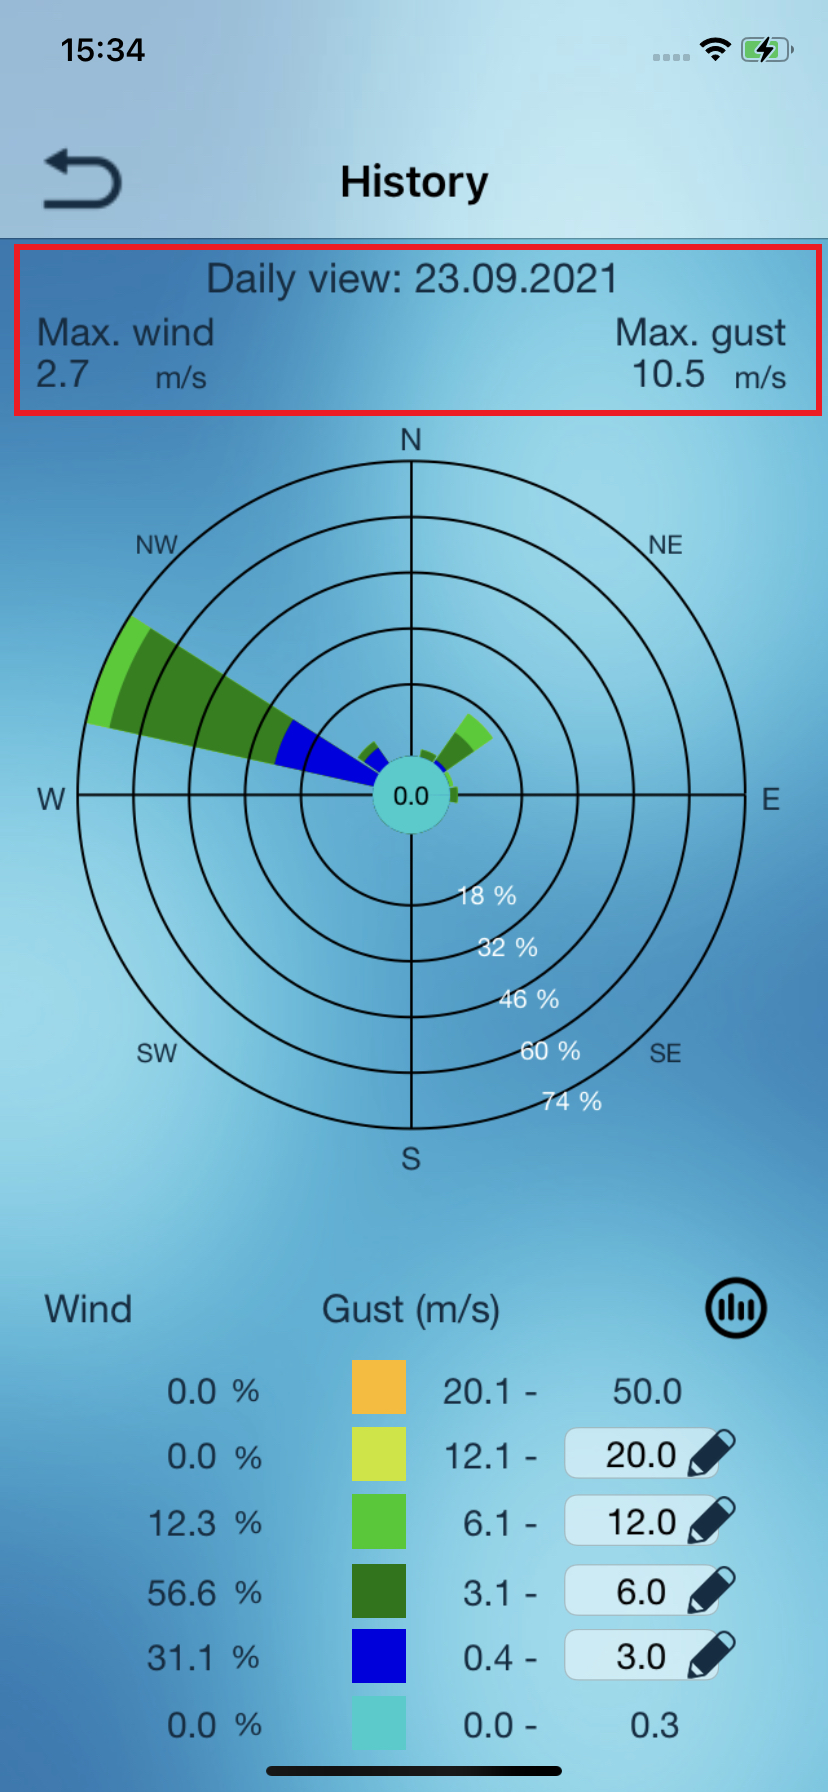
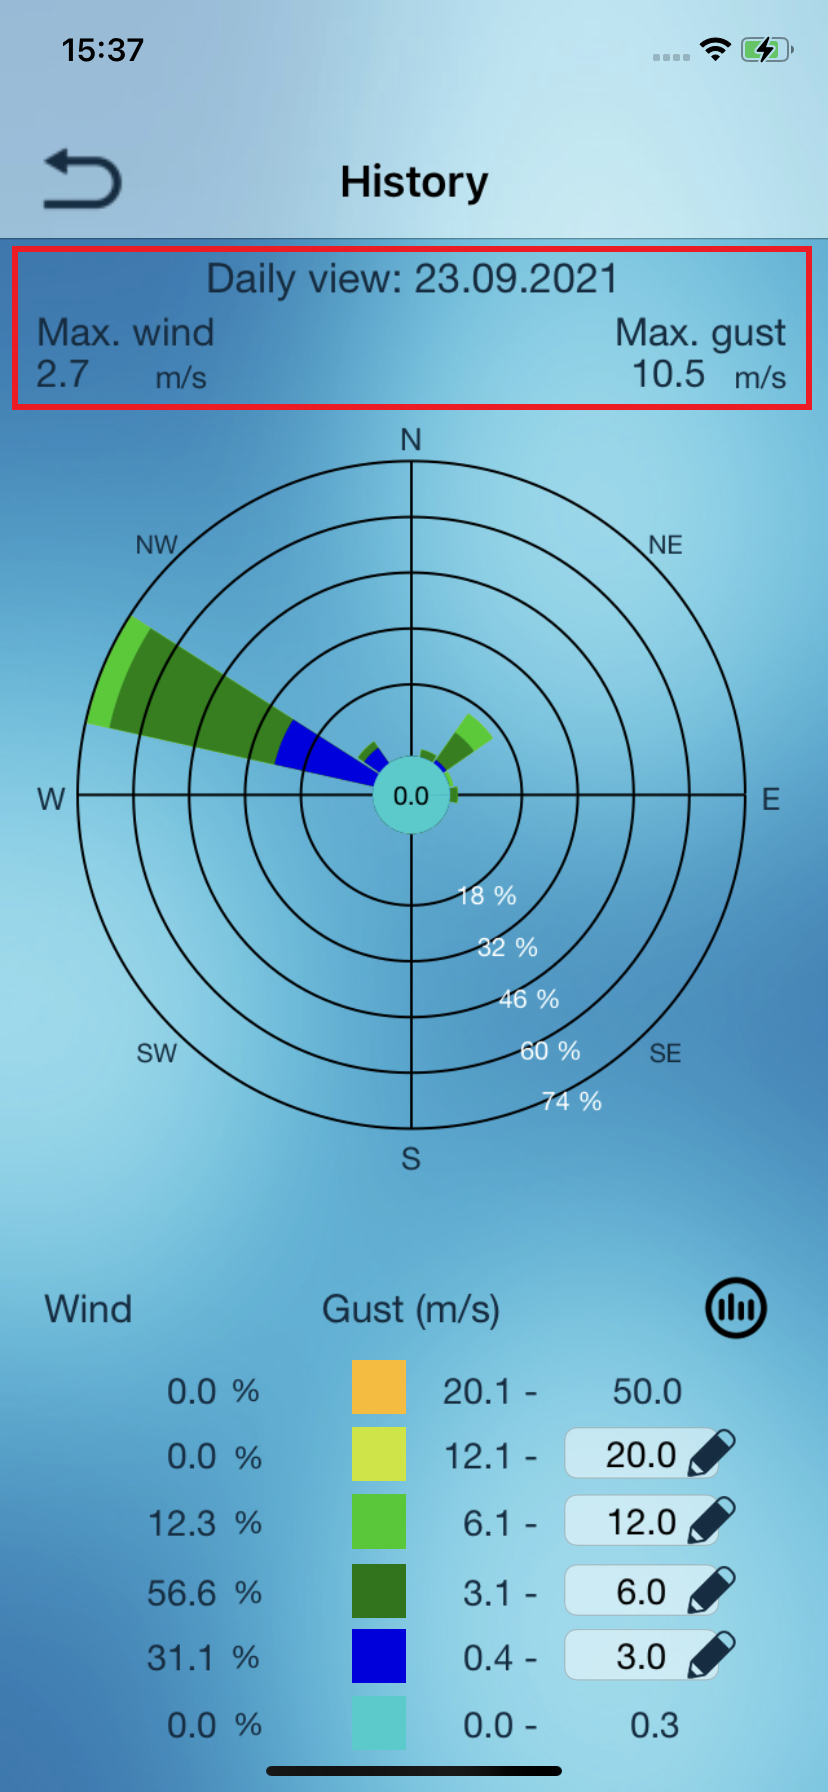
History
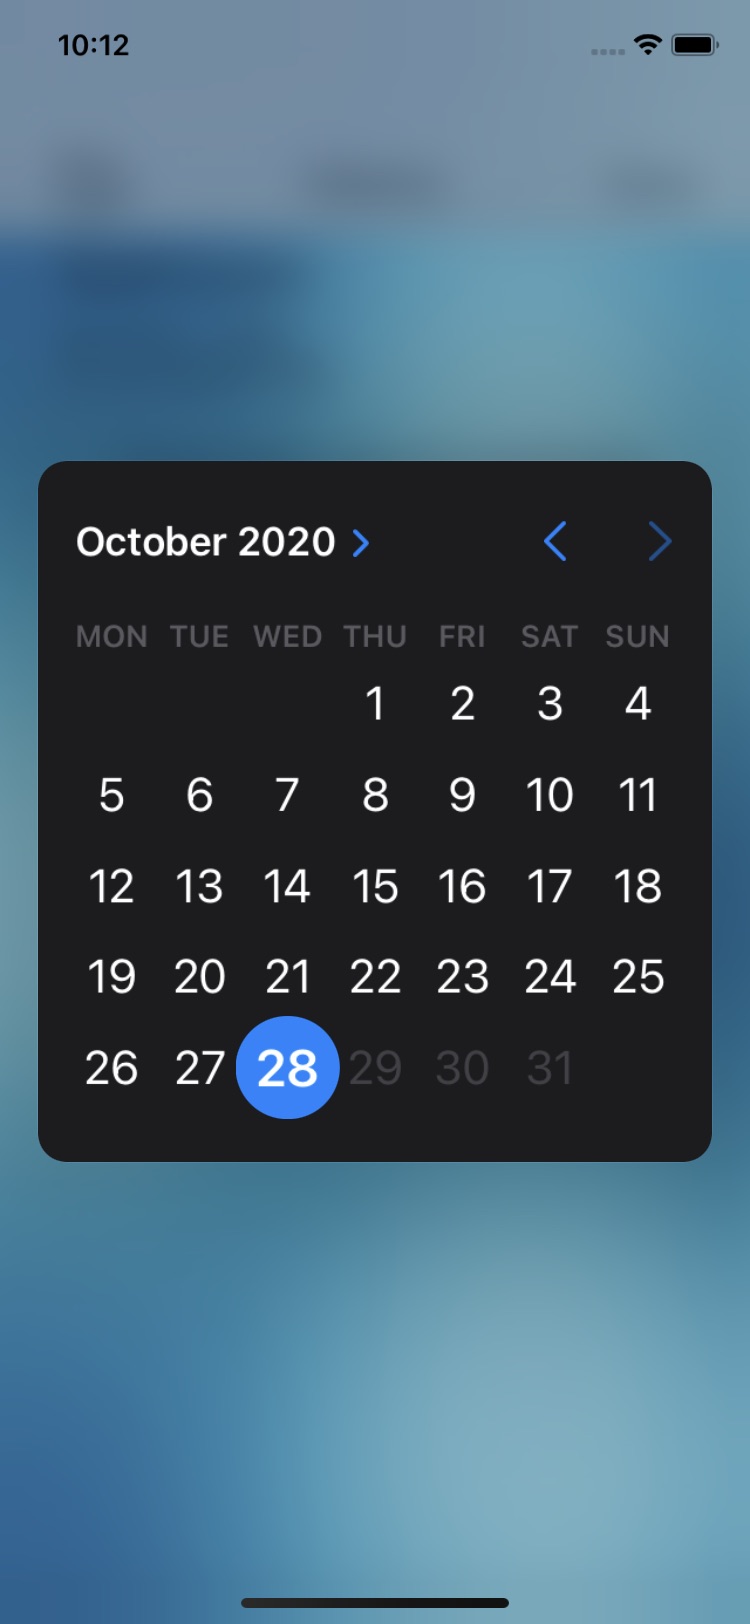
Tap "History from the last 90 days." A selection menu appears where you can select the date to be displayed. Then tap again on "History of the last 90 days".
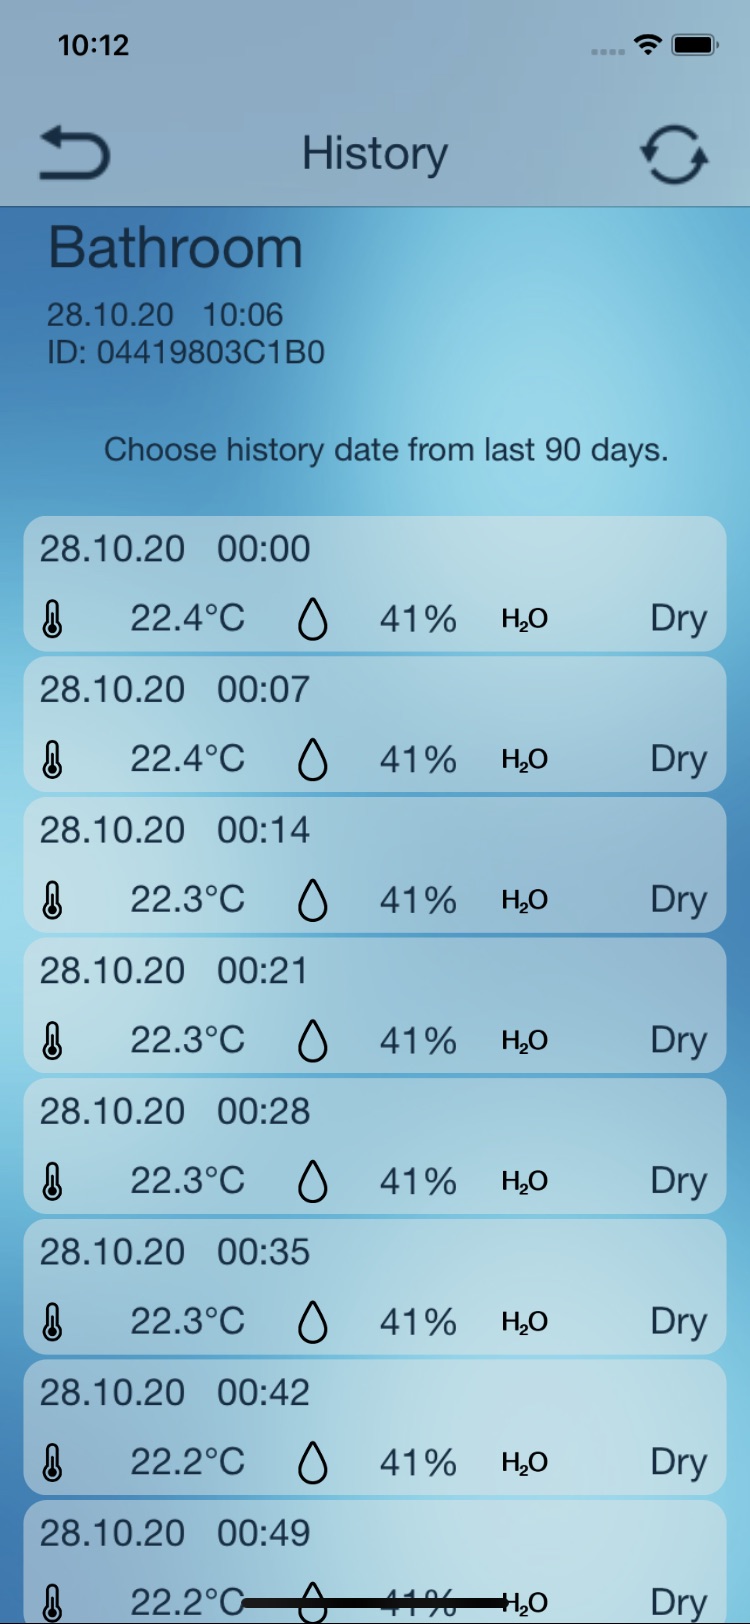
Now you will see all measurements of the selected date (one day only).
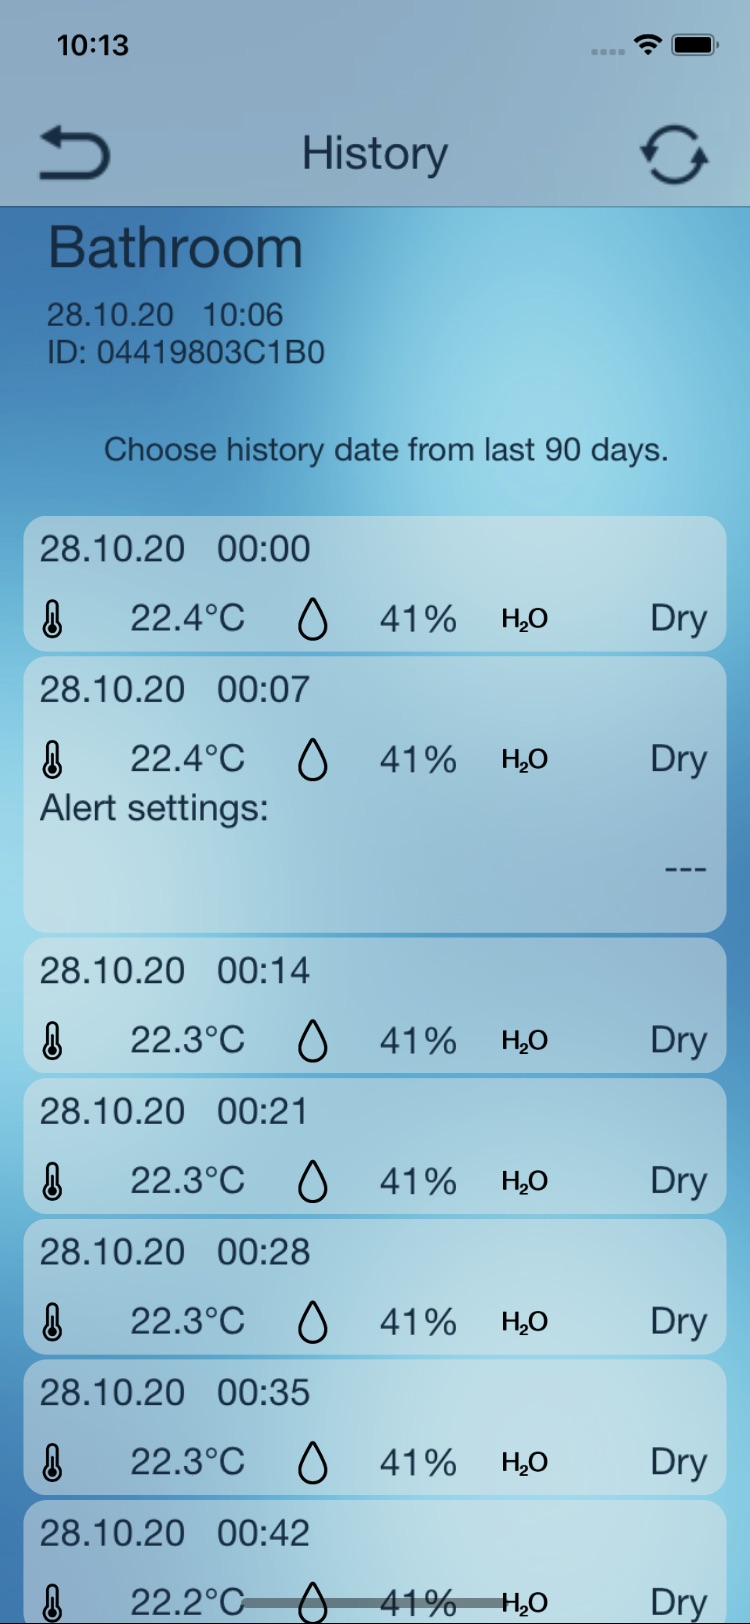
You can tap a field of history and get additional information if an alert was activated at this time.
Menu "Settings"
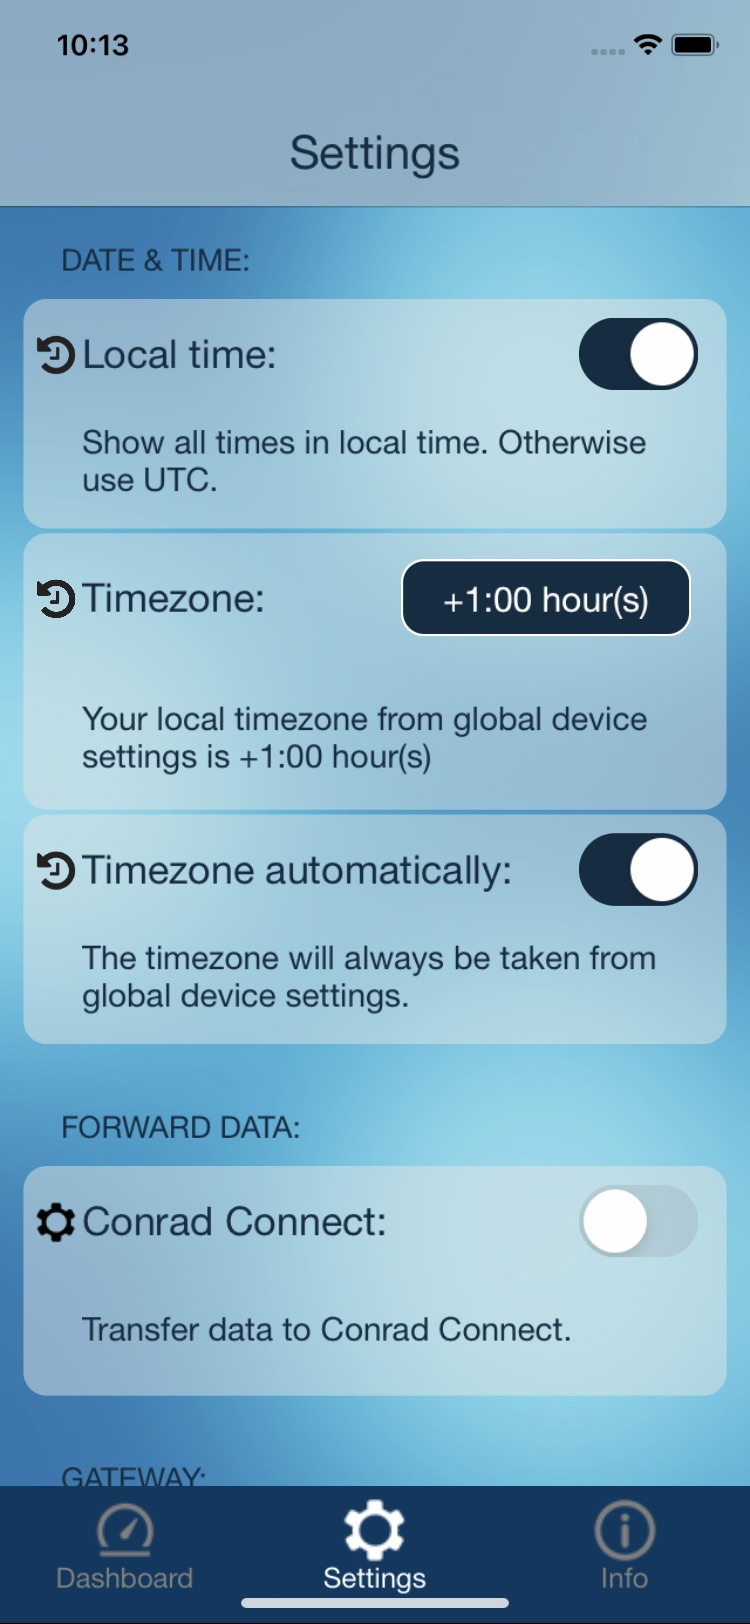
In the menu "Settings" you can adjust the following parameters of the app:
- set "Dashboard" as the startup screen of the app
- deactivate sleep mode of the device
- the unit of the displayed temperature values
- time and date settings
- configuration of the Gateway
- ... and more options
Important:
In the menu "Settings" you have the option manually configure the gateway (for example: when in your network no DHCP server is available).
Configure WiFi gateway:
You can also find this item in the settings. The WiFi gateway is not yet available.
Virtual Weatherstation
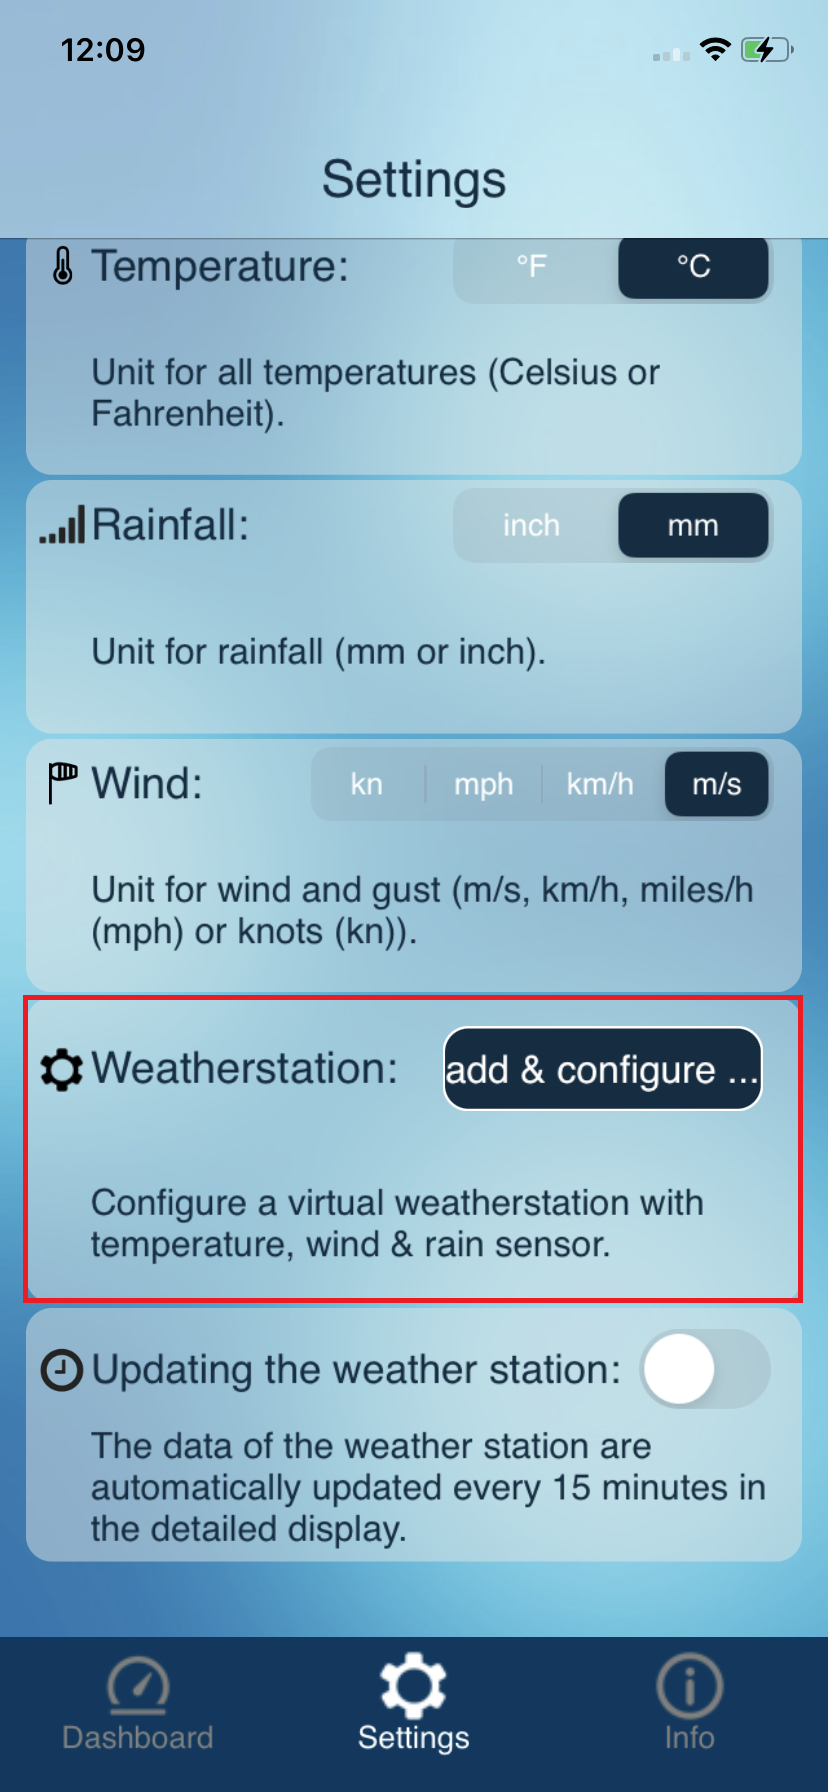
The virtual weather station can be configured in the settings. The "Configure" button is only displayed when the requirements for configuring a virtual weather station are met. To configure a virtual weather station, at least 3 sensors are required:
- one Windsensor MA10660 (Master ID0B)
- one Rainsensor MA10650 (Master ID08)
- one Thermo-Hygro-Sensor
MA10200, MA10241 (Master ID03)
oder MA10250/10251 (Master ID0E)
Once the sensors are added to the dashboard, they are directly proposed for configuration.
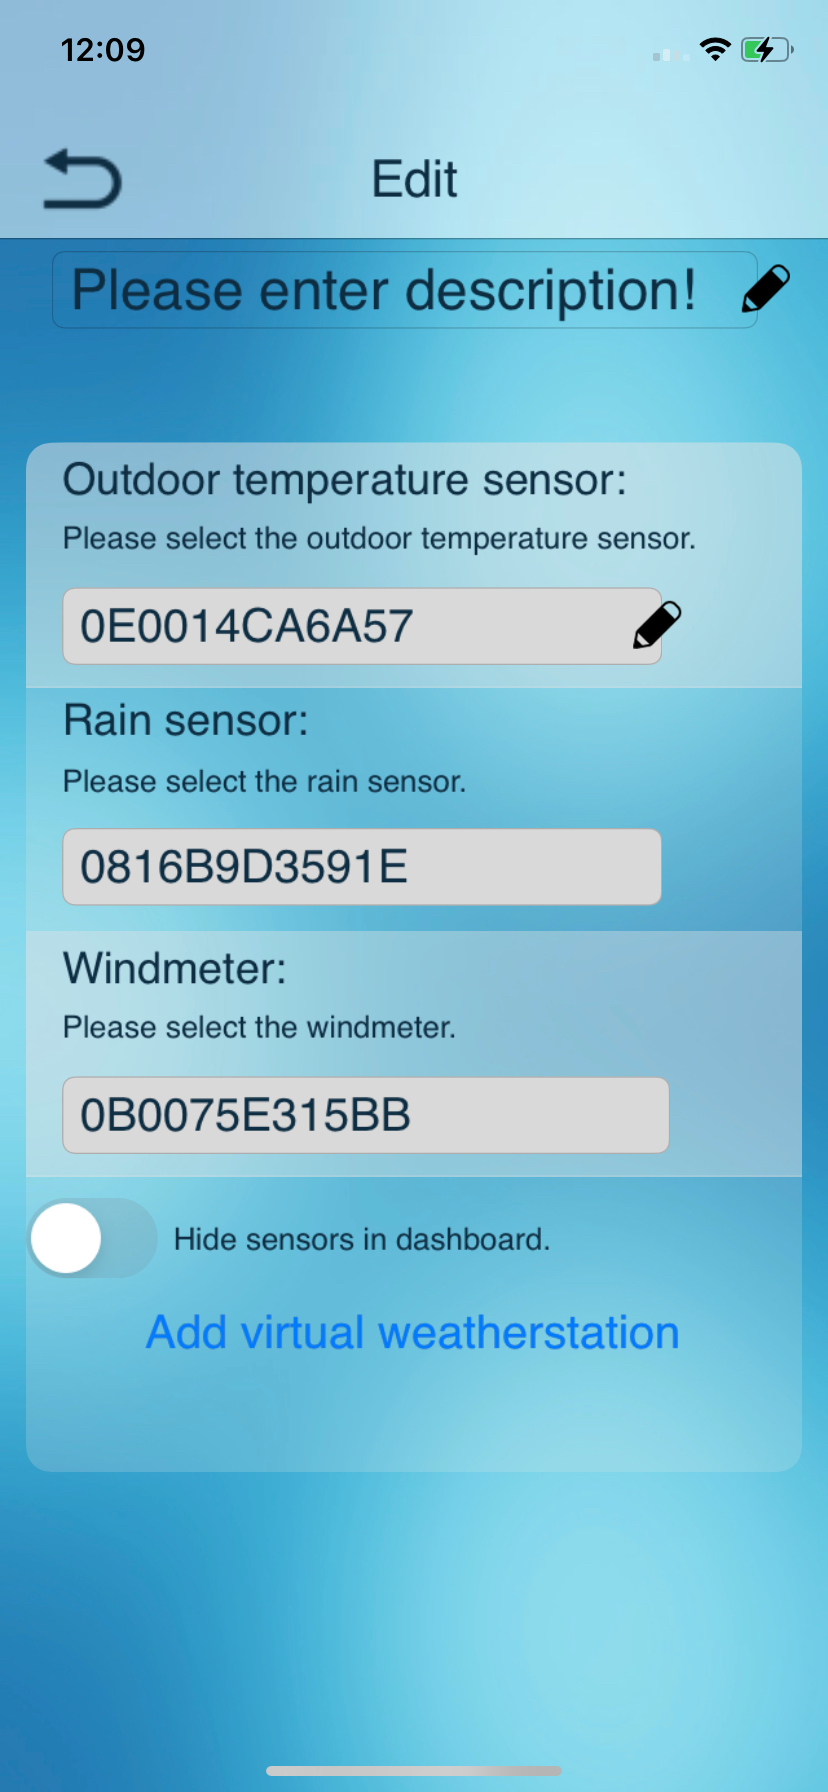
At the top of the view, you can give the virtual weather station a name by clicking in the area to the left of the pencil icon. Below that, you can select the sensors mentioned above in the respective line provided. If a certain sensor type is present more than once in the dashboard, the sensor to be used for the virtual weather station must be selected during configuration. The sensors that are included in the virtual weather station can be hidden in the dashboard.
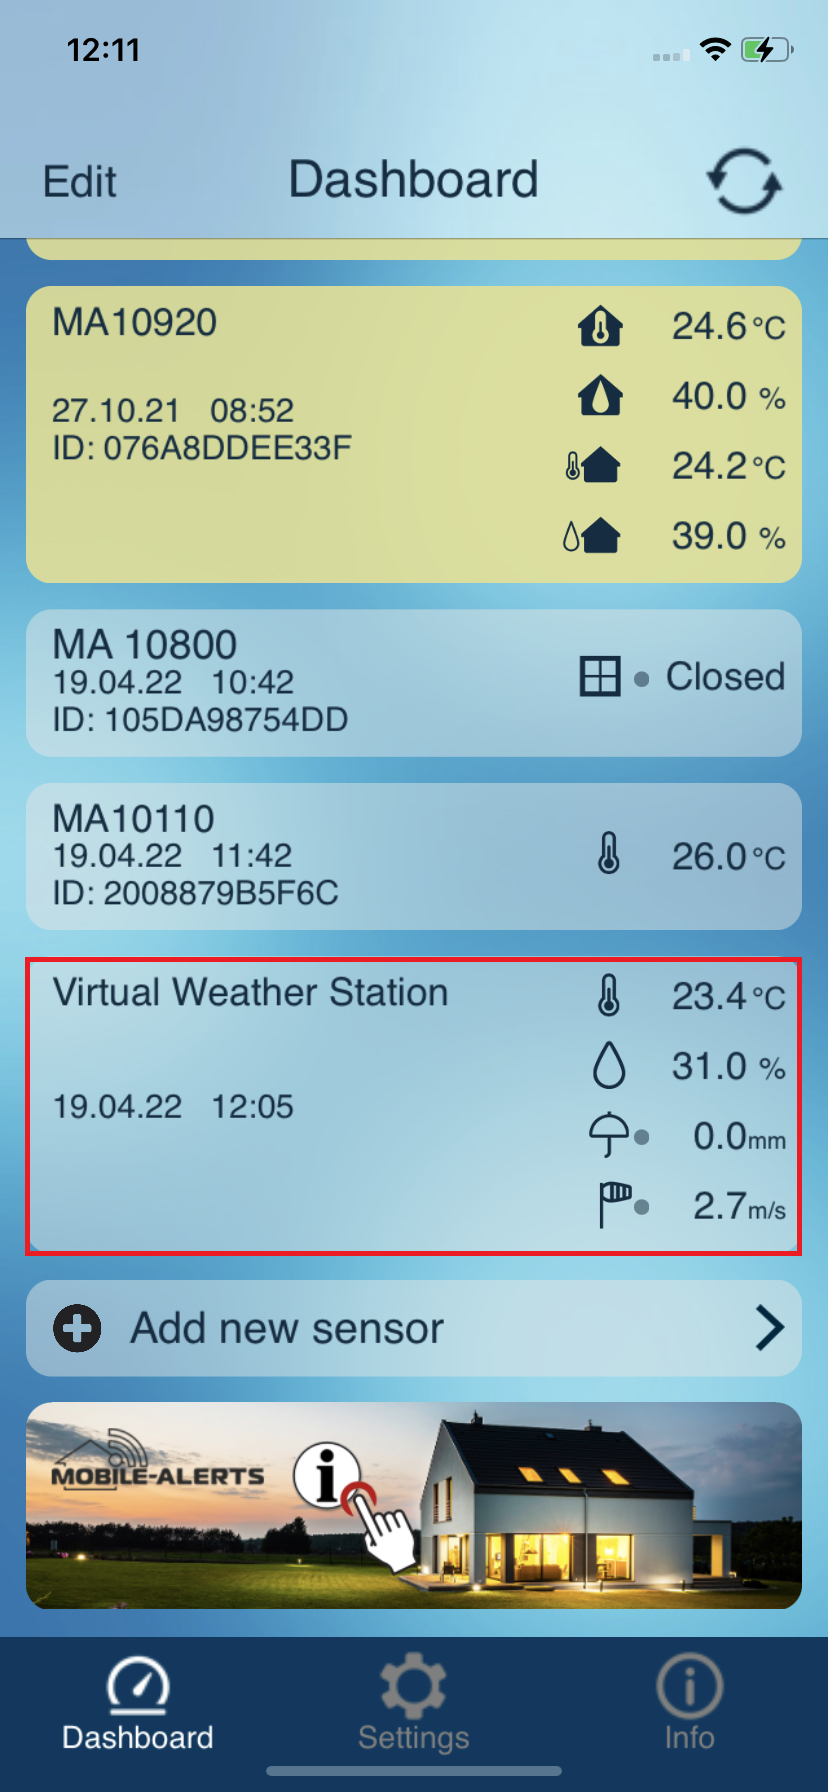
After the virtual weather station is configured, it is visible in the Dashboard.
The virtual weather station, can be customized in the detail view under the Edit item.
Important:
A maximum of one virtual weather station can be configured in the app. Once a virtual weather station has been configured, note the following:
The "Configure" button is no longer displayed in the settings menu. The function is not available again until you delete the virtual weather station in the Dashboard.
Troubleshooting
In case that no sensor values are displayed in the app, please check the following points:
Sensor troubleshooting
The display of the sensor is off or LCD contrast is very weak
If your sensor has a display, please check whether the sensor readings are visible on the display. If no values are displayed, proceed to "Dead batteries in the sensor".
The batteries in the sensor are not correctly engaged
Please make sure that the batteries are engaged with correct polarity in the sensor. To do so proceed to "Dead batteries in the sensor".
Important: See diagram inside the battery compartment of the sensor for correct polarity.
Dead batteries in the sensor
To replace the batteries of the sensor, please proceed as follows:
- Remove the old batteries from the sensor
- Wait at least 1 minute
- Insert the new batteries into the sensor
After inserting the new batteries the sensor is restarted.
The sensor can not reach the gateway
Transmission range will vary depending on what is in the path of the signal. Each obstruction (roof, walls, floors, ceilings, etc.) will reduce the signal range. It may happen that the signal of the sensor, can not be received by the gateway. In this case, please reduce the distance between the sensor and gateway or remove sources of potential interference.
We recommend to start the sensor near the gateway. To find a suitable location for the sensor please wait for a successful display of the measured value on the smartphone / app.
If you use multiple sensors and the location of one or more sensor is too far away from the gateway, you should consider the operation of another gateway in a closer location.
Gateway troubleshooting
The gateway has no Internet connection
Please check the following points:
- The gateway and router are turned on.
- The network cable between the gateway and router is plugged in correctly and a network connection is displayed on the router.
- The router has an active internet connection (check on another device, such as if you can view a Web page)
- If your network has an active DHCP server (assigns the network configuration, usually the router includes this feature), if necessary, configure the IP address of the gateway manually.
The green LED flashes
If the green LED on the gateway is NOT constantly lit (green LED flashes), the gateway must be reset to factory settings.Please do the following steps:
- Unplug the AC adapter.
- Press and hold the button on the Gateway.
- Plug in AC power, hold the button on the Gateway for at least 8 seconds.
The memory of the gateway is cleared and initialized with the factory default values . If manually assigned an IP address before, the old set up is deleted and must be reconfigured.
Smartphone / App troubleshooting
Please check whether your smartphone is connected to the Internet (wireless lan / mobile data) and if you have scanned the QR-code of the sensor.
Additional sensors
MA 10100
Temperature sensor
Master ID02

Application
Sensor for monitoring indoor or outdoor temperatures. The sensor must be installed protected from direct rain and sun.
Technical data
Batteries:
2 x Micro (LR03, AAA) Alkaline
Battery life:
approx. 2 years
Measuring range:
– 29.9°C to + 59.9°C
Accuracy:
+/- 1°C
Measuring interval:
7 minutes
Range:
100m (open field)
Display in the App
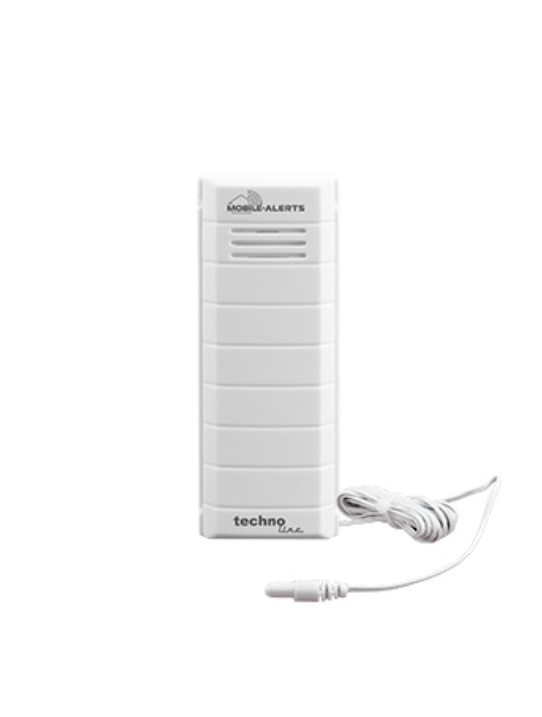
MA 10101
Temperature sensor with waterproof cable temperature sensor
Master ID02
Application
Sensor for monitoring internal or external temperatures and non-corrosive liquids. The sensor must be installed protected from direct rain and sun.
Technical data
Batteries:
2 x Micro (LR03, AAA) Alkaline
Battery life:
approx. 2 years
Measuring range:
– 29.9°C to + 59.9°C
Accuracy:
+/- 1°C
Measuring interval:
7 minutes
Range:
100m (open field)
Probe cable length:
1m
Display in the App
MA 10110
Temperature sensor
Master ID20
Application
Sensor for monitoring internal or external temperatures. The sensor must be installed protected from direct rain and sun.
Technical data
Batteries:
2 x Micro (LR03, AAA) Alkaline
Battery life:
approx. 2 years
Measuring range:
– 29.9°C to + 59.9°C
Accuracy:
+/- 1°C
Measuring interval:
7 minutes
Range:
100m (open field)
Display in the App
MA 10120
Temperature sensor with waterproof cable temperature sensor
Master ID02
Application
Sensor for monitoring internal or external temperatures and non-corrosive liquids. The sensor must be installed protected from direct rain and sun.
Technical data
Batteries:
2 x Micro (LR03, AAA) Alkaline
Battery life:
approx. 2 years
Measuring range:
– 29.9°C to + 59.9°C
Accuracy:
+/- 1°C
Measuring interval:
7 minutes
Range:
100m (open field)
Probe cable length:
1m
Display in the App
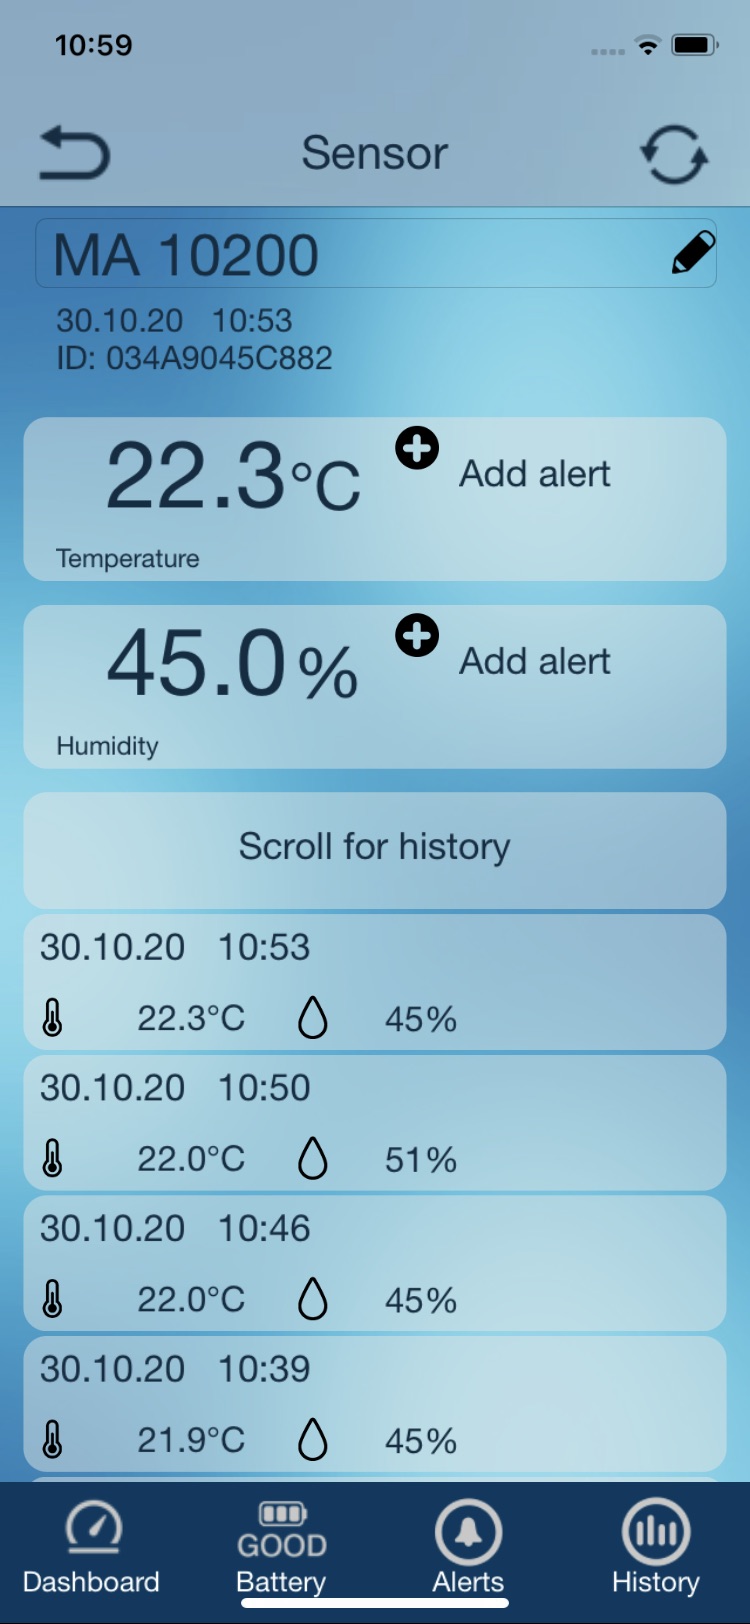
MA 10200
Temperature and humidity sensor
Master ID03

Application
Sensor for monitoring indoor or outdoor temperatures and humidity. The sensor must be installed protected from direct rain and sun.
Technical data
Batteries:
2 x Mignon (LR06, AA) Alkaline
Battery life:
approx. 2 years
Measuring range temperature:
– 39.9°C to + 59.9°C
Temperature accuracy:
+/- 1°C
Measuring range air humidity:
20% to 99%
Air humidity accuracy:
+/- 4%
Measuring interval:
7 minutes
Range:
100m (open field)
Display in the App
MA 10230/MA 10231
Indoor climate station
Master ID12
Application
Station for monitoring of indoor temperature and humidity. Pairable with one outdoor sensor (ID03) to give a ventilation recommendation. The sensor must be mounted protected from direct sun and rain.
Technical data
Batteries:
2 x Micro (LR03, AAA) alkaline.
Battery life:
approx. 2 years
Temperature measuring range:
- 9.9°C to + 59.9°C
Temperature accuracy:
+/- 0.8°C
Humidity measuring range:
1% to 99%
Humidity accuracy:
+/- 3%
Transmission frequency:
868 MHz
Range:
100m (open area)
Display in the app
Below the display for measured indoor temperature and indoor humidity, there is an information field for estimating the current humidity.
The following estimates can be displayed:
- Humidity is very low below 34% rH
- Humidity is low 34% rH to 40% rH
- Optimal humidity 41% rH to 55% rH
- Humidity is high 56% rH to 64% rH
- Humidity is very high above 65% rH
If you pair the MA 10230 with an ID03 outdoor sensor, MA 10200, MA10250 in the app, you will also see a ventilation recommendation. The ventilation recommendation requires a 10 minute shock ventilation, when the window is wide open and the paired sensor is mounted outside protected from direct sun and rain. Please note the instructions for placement in the respective user manual. The app calculates how the indoor humidity is likely to change during ventilation.
If you air up now, nothing will change!
This is displayed if the humidity calculation results in a value that deviates from the current value by max. +/- 4%.
If you ventilate now, it’ll get drier!
This is indicated if the humidity decreases by at least 5% after ventilation.
If you ventilate now, it will get more humid!
This is indicated if the humidity increases by at least 5% after ventilation.
Tap the MA 10 230 to display it.
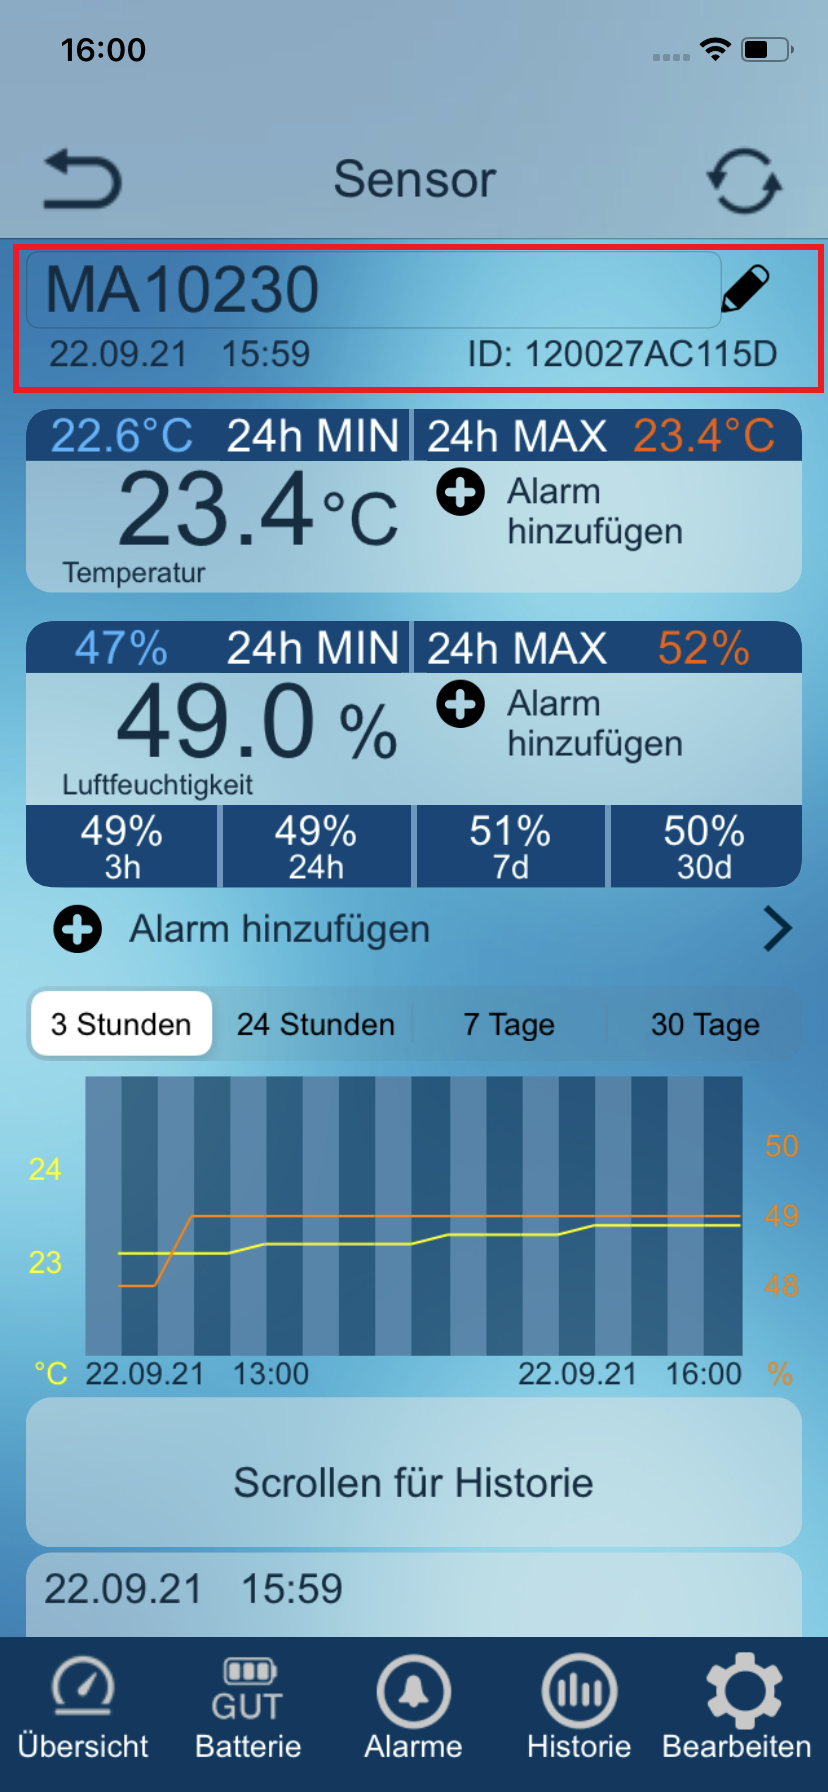
In the first line to the left of the pen symbol, tap to specify a name for the sensor.
Below you can see the time of the last transmitted values, as well as the ID of the sensor.
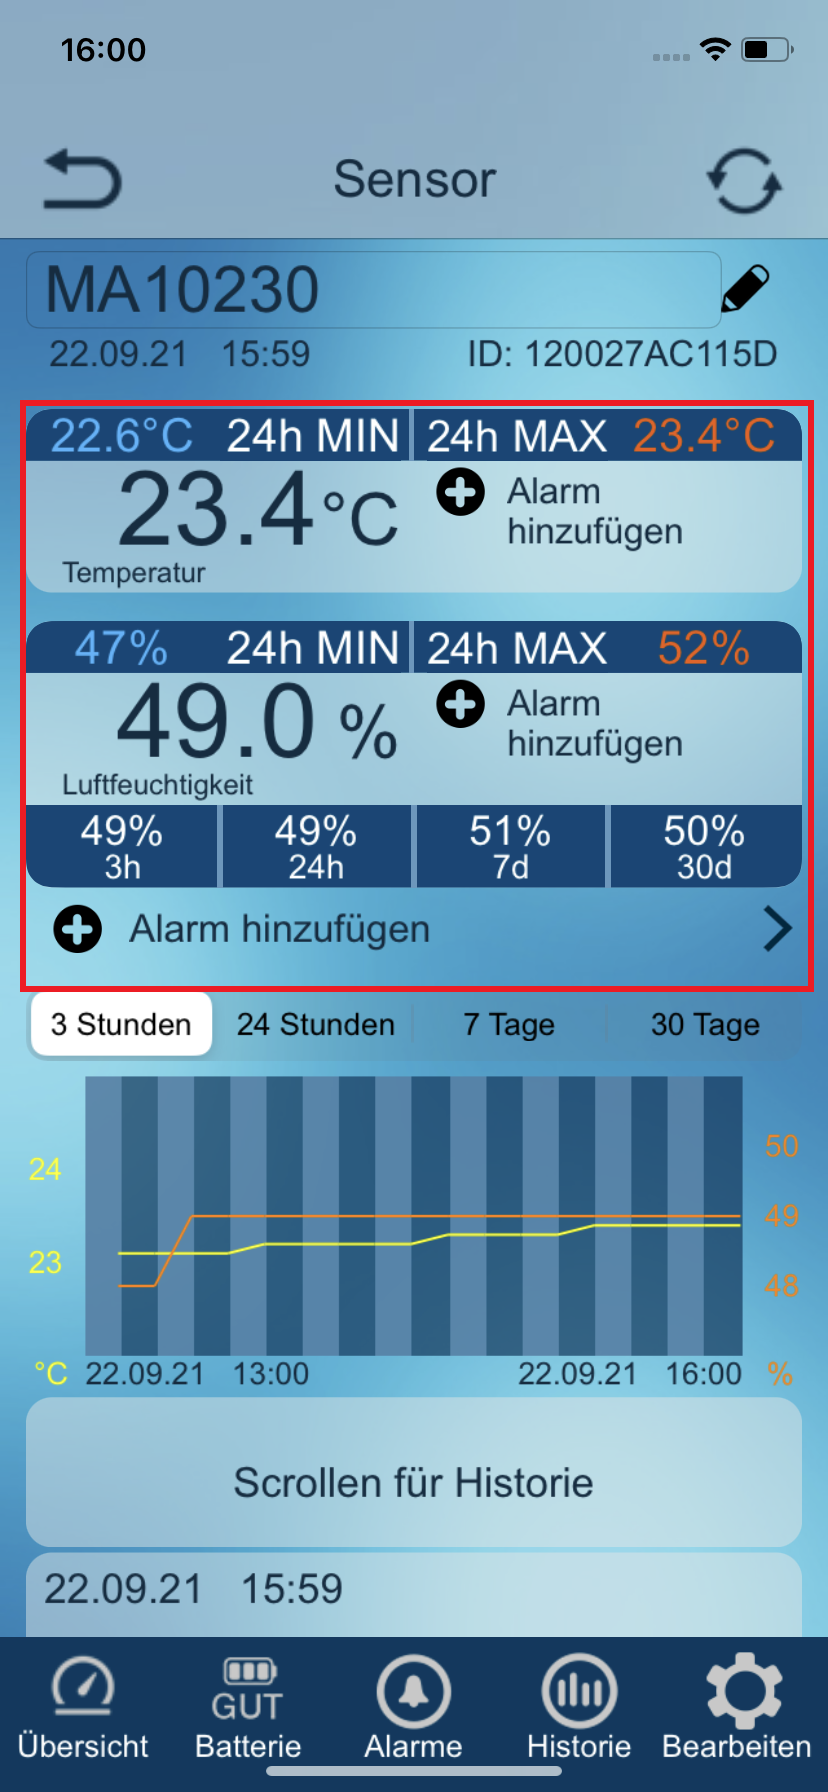
A MIN and MAX value of the last 24 hours is displayed above the current internal temperature and internal humidity. The 24h average value is determined automatically and cannot be reset by the user.
Tap to the right of the current reading to open the alarm setting. (For instructions on setting, see Alarm settings).
Further below the current air humidity are displays for average values of 4 different time periods, 3 hours (3h), 24 hours (24h), 7 days (7d) and 30 days (30d). The numbers are displayed up to 55% in green, up to 64% in yellow and up to 65% in red.
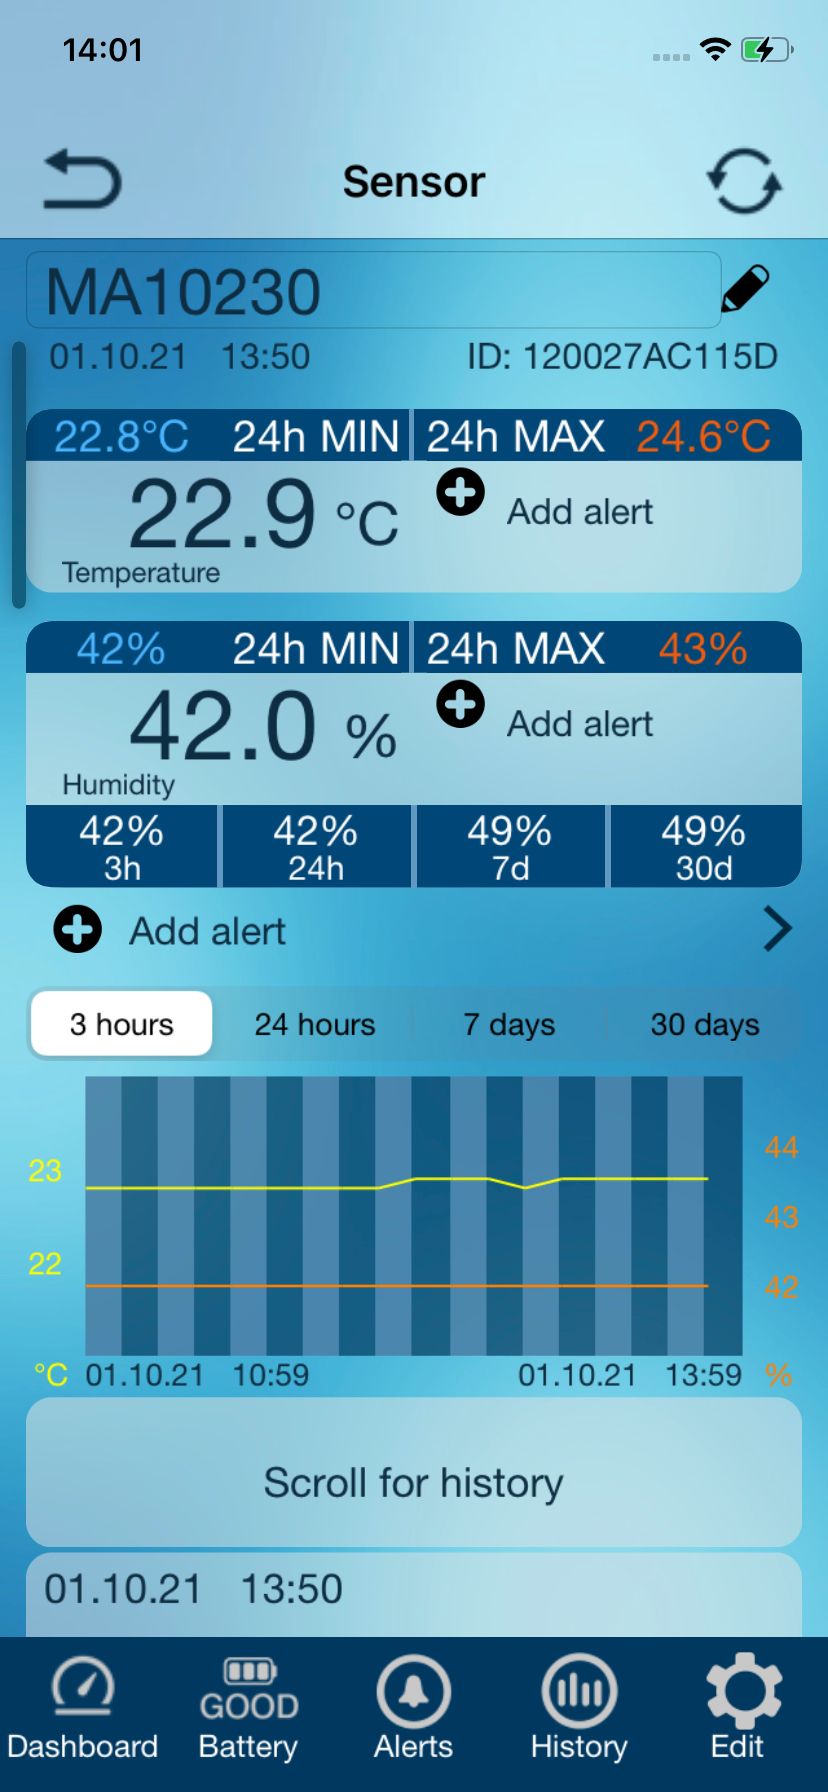
Under "Add Alarm", you can set alarms for average values of specific time periods.
(Explanation on “Setting average alarm values for indoor humidity” see below).
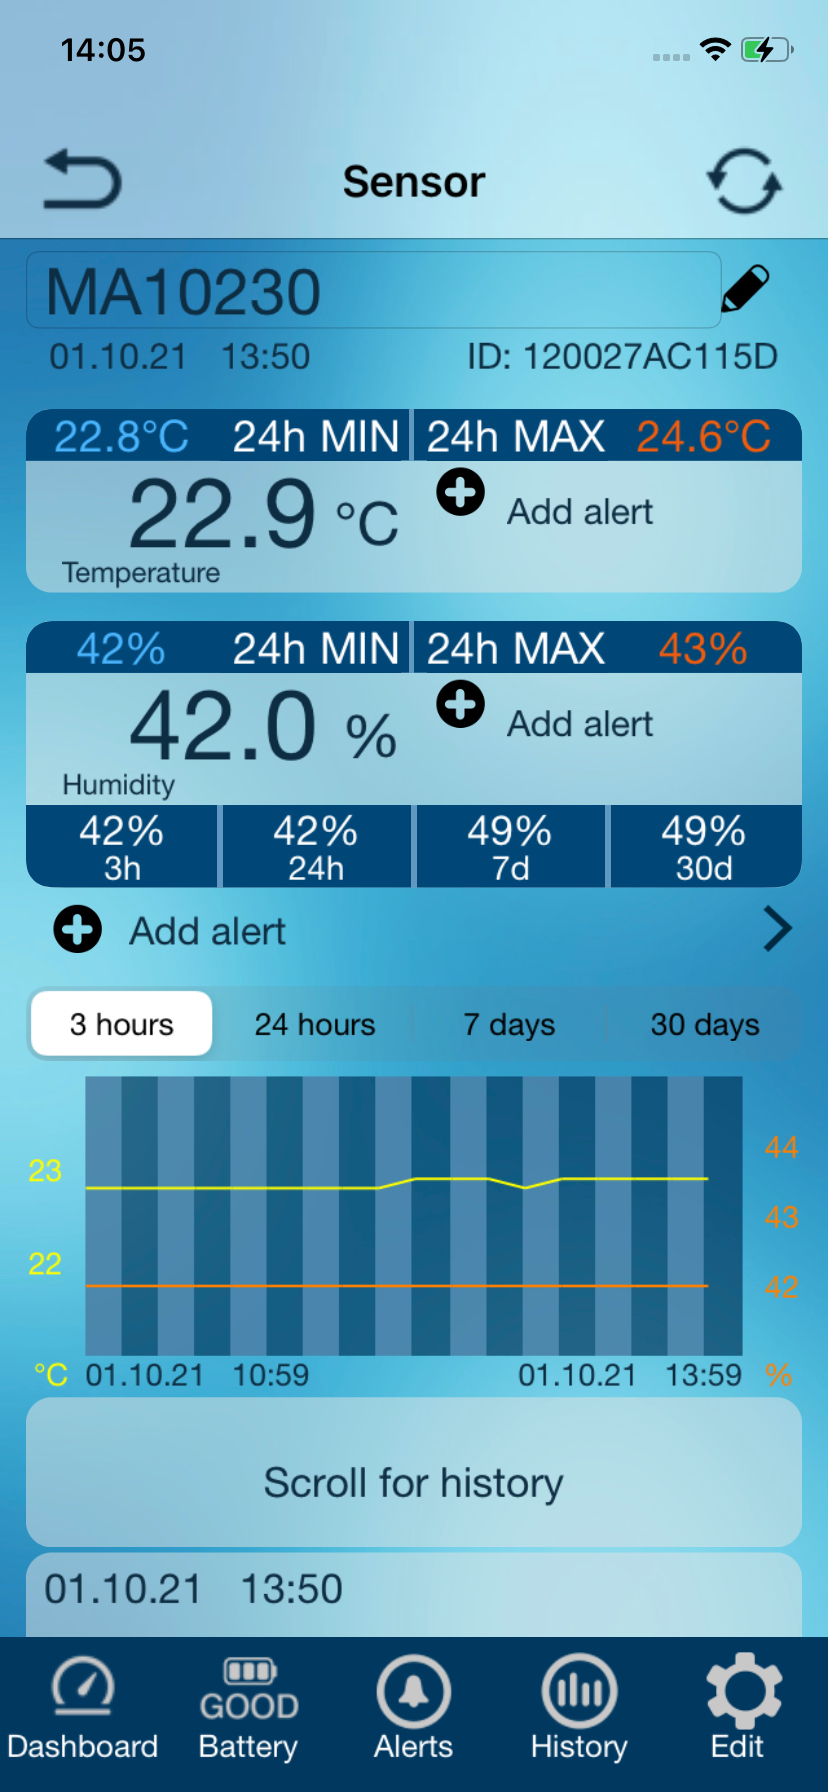
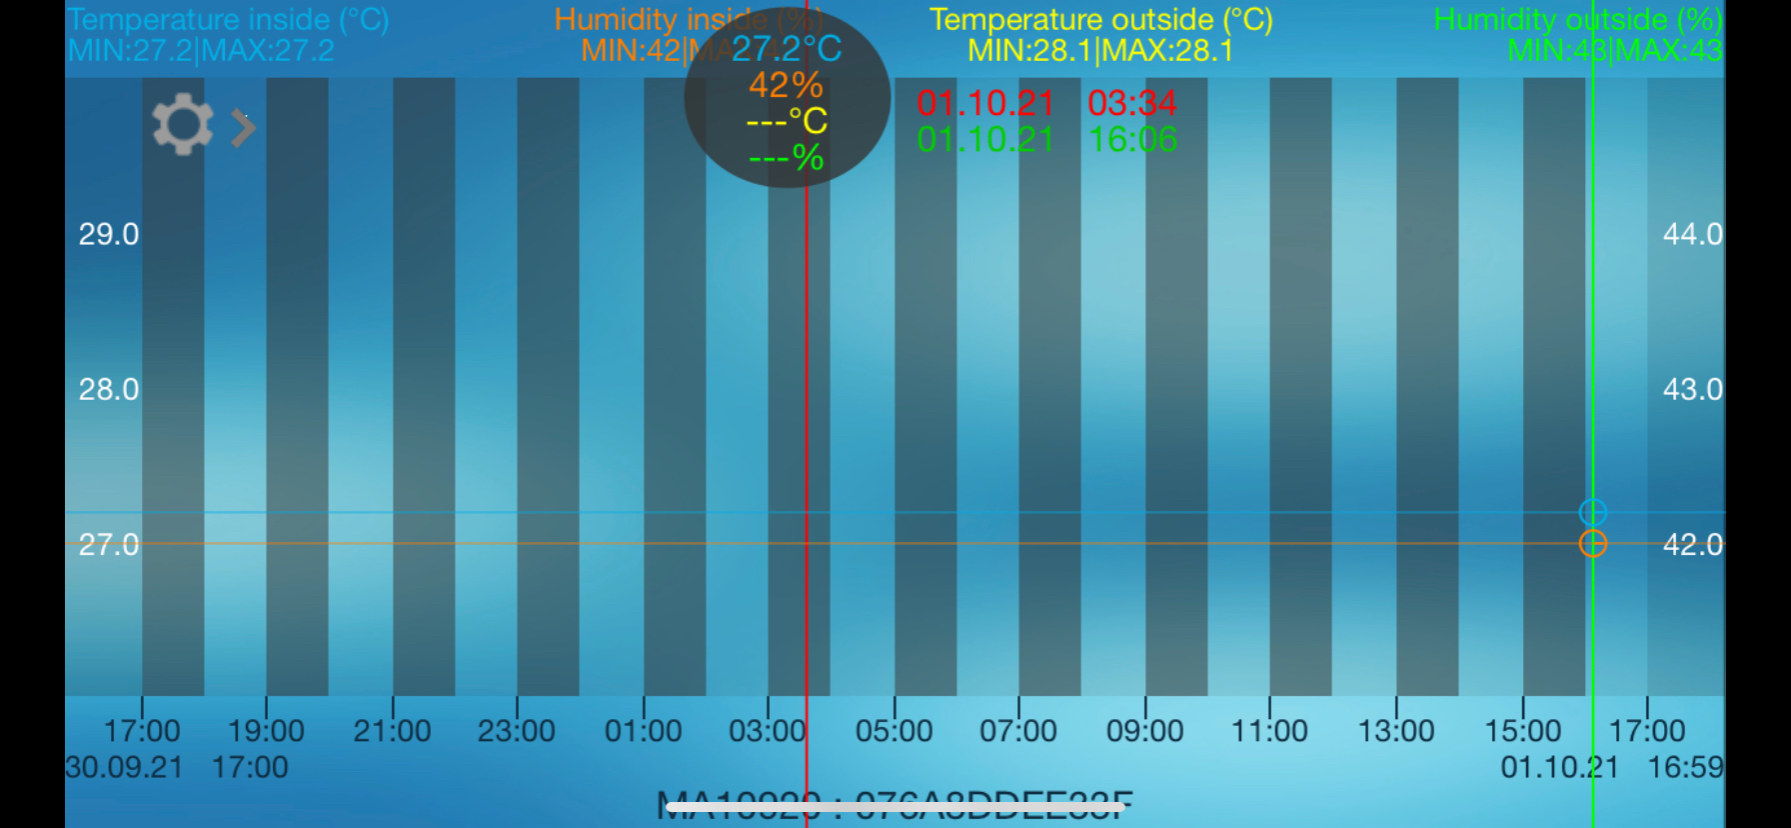
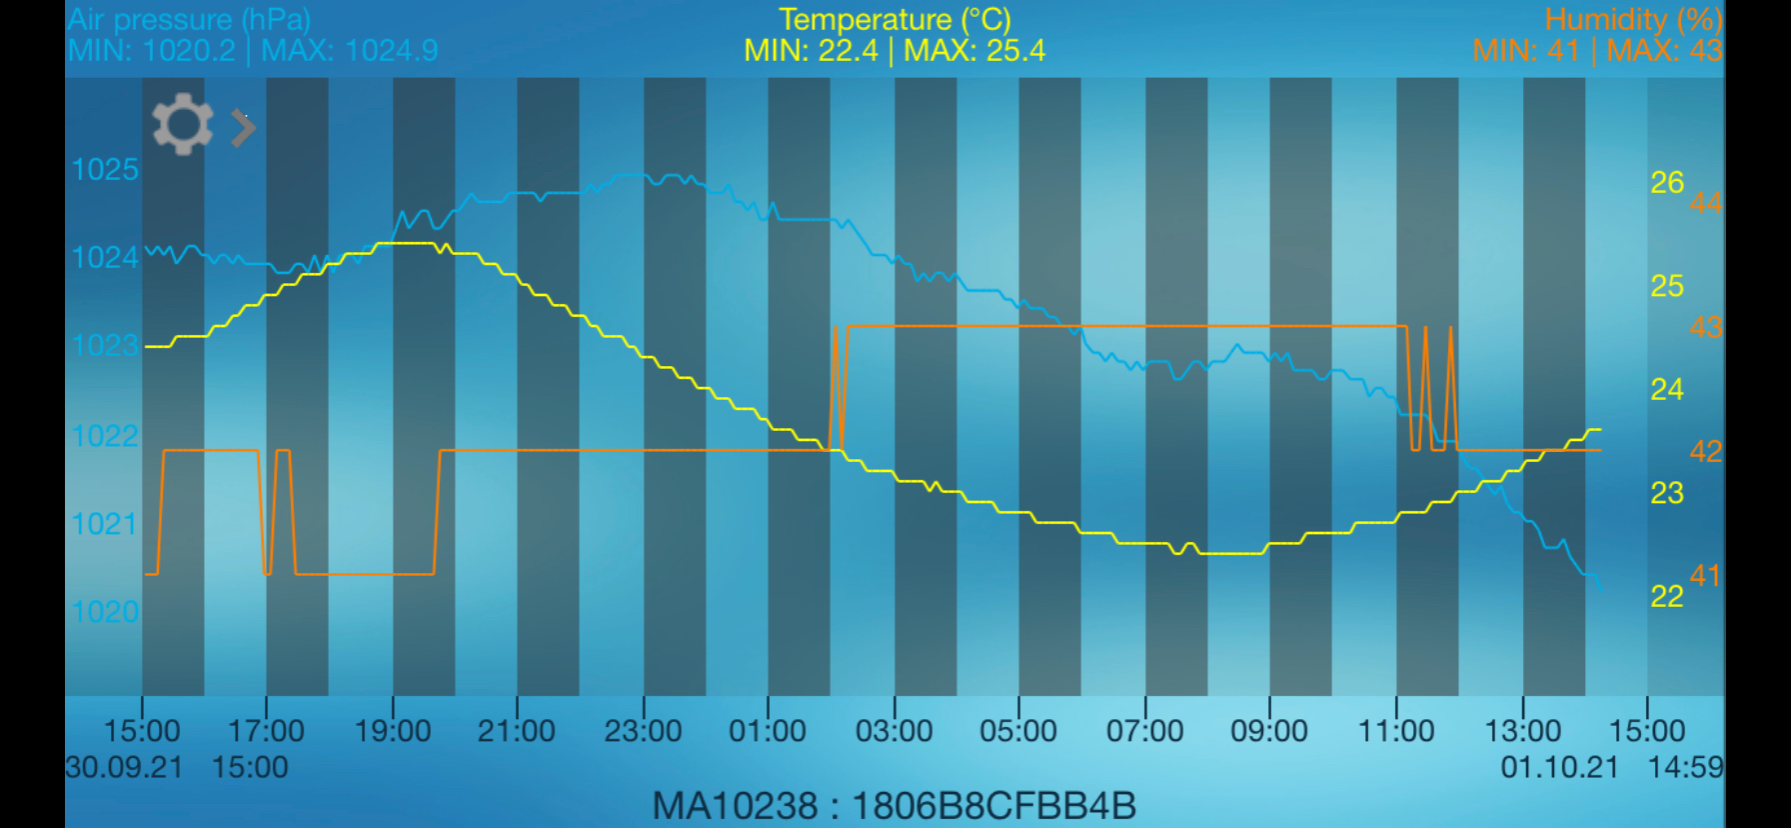
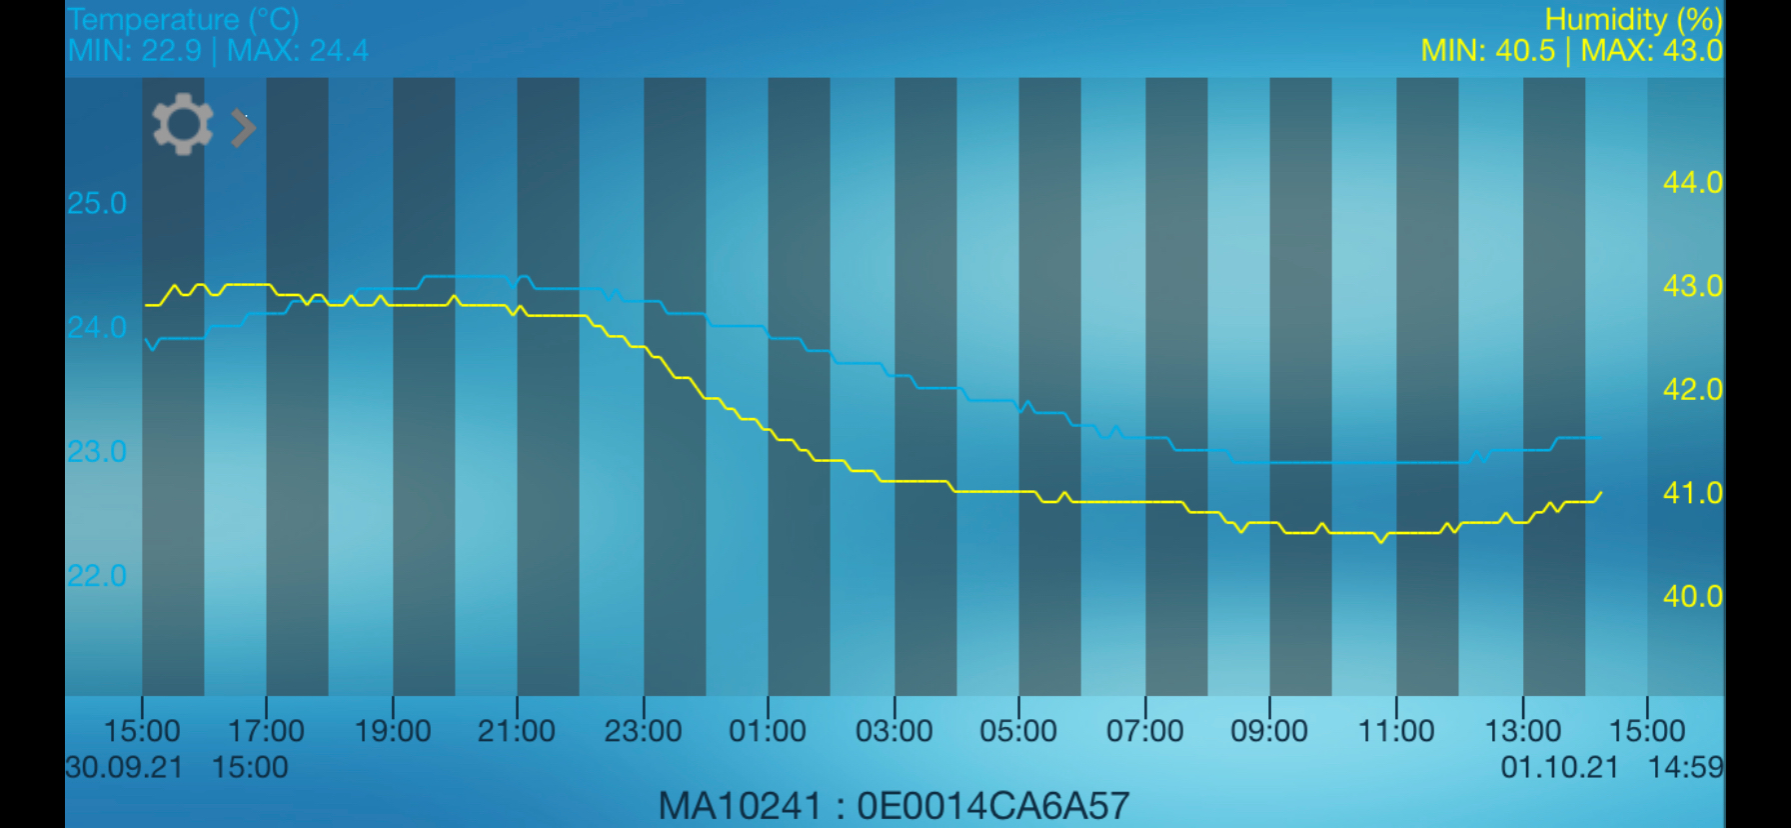
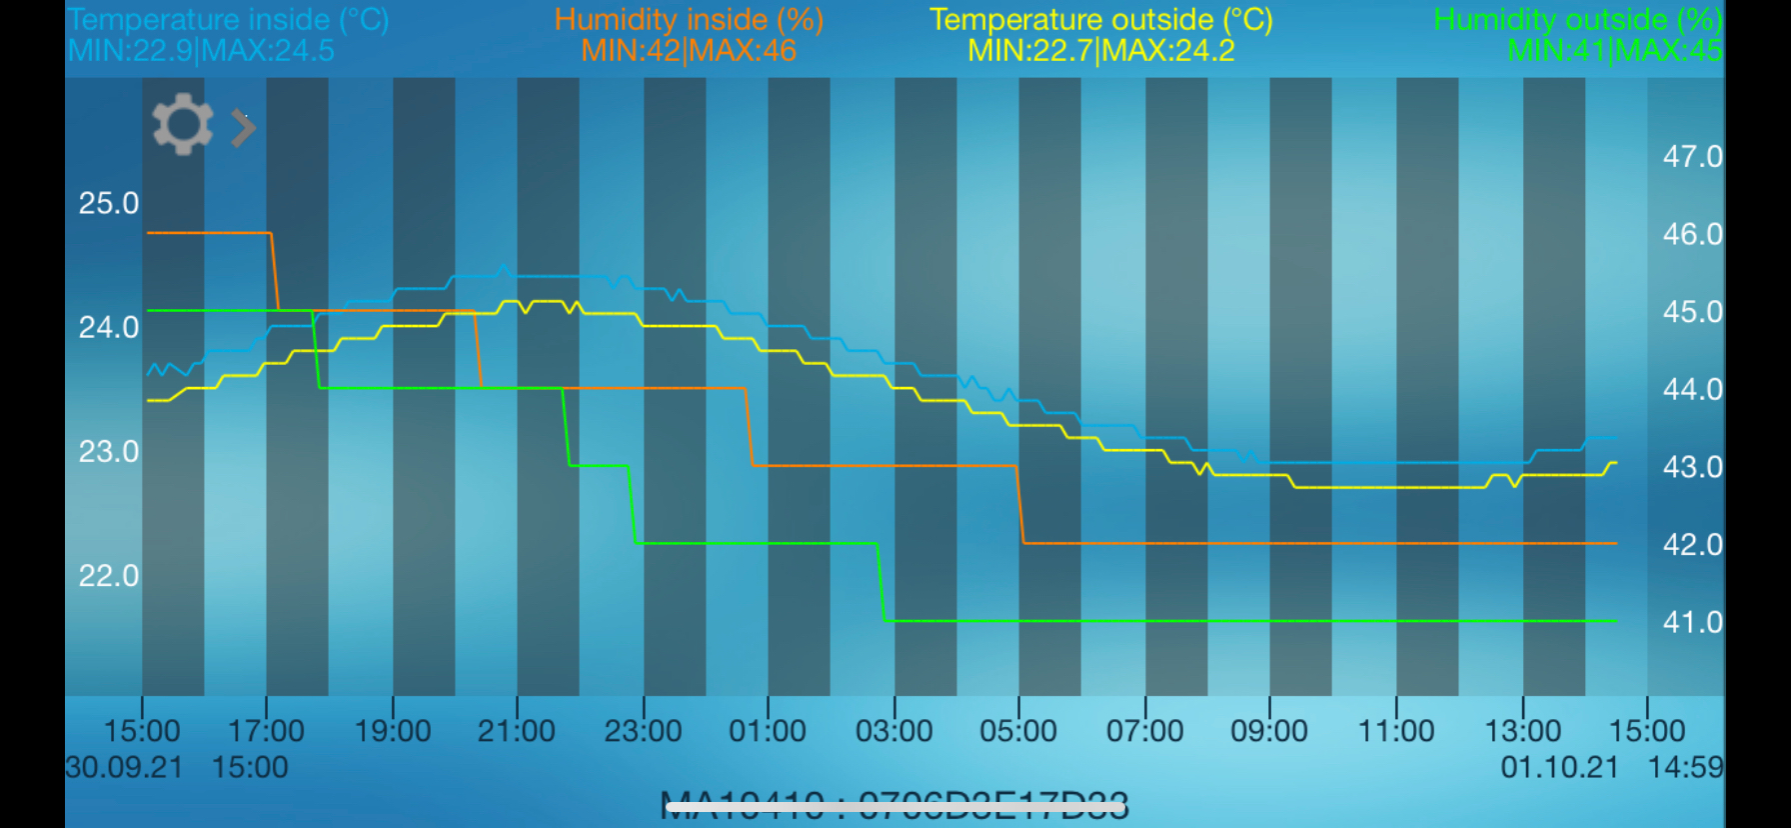
In the graphic, you can display measured values for different time periods, tap the respectivetime period above to select. Below the graphic is the history of the last 50 readings. No average values are displayed in the history.
Information about the battery status can be found here
Under Alerts, you will see the past alerts. In the case of entries for averages, there is no entry for reversal.
Information about the history display can be found here.
Under Edit you can set an ID03 sensor, e. g. MA10 200, as an external sensor to determine the ventilation recommendation. Tap the ID: field to select a sensor from your sensor overview.
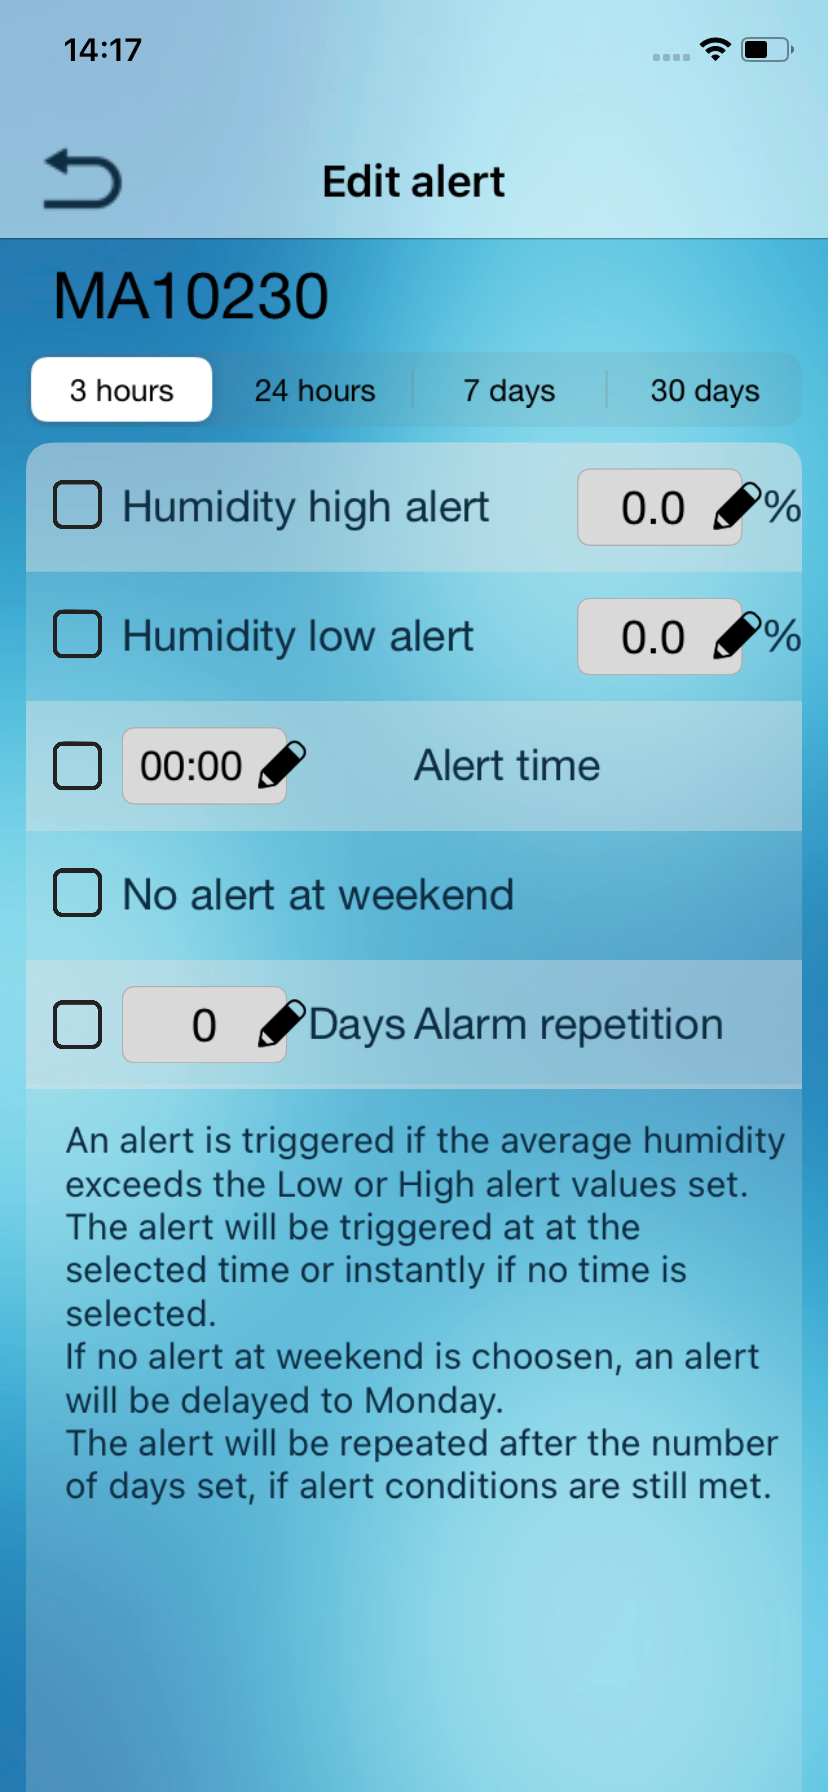
Here you can set alarms for indoor humidity averages of 3 hours, 24 hours, 7 days and 30 days. Tap a period to set or edit an alarm for that period.
Underneath, set the maximum or minimum value at which you want to be alerted.
Set a time when you want to be alerted at, if you want to be alerted at a specific time.
An alarm is triggered if the average value is exceeded or undercut at the time of the alarm. The alarm is triggered at the alarm time + 30 minutes. A further alarm will only occur if you have activated the alarm repetition or have set a new alarm value. If you do not want an alarm to occur at the weekend, you can set this.
If you want the alarm to be repeated at a later time, e.g. 3 days later, then place a tick in this field and set a time for the alarm to be repeated.
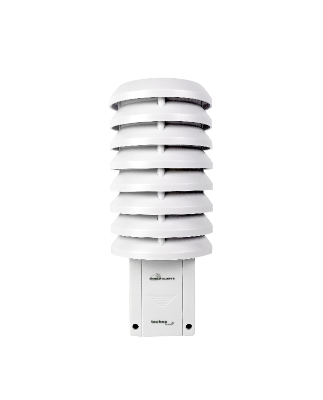
MA 10238
Thermo-/ Hygrometer
Master ID18
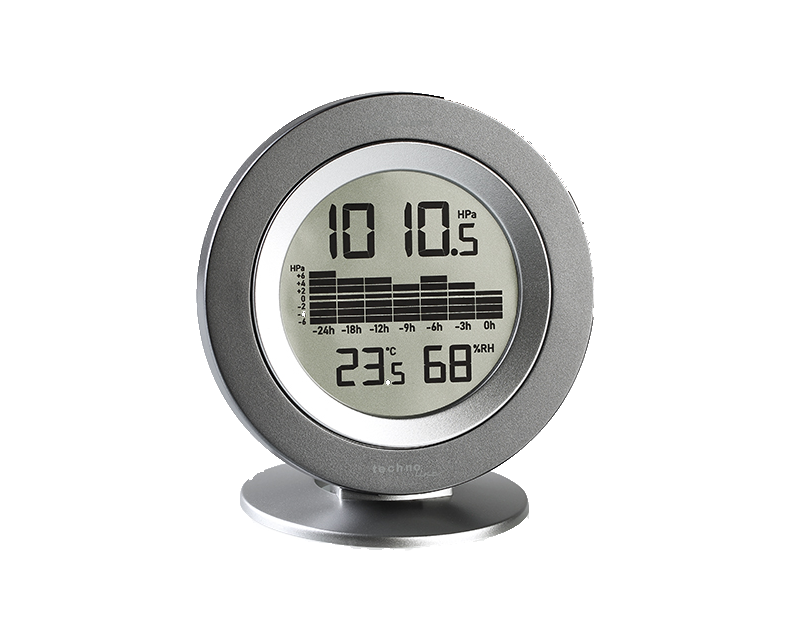
Application
Station for monitoring indoor temperature and humidity, as well as air pressure. The station must be placed away from direct rain and sun.
Technical data
Batteries:
2 x Micro (LR03, AAA) Alkaline
Battery life:
approx. 2 years
Temperature measuring range:
- 9.9°C to + 59.9°C
Temperature accuracy:
+/- 1°C
Humidity measuring range:
1% to 99%
Humidity accuracy:
at 25 °C: +/-5% between 10-90%RH; +/-7.5%RH < 10%RH or > 90%RH
Measuring interval:
6 Minute
Range:
160m (open area)
Display in the app
MA 10241
Thermo-/ Hygrometer
Master ID0E
Application
The MA 10241 is an additional sensor for the Mobile Alerts system and acts as a thermo-hygro-sensor.
The sensor provides measured values for temperature and humidity and is characterized by a high accuracy of the measured values.
Technical data
Batteries:
2 x Micro (LR03, AAA) Alkaline
Battery life:
approx. 2 years
Temperature measuring range:
- 9.9°C to + 59.9°C
Temperature accuracy:
+/- 1°C
Humidity measuring range:
1% to 99%
Humidity accuracy:
at 25 °C: +/-5% between 10-90%RH; +/-7.5%RH < 10%RH or > 90%RH
Measuring interval:
6 Minutes
Range:
160m (open area)
Display in the app

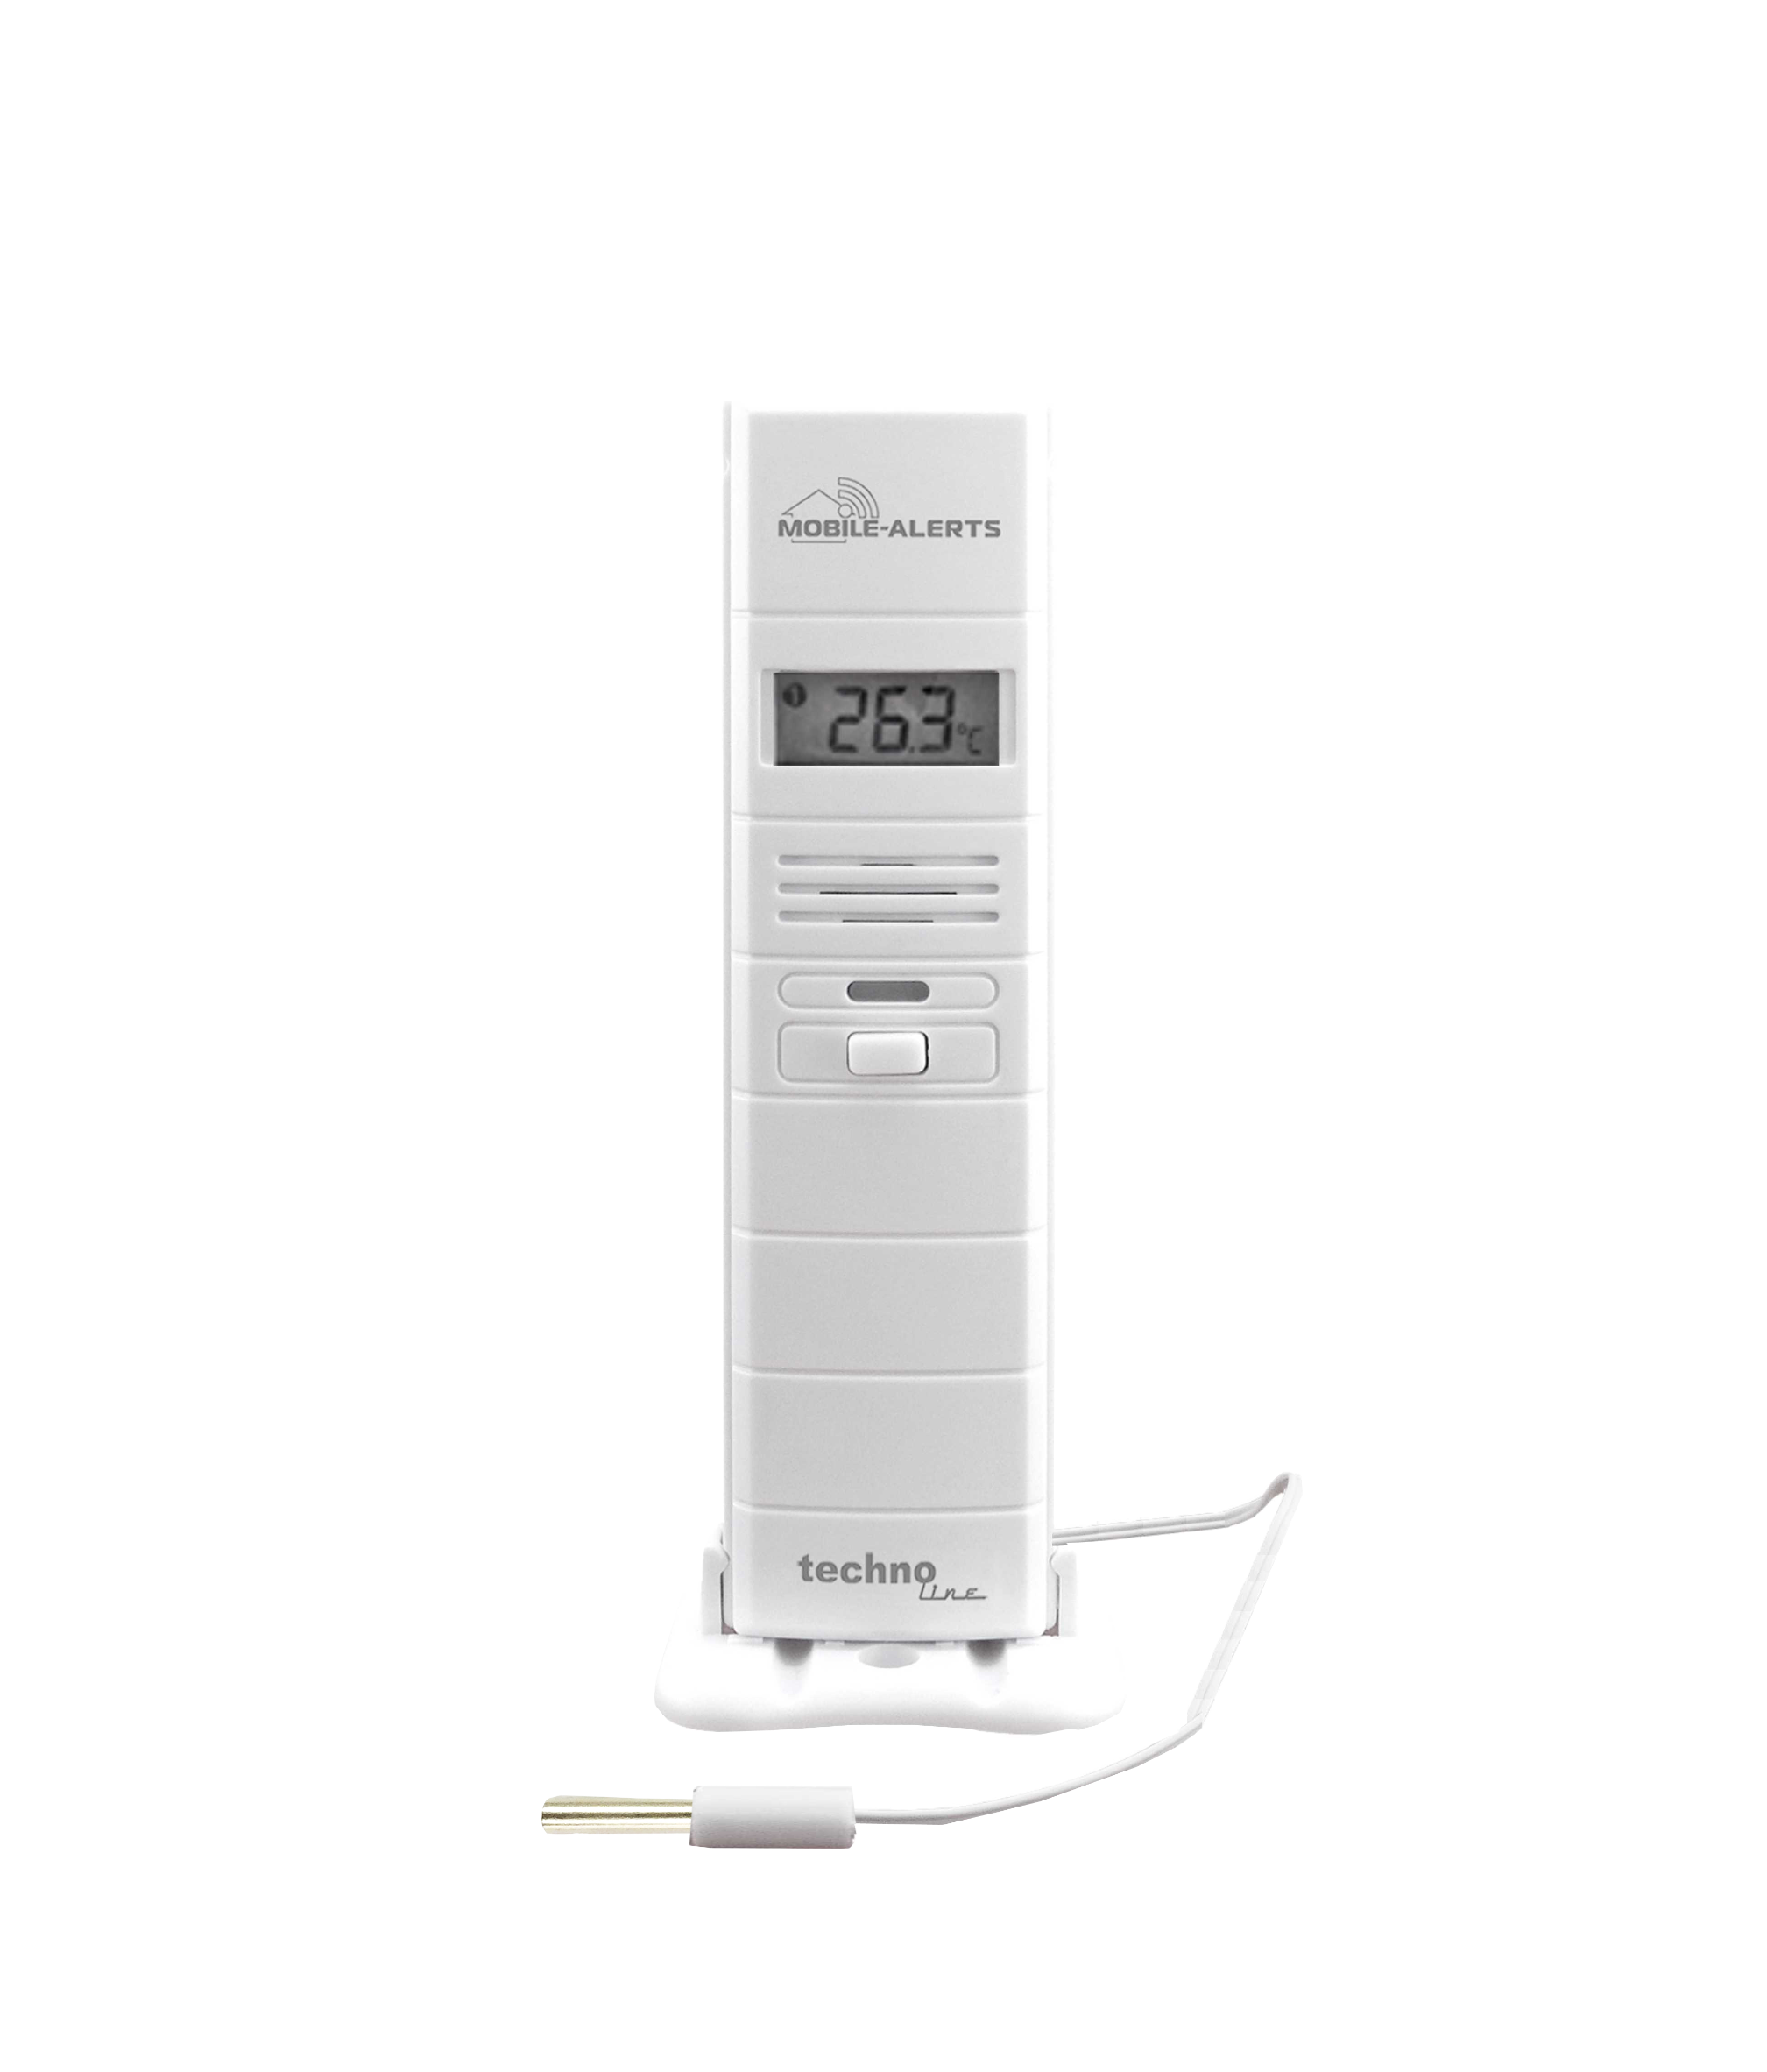
MA 10250/51
Thermo-Hygro-Sensor & Repeater
Master ID03
Application
The MA 10251 is an additional sensor for the Mobile Alerts system and acts as a thermo-hygro sensor and repeater for wind sensor MA 10660. It provides data on temperature and humidity.
The measured values can be displayed graphically in the app and exported via a CSI file. The values can be accessed via Amazon Echo or via the website https://monitor.mobile-alerts.eu.
Technical data
Batteries:
2 x Mignon (LR06, AA) Alkaline
Batterie life:
approx. 2 Jahre
Temperature measuring range:
– 39.9°C to + 59.9°C
Temperature accuracy:
+/- 1°C
Humidity measuring range:
1% bis 99%
Humidity accuracy:
+/- 3%
Measuring interval:
7 minutes
Range:
100m (open area)
Display in the app
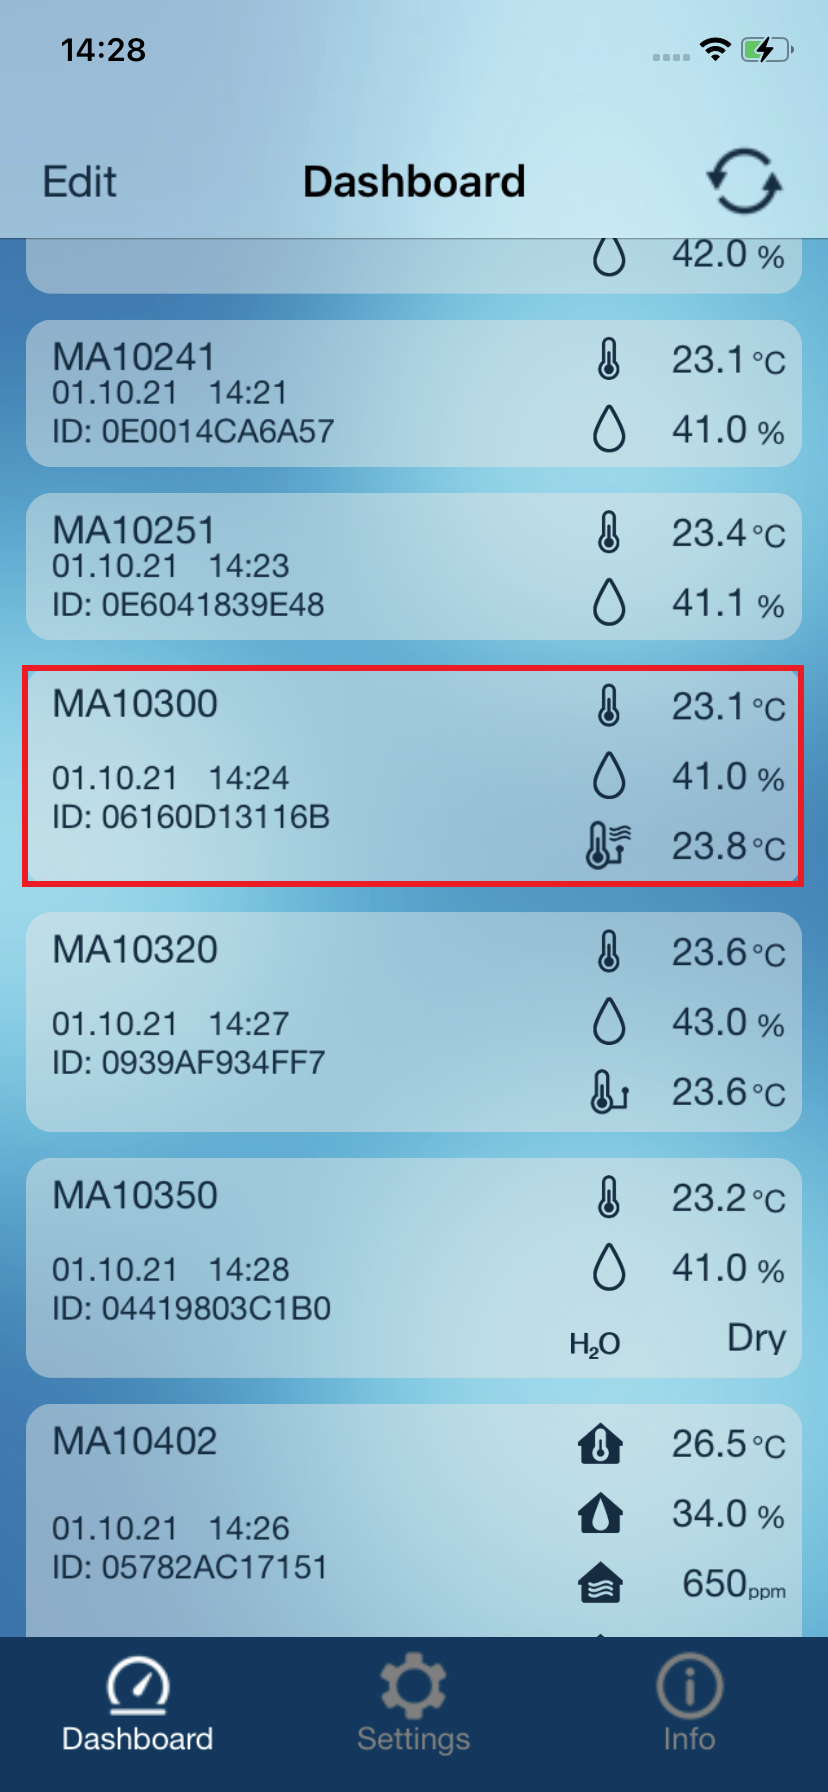
MA 10300
Temperature and hygrometer sensor with additional cable temperature sensor
Master ID06
Application
Sensor for monitoring of indoor or outdoor temperatures, humidity and non corrosive liquids. The sensor must be mounted protected from direct sun and rain.
Technical data
Batteries:
2 x Micro (LR03, AAA) Alkaline
Batterie life:
approx. 2 years
Temperature measuring range:
– 39.9°C to + 59.9°C
Temperature accuracy:
+/- 1°C
Humidity measuring range:
20% to 99%
Humidity accuracy:
+/- 4%
Measuring interval:
7 minutes
Range:
100m (open area)
Cable length:
1,5m
Display in the app
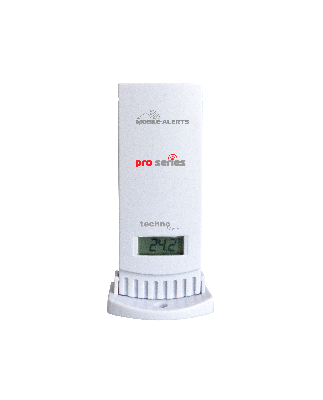
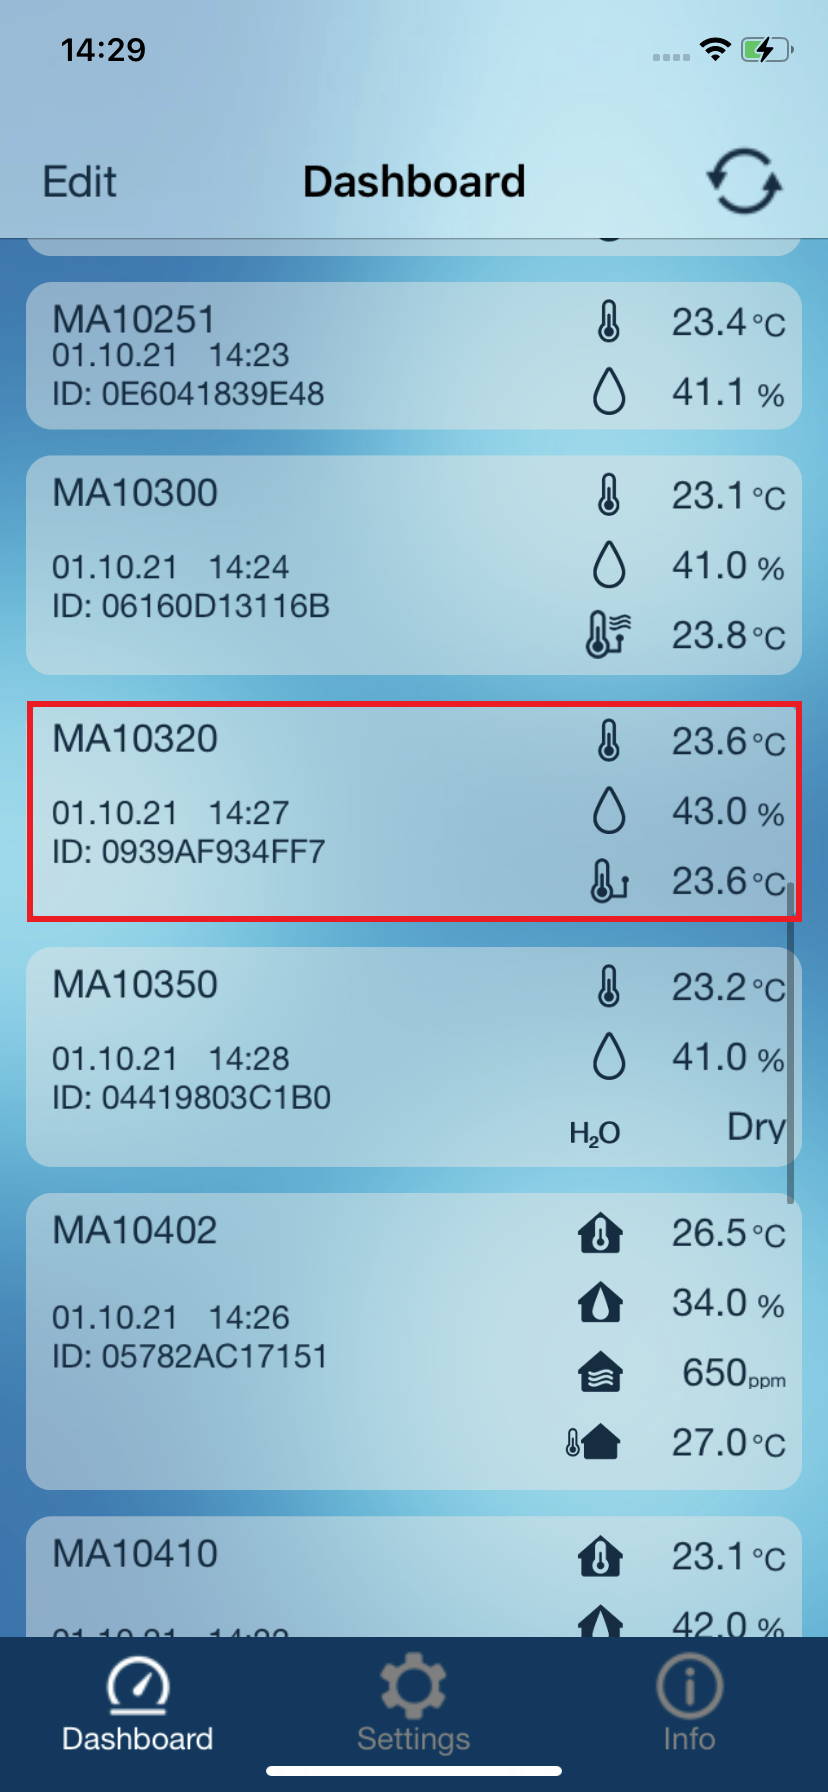
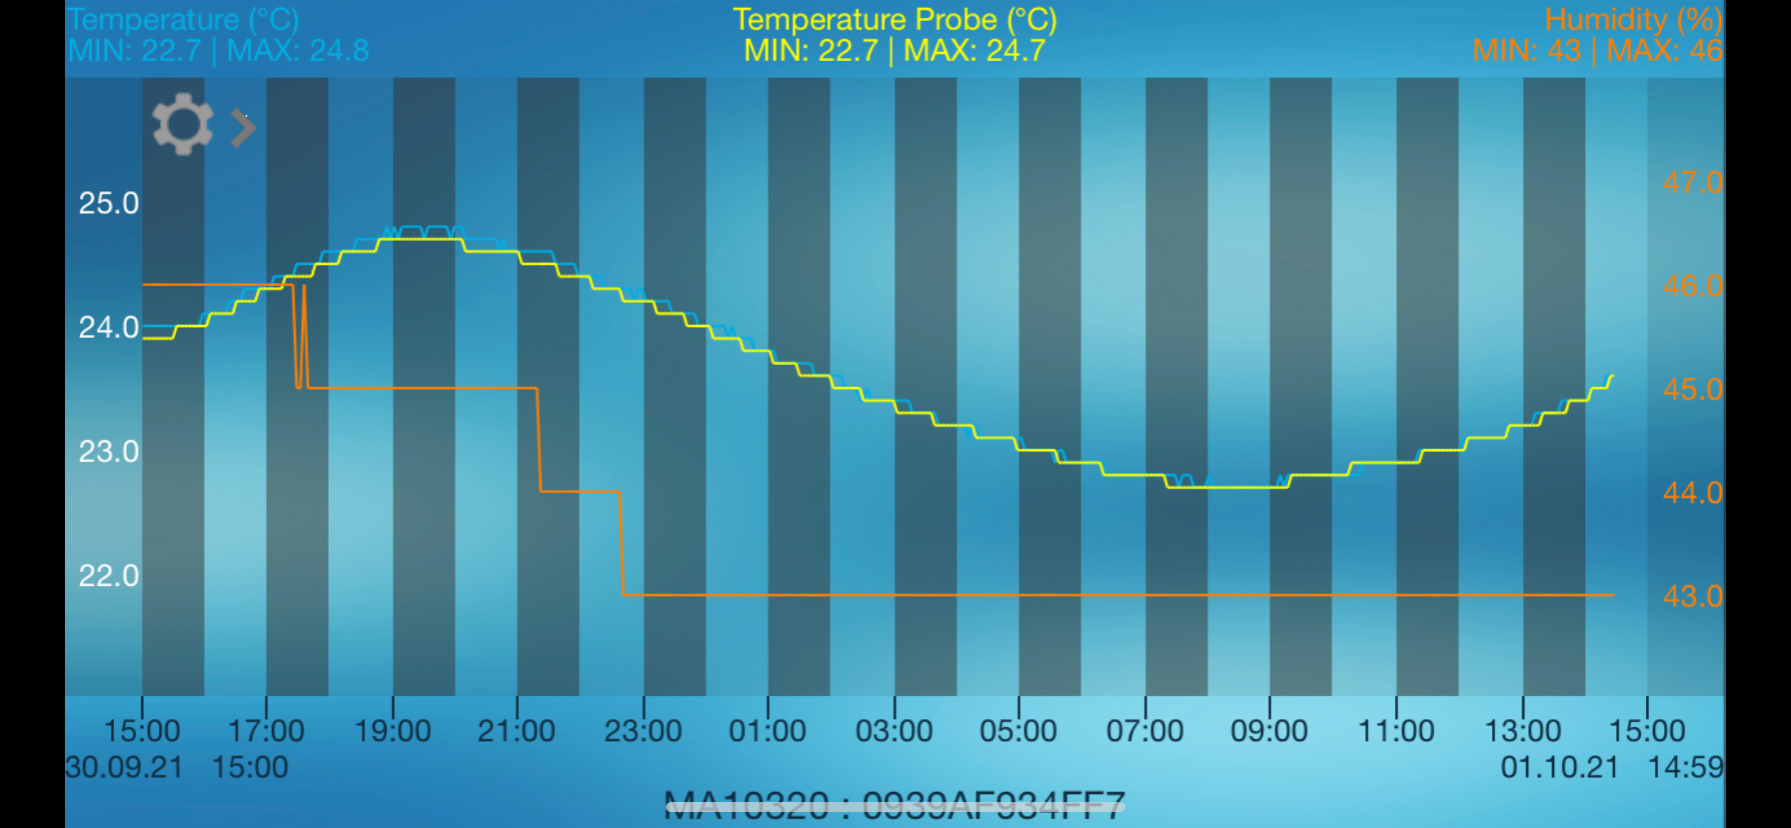
MA 10320 - pro series
Temperature and hygrometer sensor of professional series with additional cable temperature sensor
Master ID09
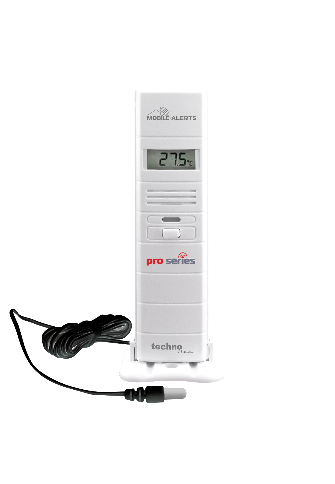
Application
Sensor for monitoring of indoor or outdoor temperatures, humidity and non corrosive liquids. The sensor must be mounted protected from direct sun and rain.
Note: This professional sensor has opposite standard sensors an extended measuring range and additional functionality.
Technical data
Batteries:
2 x Micro (LR03, AAA) Alkaline
Batterie life:
approx. 2 years
Temperature measuring range:
– 39.9°C to + 59.9°C
Temperature accuracy:
+/- 1°C
Measuring range probe temperature:
– 50.0°C to + 110.0°C
Accuracy probe temperature:
+/- 0.5°C
Measuring range humidity:
20% to 99%
Accuracy range humidity:
+/- 3%
Measurement intervals:
3.5 minutes
Transmission range:
100m (open area)
Cable length:
1,5m
Display in the app

MA 10350
Temperature and hygrometer sensor with water detection cable sensor
Master ID04
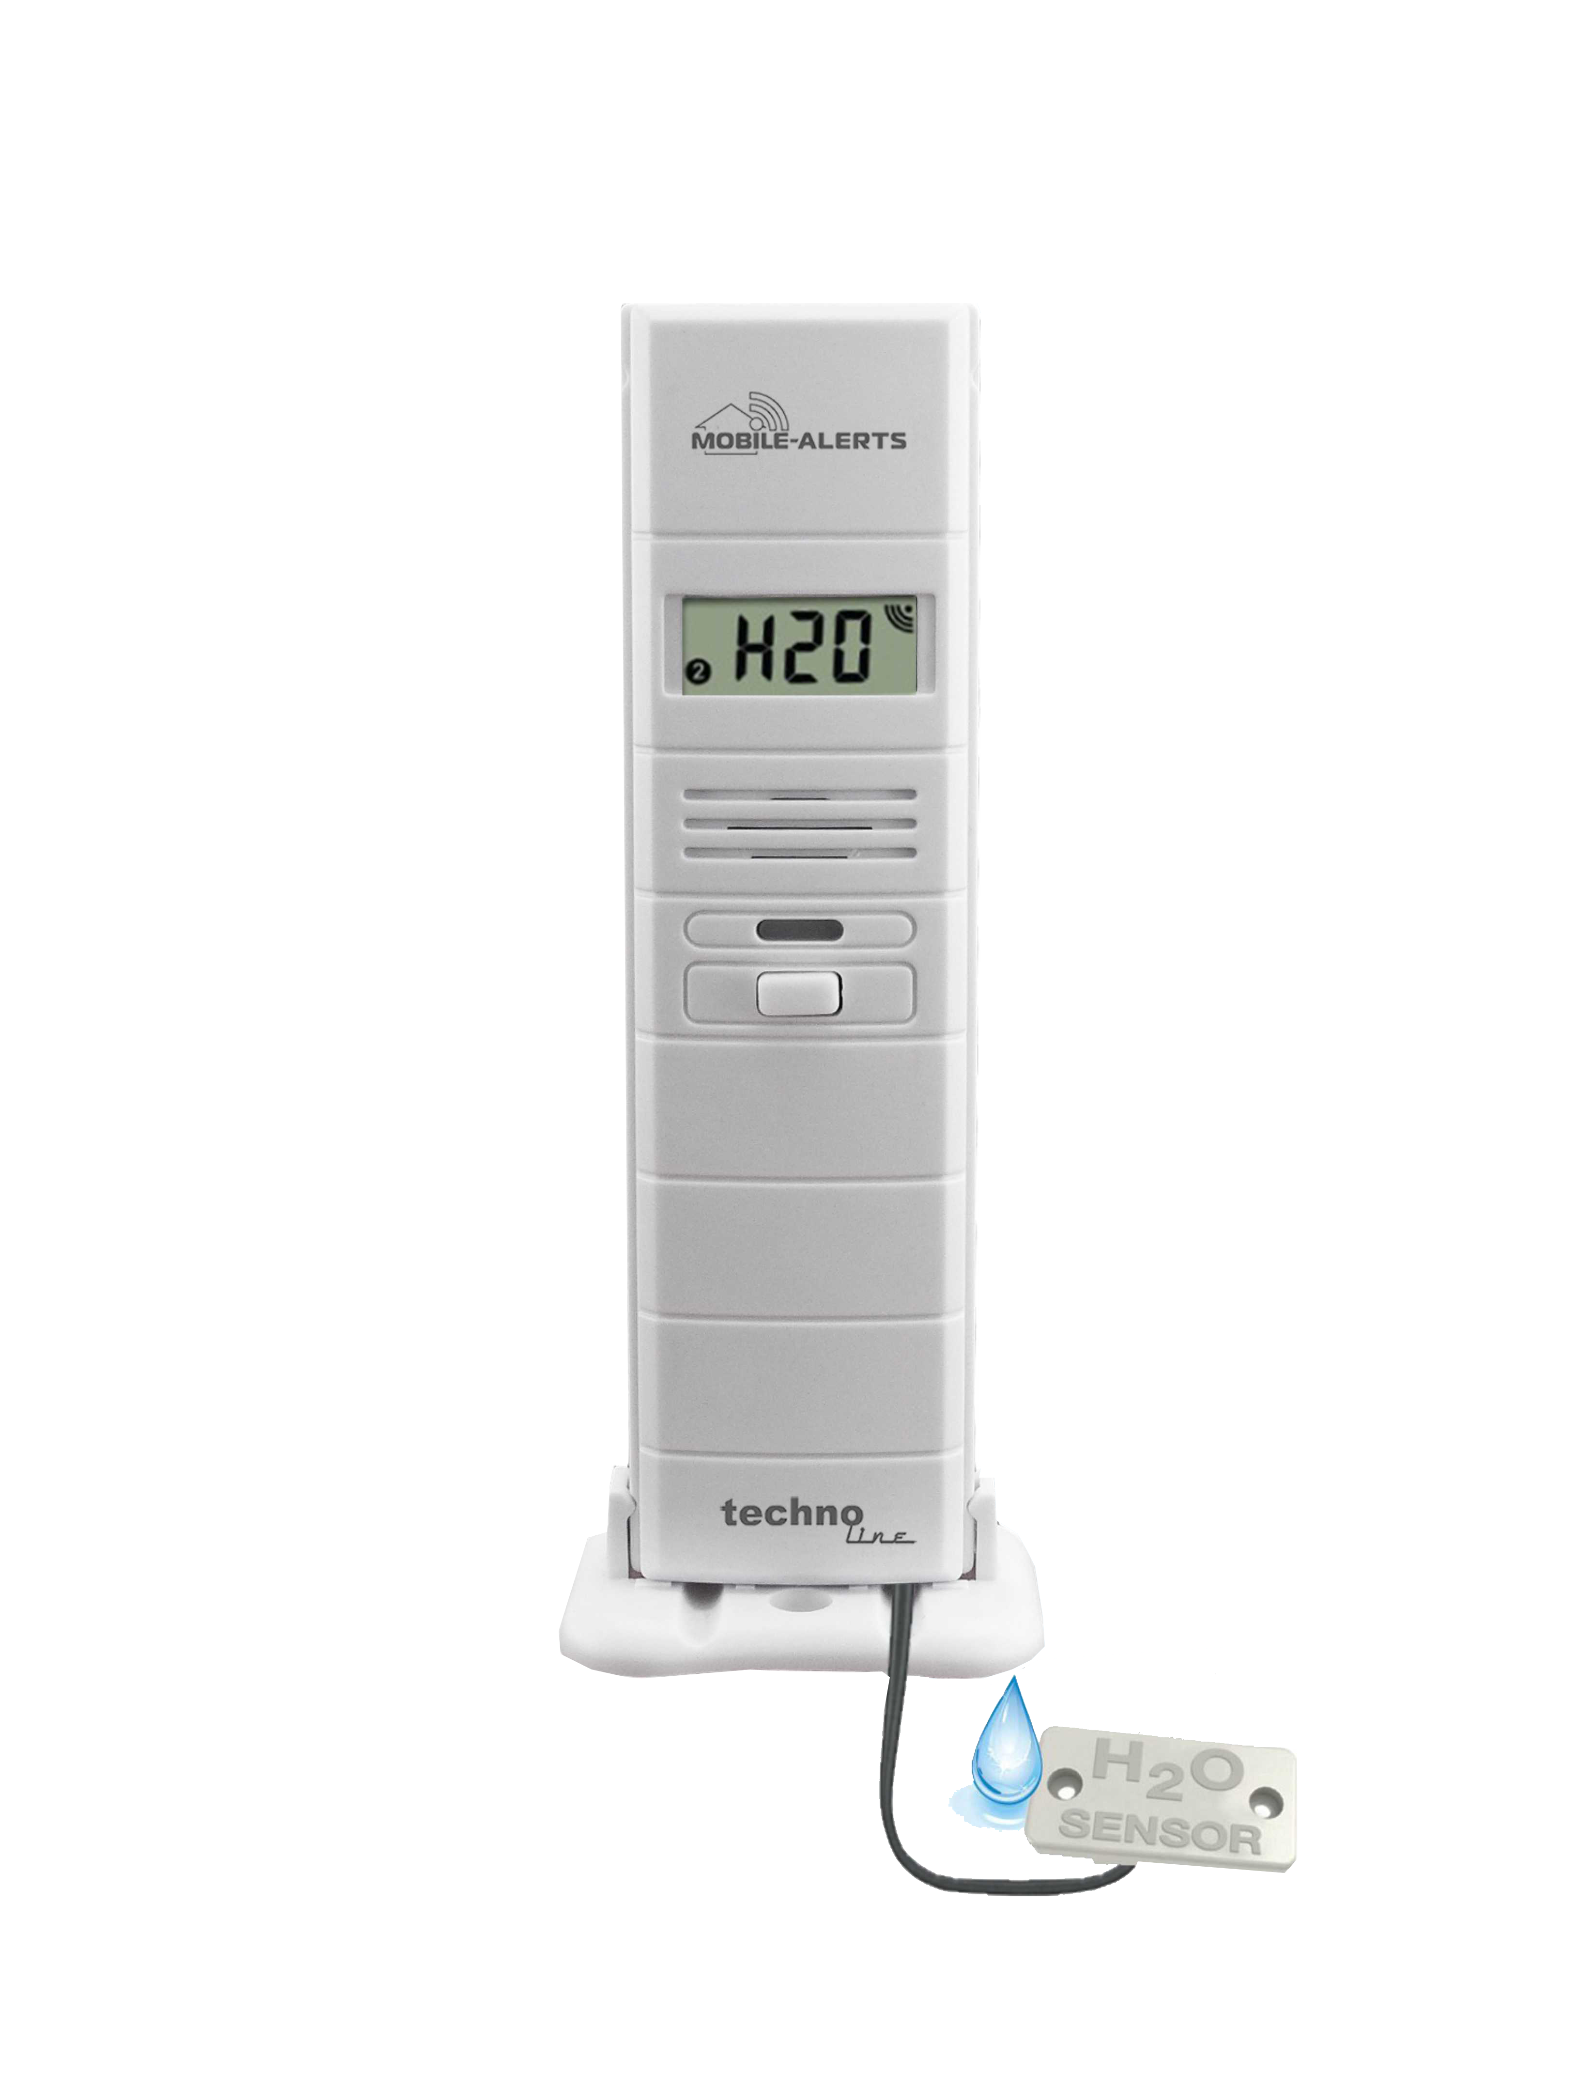
Application
Sensor for monitoring of indoor or outdoor temperatures, humidity and water detection. The sensor must be mounted protected from direct sun and rain.
Technical data
Batteries:
2 x Micro (LR03, AAA) Alkaline
Batterie life:
approx. 2 years
Temperature measuring range:
– 39.9°C to + 59.9°C
Temperature accuracy:
+/- 1°C
Humidity measuring range:
20% to 99%
Humidity accuracy:
+/- 4%
Measuring interval:
7 minutes
Range:
100m (open area)
Cable length:
1,5m
Display in the app

MA 10402
Air quality station / air quality monitor
Master ID05

Application
Station for monitoring indoor and outdoor temperature as well as air humidity (indoor) and air quality.
The outdoor sensor must be mounted protected from direct rain and sunlight.
Technical data
Batteries:
2 x Baby (LR14, C) Alkaline (Station)
2 x Micro (LR03,AAA) Alkaline (Sensor)
Batterie life:
approx. 2 years
Temperature measuring range (indoor):
– 9,5°C to + 59.9°C
Tmeperature accuracy (indoor):
+/- 0,5°C
Temperature measuring range (outdoor):
– 39.9°C to + 59.9°C
Temperature accuracy (outdoor):
+/- 0,1°C
Humidity measuring range:
20% to 99%
Humidity accuracy:
+/- 1%
Measuring interval:
7 minutes
Range:
100m (open area)
Display in the app
MA 10410
Air quality station / air quality monitor
Master ID07

Application
Station for monitoring indoor and outdoor temperature as well as air humidity (indoor) and air quality.
The outdoor sensor must be mounted protected from direct rain and sunlight.
Technical data
Batteries:
2 x Baby (LR14, C) Alkaline (Station)
2 x Micro (LR03,AAA) Alkaline (Sensor)
Batterie life:
ca. 2 Jahre
Temperature measuring range (indoor):
– 9,5°C bis + 59.9°C
Temperature accuracy (indoor):
+/- 0,5°C
Temperature measuring range (outdoor):
– 39.9°C bis + 59.9°C
Temperature accuracy (outdoor):
+/- 0,1°C
Humidity measuring range:
20% bis 99%
Humidity accuracy:
+/- 1%
Measuring interval:
7 Minuten
Range:
100m (Freifeld)
Display in the app
MA 10430
Air quality station / air quality monitor
Master ID07
Application
Station for monitoring indoor and outdoor temperature as well as air humidity (indoor) and air quality.
The outdoor sensor must be mounted protected from direct rain and sunlight.
Technical data
Batteries:
2 x Baby (LR14, C) Alkaline (Station)
2 x Micro (LR03,AAA) Alkaline (Sensor)
Batterie life:
ca. 2 Jahre
Temperature measuring range (indoor):
– 9,5°C bis + 59.9°C
Temperature accuracy (indoor):
+/- 0,5°C
Temperature measuring range (outdoor):
– 39.9°C bis + 59.9°C
Temperature accuracy (outdoor):
+/- 0,1°C
Humidity measuring range:
20% bis 99%
Humidity accuracy:
+/- 1%
Measuring interval:
7 Minuten
Range:
100m (Freifeld)
Display in the app

MA 10450
Air quality station / air quality monitor
Master ID05

Application
Station for monitoring indoor and outdoor temperature.
The outdoor sensor must be mounted protected from direct rain and sunlight.
Technical data
Batteries:
2 x Baby (LR14, C) Alkaline (Station)
2 x Micro (LR03,AAA) Alkaline (Sensor)
Batterie life:
ca. 2 Jahre
Temperature measuring range (indoor):
– 9,5°C bis + 59.9°C
Temperature accuracy (indoor):
+/- 0,5°C
Temperature measuring range (outdoor):
– 39.9°C bis + 59.9°C
Temperature accuracy (outdoor):
+/- 0,1°C
Humidity measuring range:
20% bis 99%
Humidity accuracy:
+/- 1%
Measuring interval:
7 Minuten
Range:
100m (Freifeld)
Display in the app
MA 10650
Rain meter
Application
Sensor for monitoring of rain.
Technical data
Batteries:
2 x mignon (LR06, AA) alkaline
Battery life:
approx. 2 years
Measuring rain:
0.258 mm
Accuracy rain:
+/- 3%
Measurement intervals:
continuously during precipitation
Transmission range:
100m (open area)
Display in the app
Touch the rain sensor field to enter the sensor menu.
Touch the current label left to the pencil icon to change the name of the sensor.
You can see the time of the last rain sensor data reception and the sensor ID below.
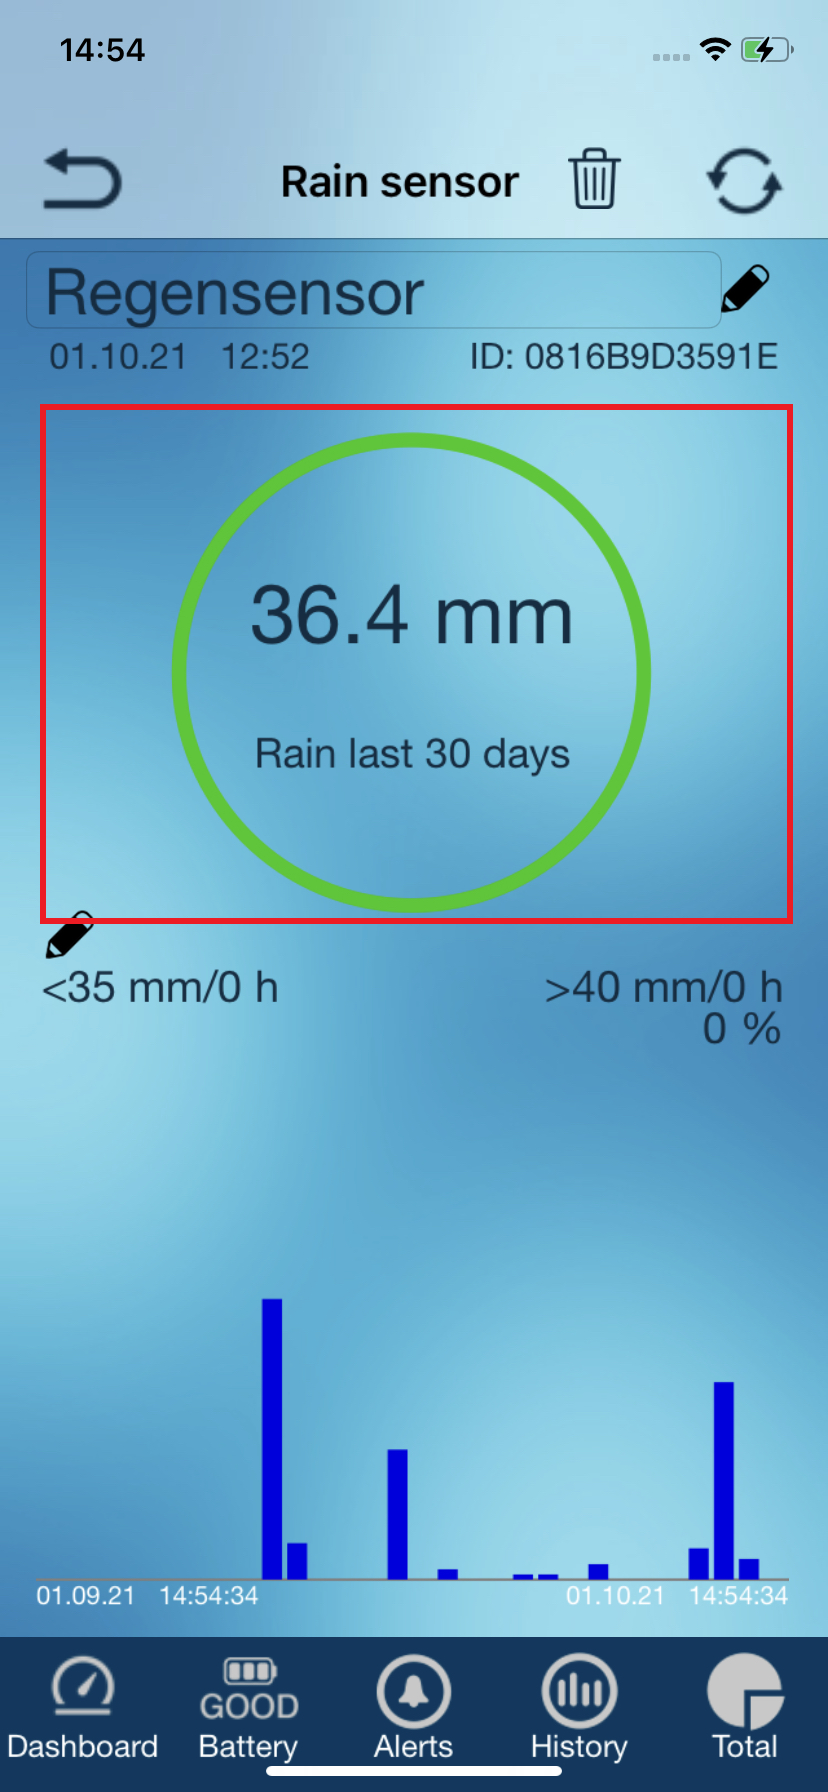
In the circle rainfall data of specific periods of time are displayed. Swipe to the right or left to switch between different time periods. Tap a value to stop the automatic scrolling. The rain units can be changed in the settings menu between inch and mm.
In the circle the following data are displayed scrollable from left to right:
- Rain last 24 hours
- Rain last hour
- Heaviest rain last 24 hours (Heaviest rain last 24 hours indicates when the intensity of the rain was most. The value of mm / h is calculated by the time interval between two rocker beats, extrapolated to a value when this intensity had continued for one hour.)
- Rain last 7 days
- Rain last 30 days

Below the circle is the line for alerts.
Tap into the line below the pin to switch to edit alert menu.
Left is the minimum alarm value, to the right the maximum alert value and in the middle the alert icon for current rain is displayed. Symbols are only visible when the respective alarm is activated.
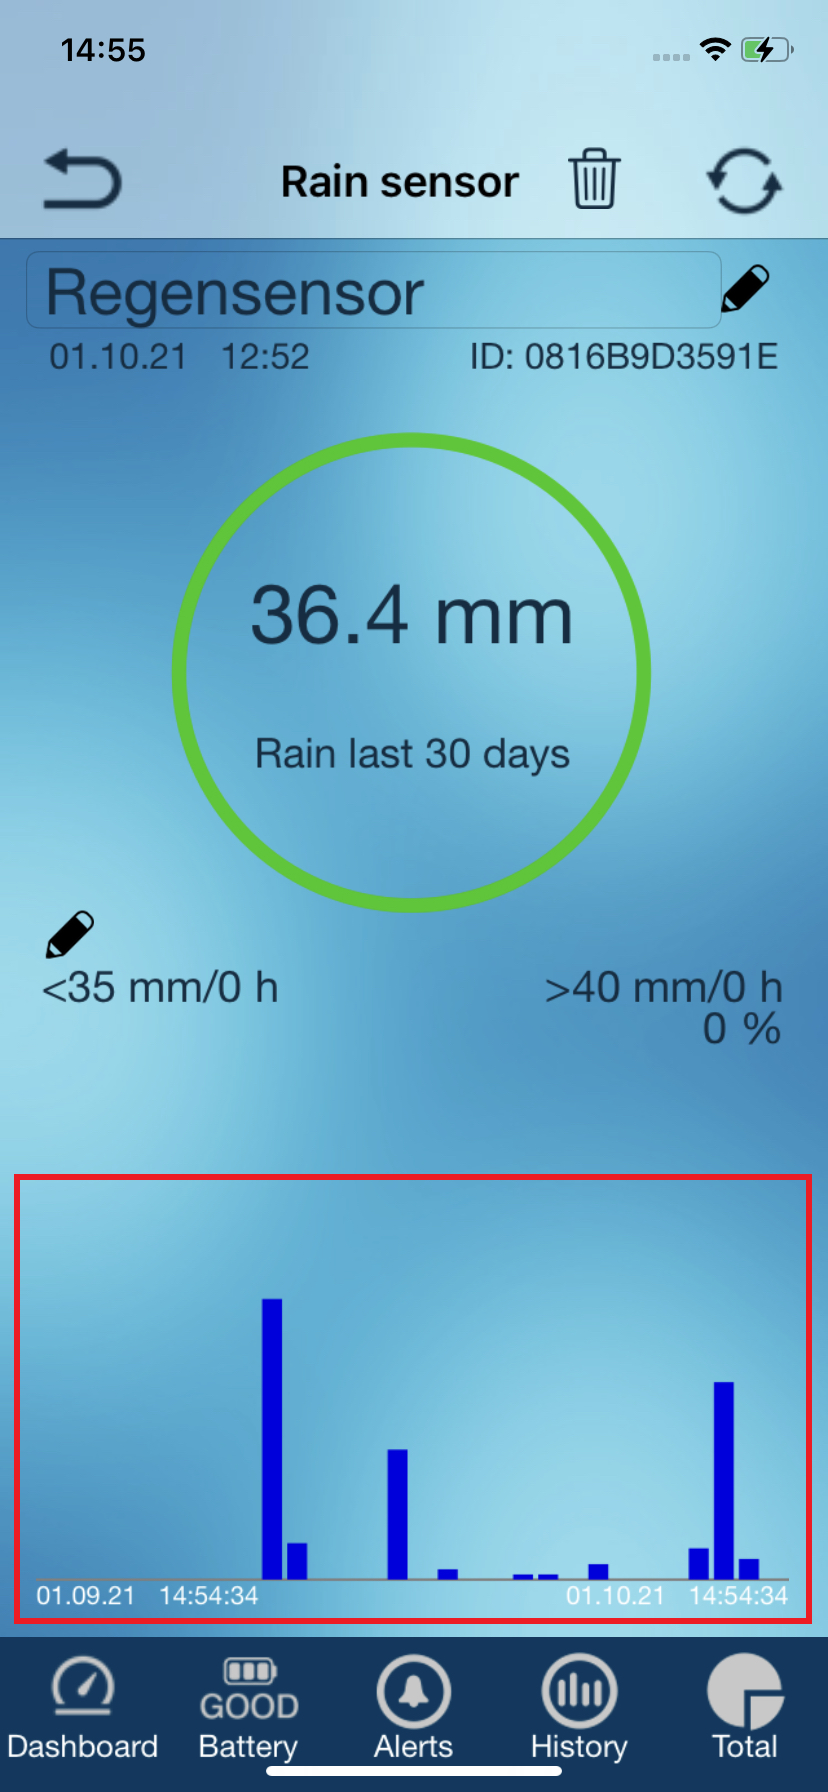
A diagram applicable to the certain period is displayed in the lower part. The periods are always exact, the value of the last hour is exactly 60 minutes back.
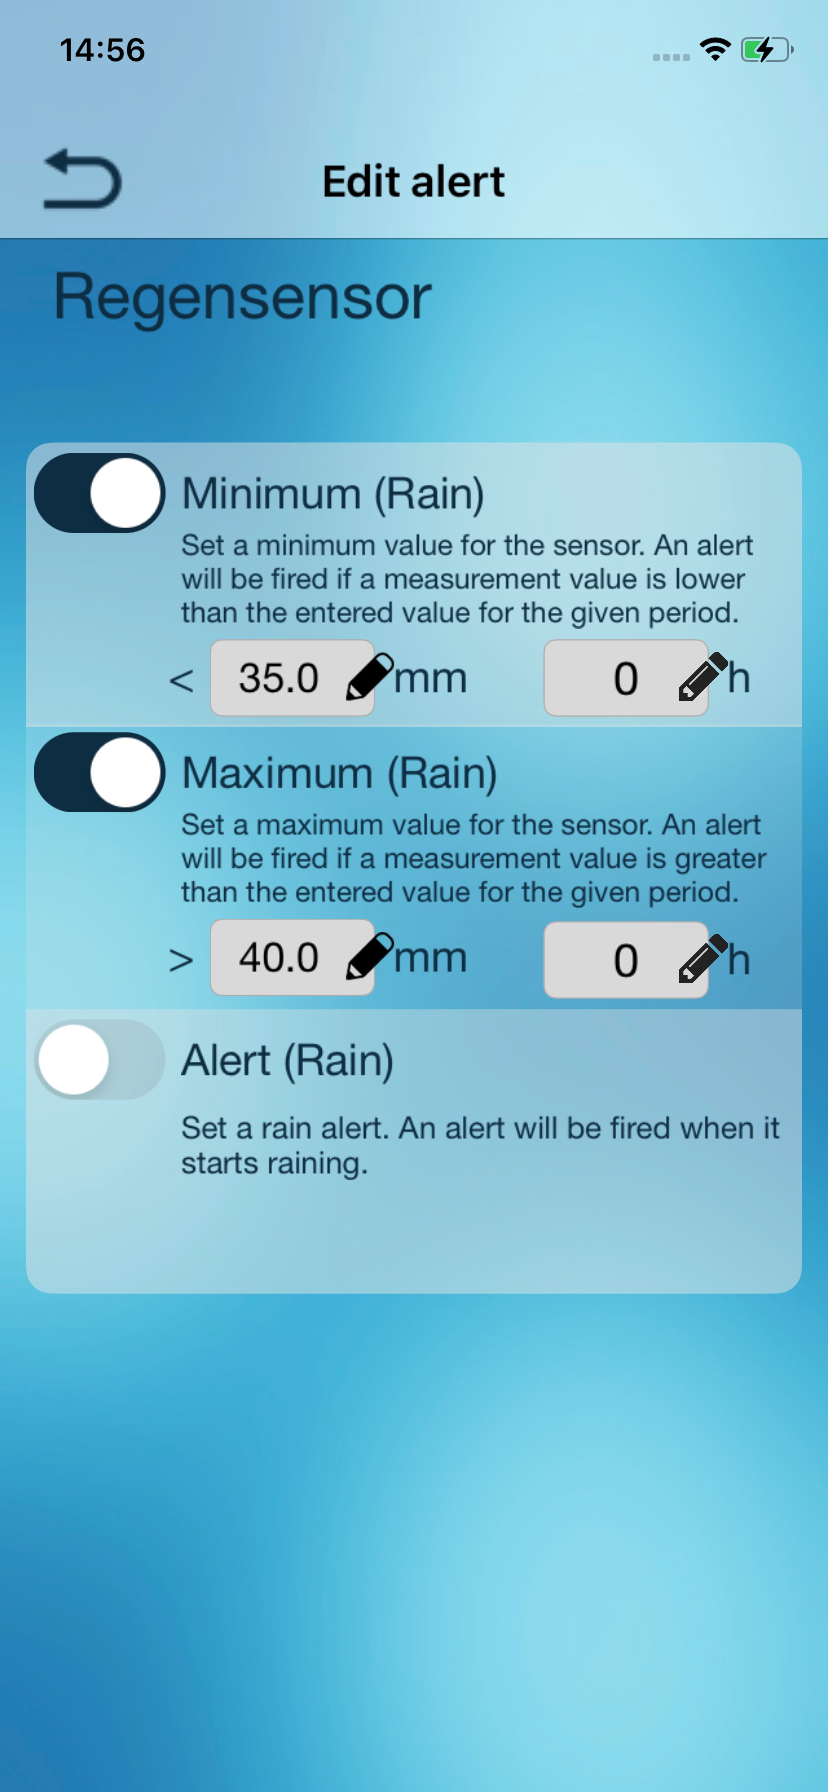
The following alarms can be activated here:
- Minimum Rain (Minimum period is 24h)
- Maximum Rain (Minimum period is 1h)
- Alert (Rain)
If the maximum alarm has been activated, the counting of the rain and the hours begin from the time of activation.
The percentage in the sensor view below the Maximum (rain) alarm indicates to how much the alarm threshold is reached in %. At 50% the color of the circle in the sensor view changes from green to yellow, at 75% from yellow to orange and at 95% from orange to red.
If the alarm threshold is reached, a push message is sent and the count of time and rain amount is reset to zero, the counting starts over again.
The Minimum and Maximum rain in x hours alarms are continuous alarms.
If, for example, Minimum (rain) is activated and set for a period of 24 h, a push message is sent when the alarm value has been reached, until the alarm is deactivated, for every 24 hours.
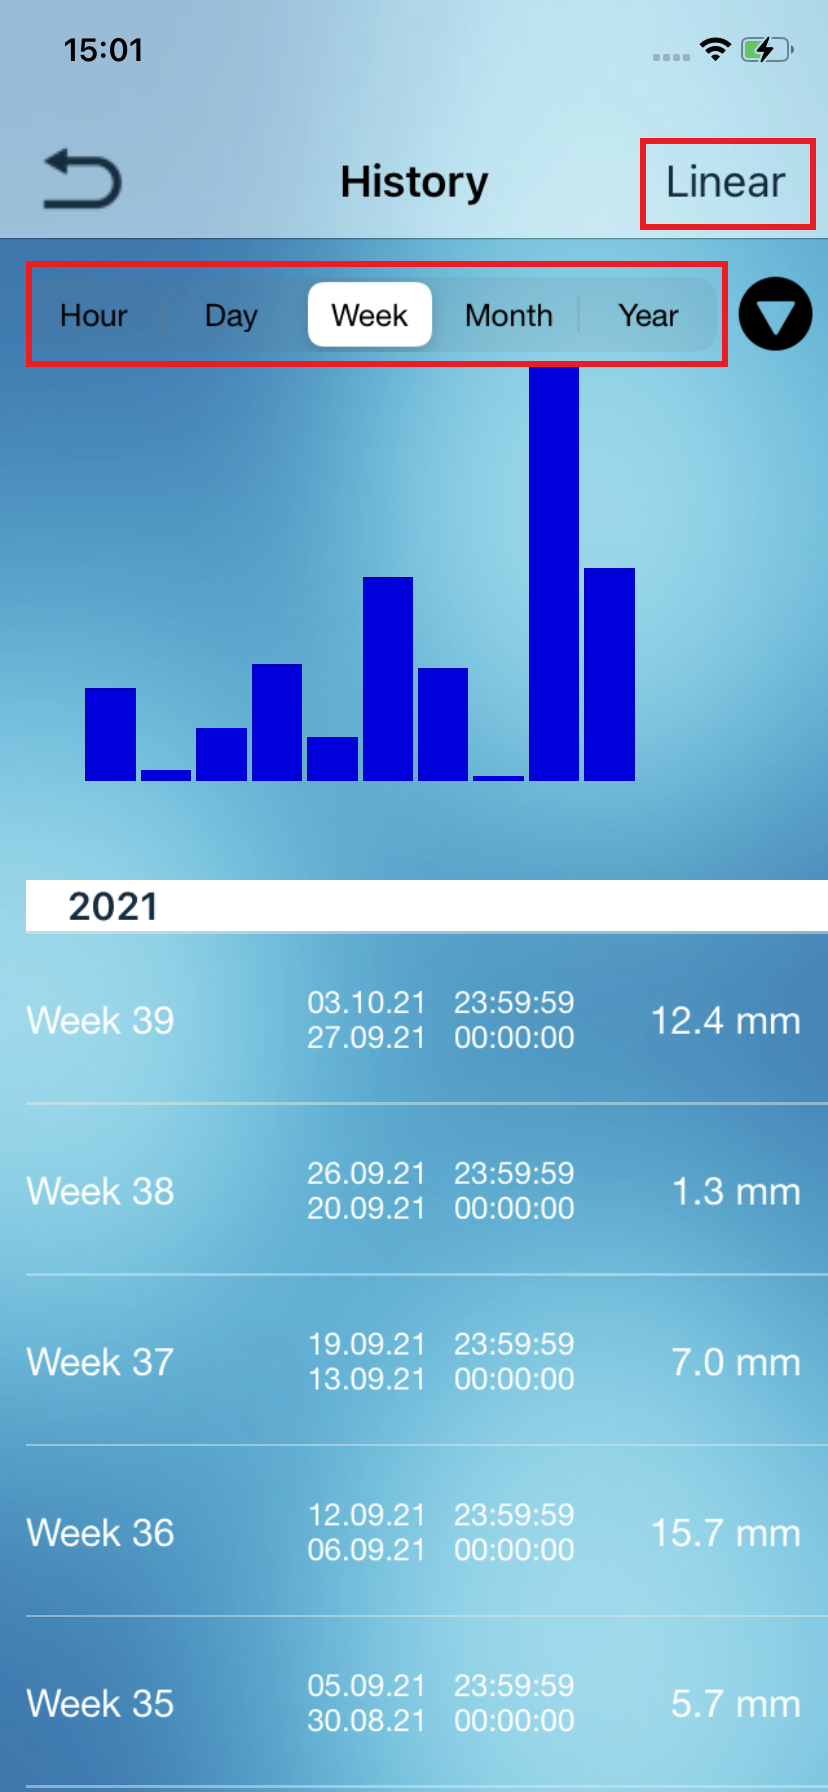
Tapping Logarithmic or linear, you can switch between the views.
Tap the various periods of time to display them.
Tap the arrow to sort the data ascending or descending.
You can scroll through the bar graph from left to right.
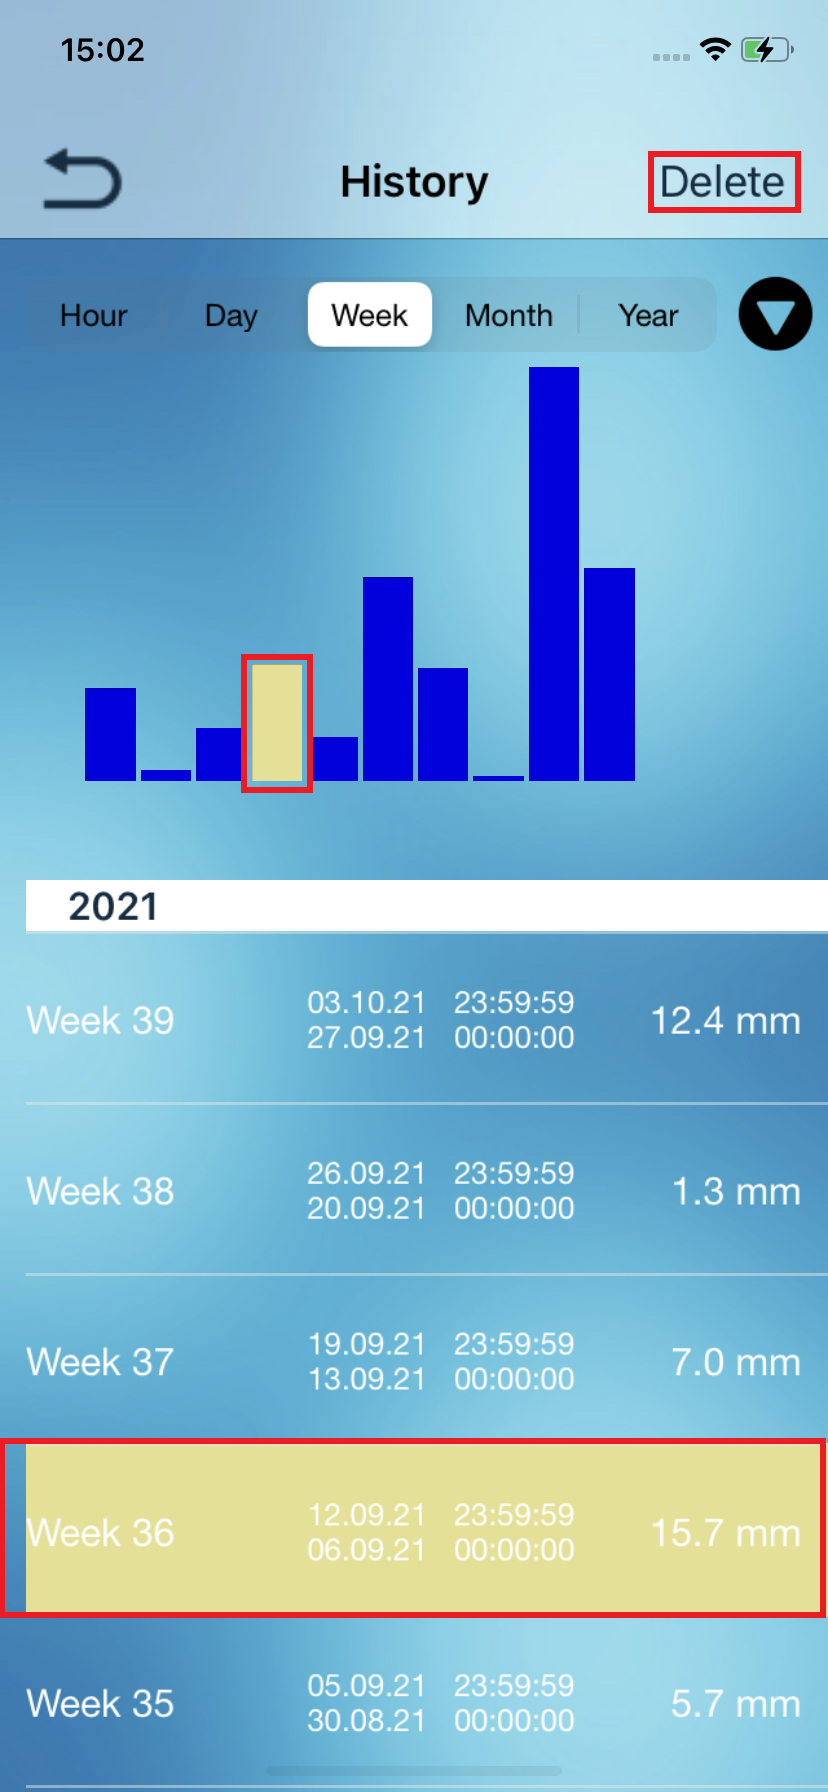
If you select a value by tapping, then the matching bar is highlighted in yellow.
If you want to choose a value far back in time, highlight the
record of the desired period of time in the year range. If you select
the next smaller unit of time now, for example, the month, the matching
period will be displayed automatically. Tap “Delete” on the top right,
to delete the selected value for the selected period in the app.
In the day view you can select a detail view instead of deleting, it can be selected by tapping Details.
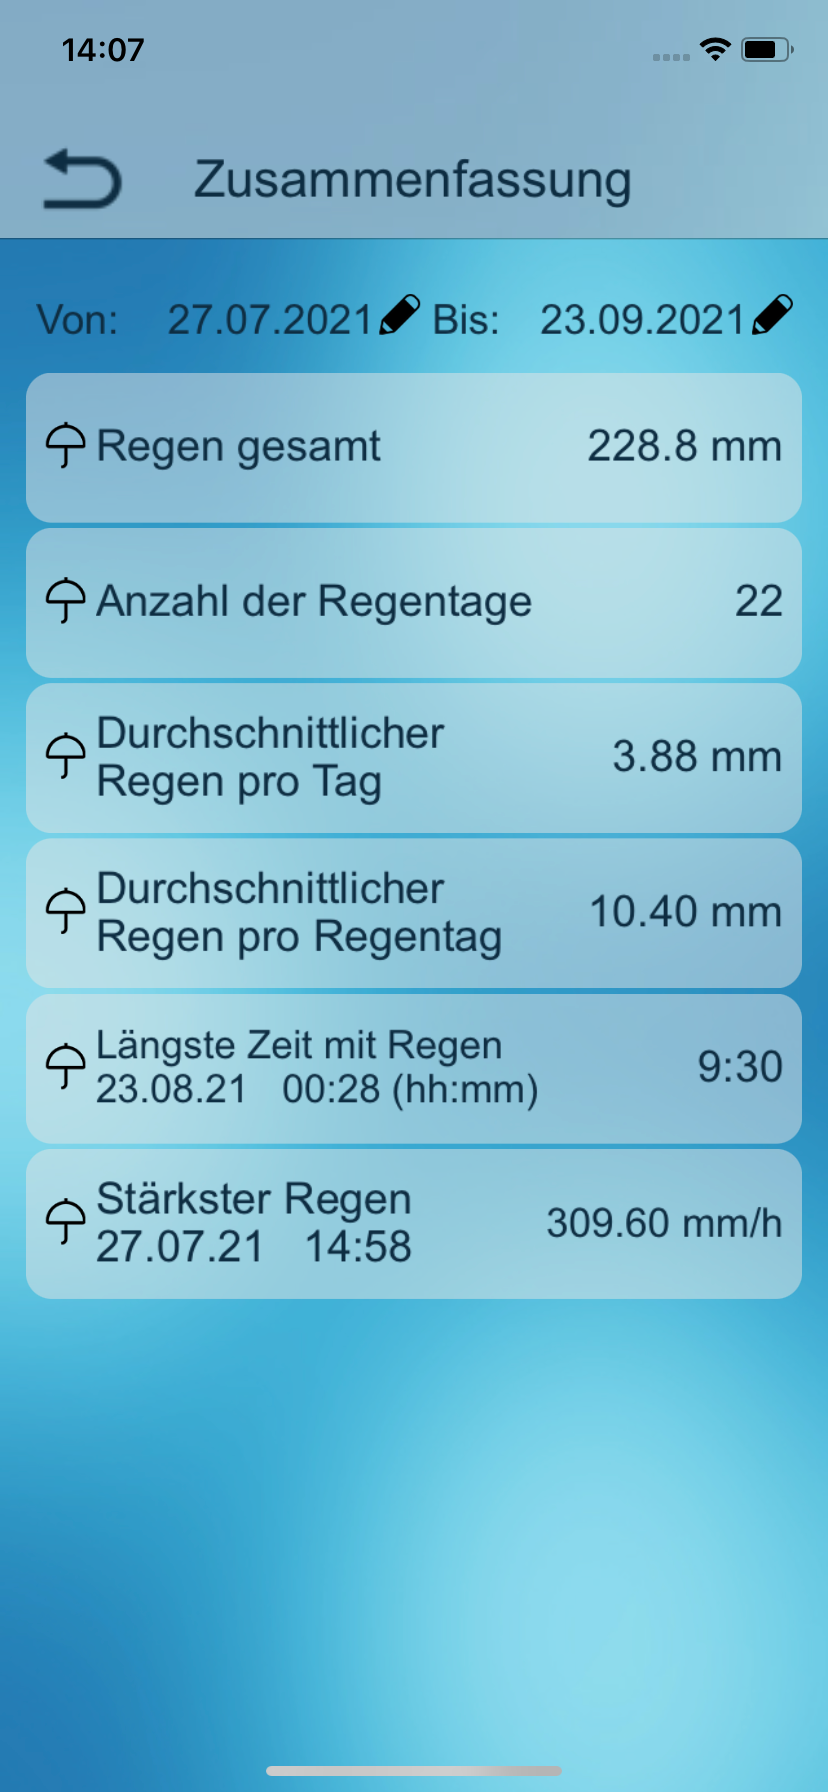
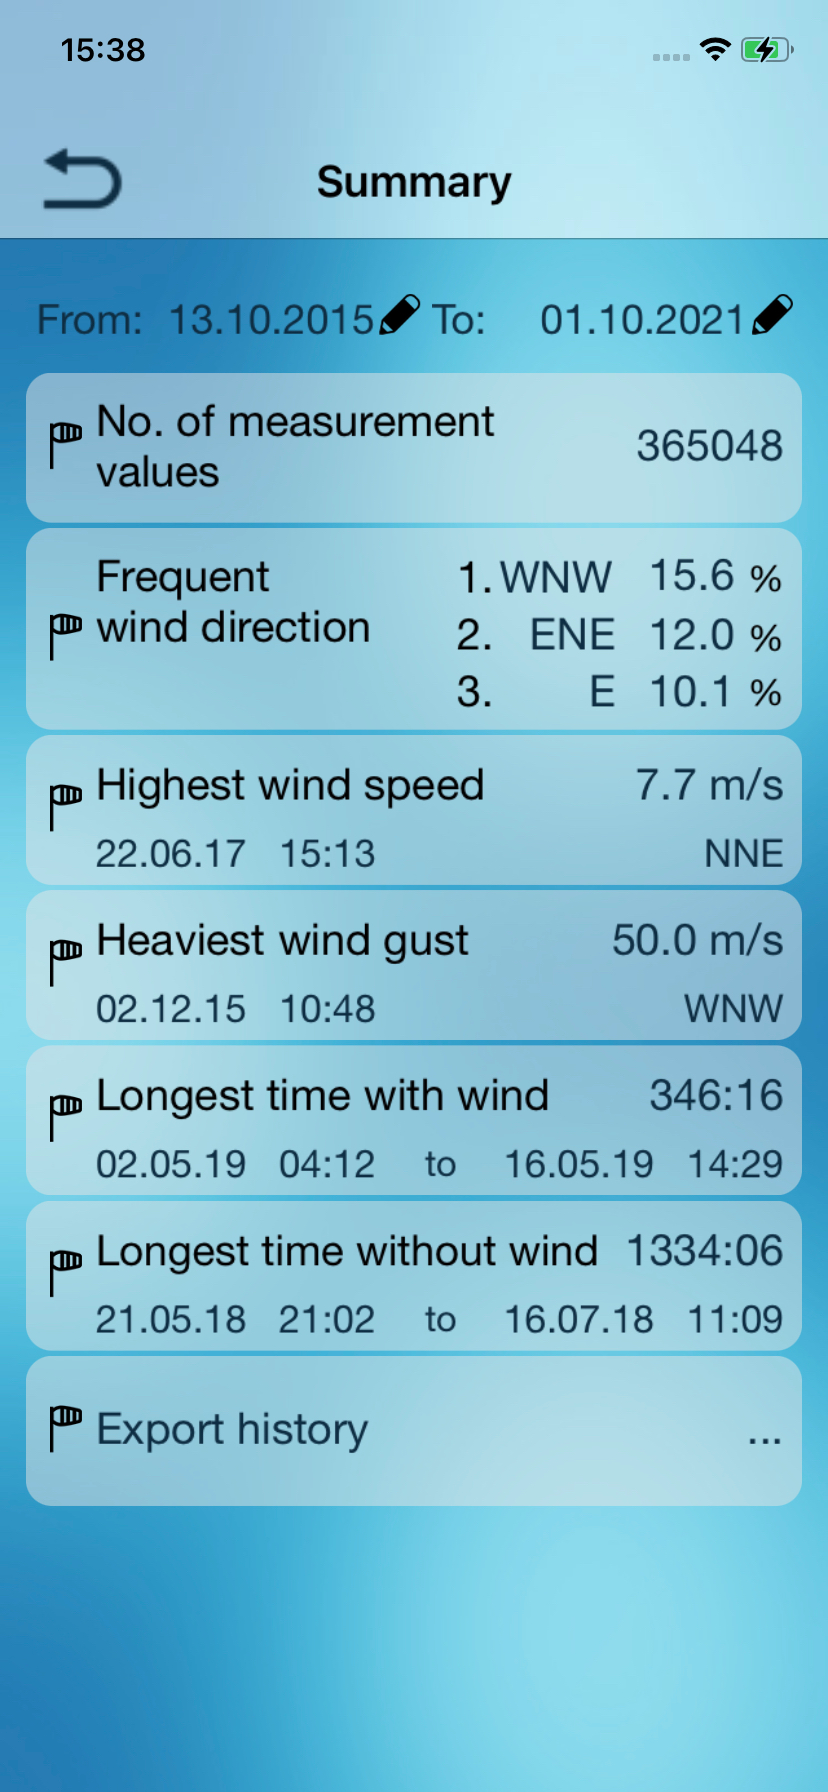
By tapping next to "From:" and "To:" You can select the time period of the summary.
Longest rain time specifies the time period in which the counter rocker turned at least every 2hours once.
Heaviest rain indicates when the intensity of the rain was most. The
value of mm / h is calculated by the time interval between two rocker
beats, extrapolated to a value when this intensity had continued for
one hour.
Data transfer from older rain sensors
If you select your rain sensor in the dashboard and click on the "Summary" button, you can click on "Add data from an older sensor" at the very bottom.
In the menu you can now select your old sensor, if it is in your dashboard. If the old sensor is no longer in your dashboard, add it via QR code
(or if you have lost the QR code, you can add it manually using the device ID).
If you also no longer have the device ID, it is not possible to link the data.
Only the data from 2 sensors can be linked. If you have more than two rain sensors, you have the option of linking the sensors in a chain.
For example, if you have 3 sensors, you can transfer the data from sensor 1 to sensor 2, which will then be seen as the total data from sensor 2. Then you link sensor 2 with sensor 3.
In this way you can transfer the data from sensor 1 AND 2 to sensor 3.
MA 10660
Anemometer
Master ID0B
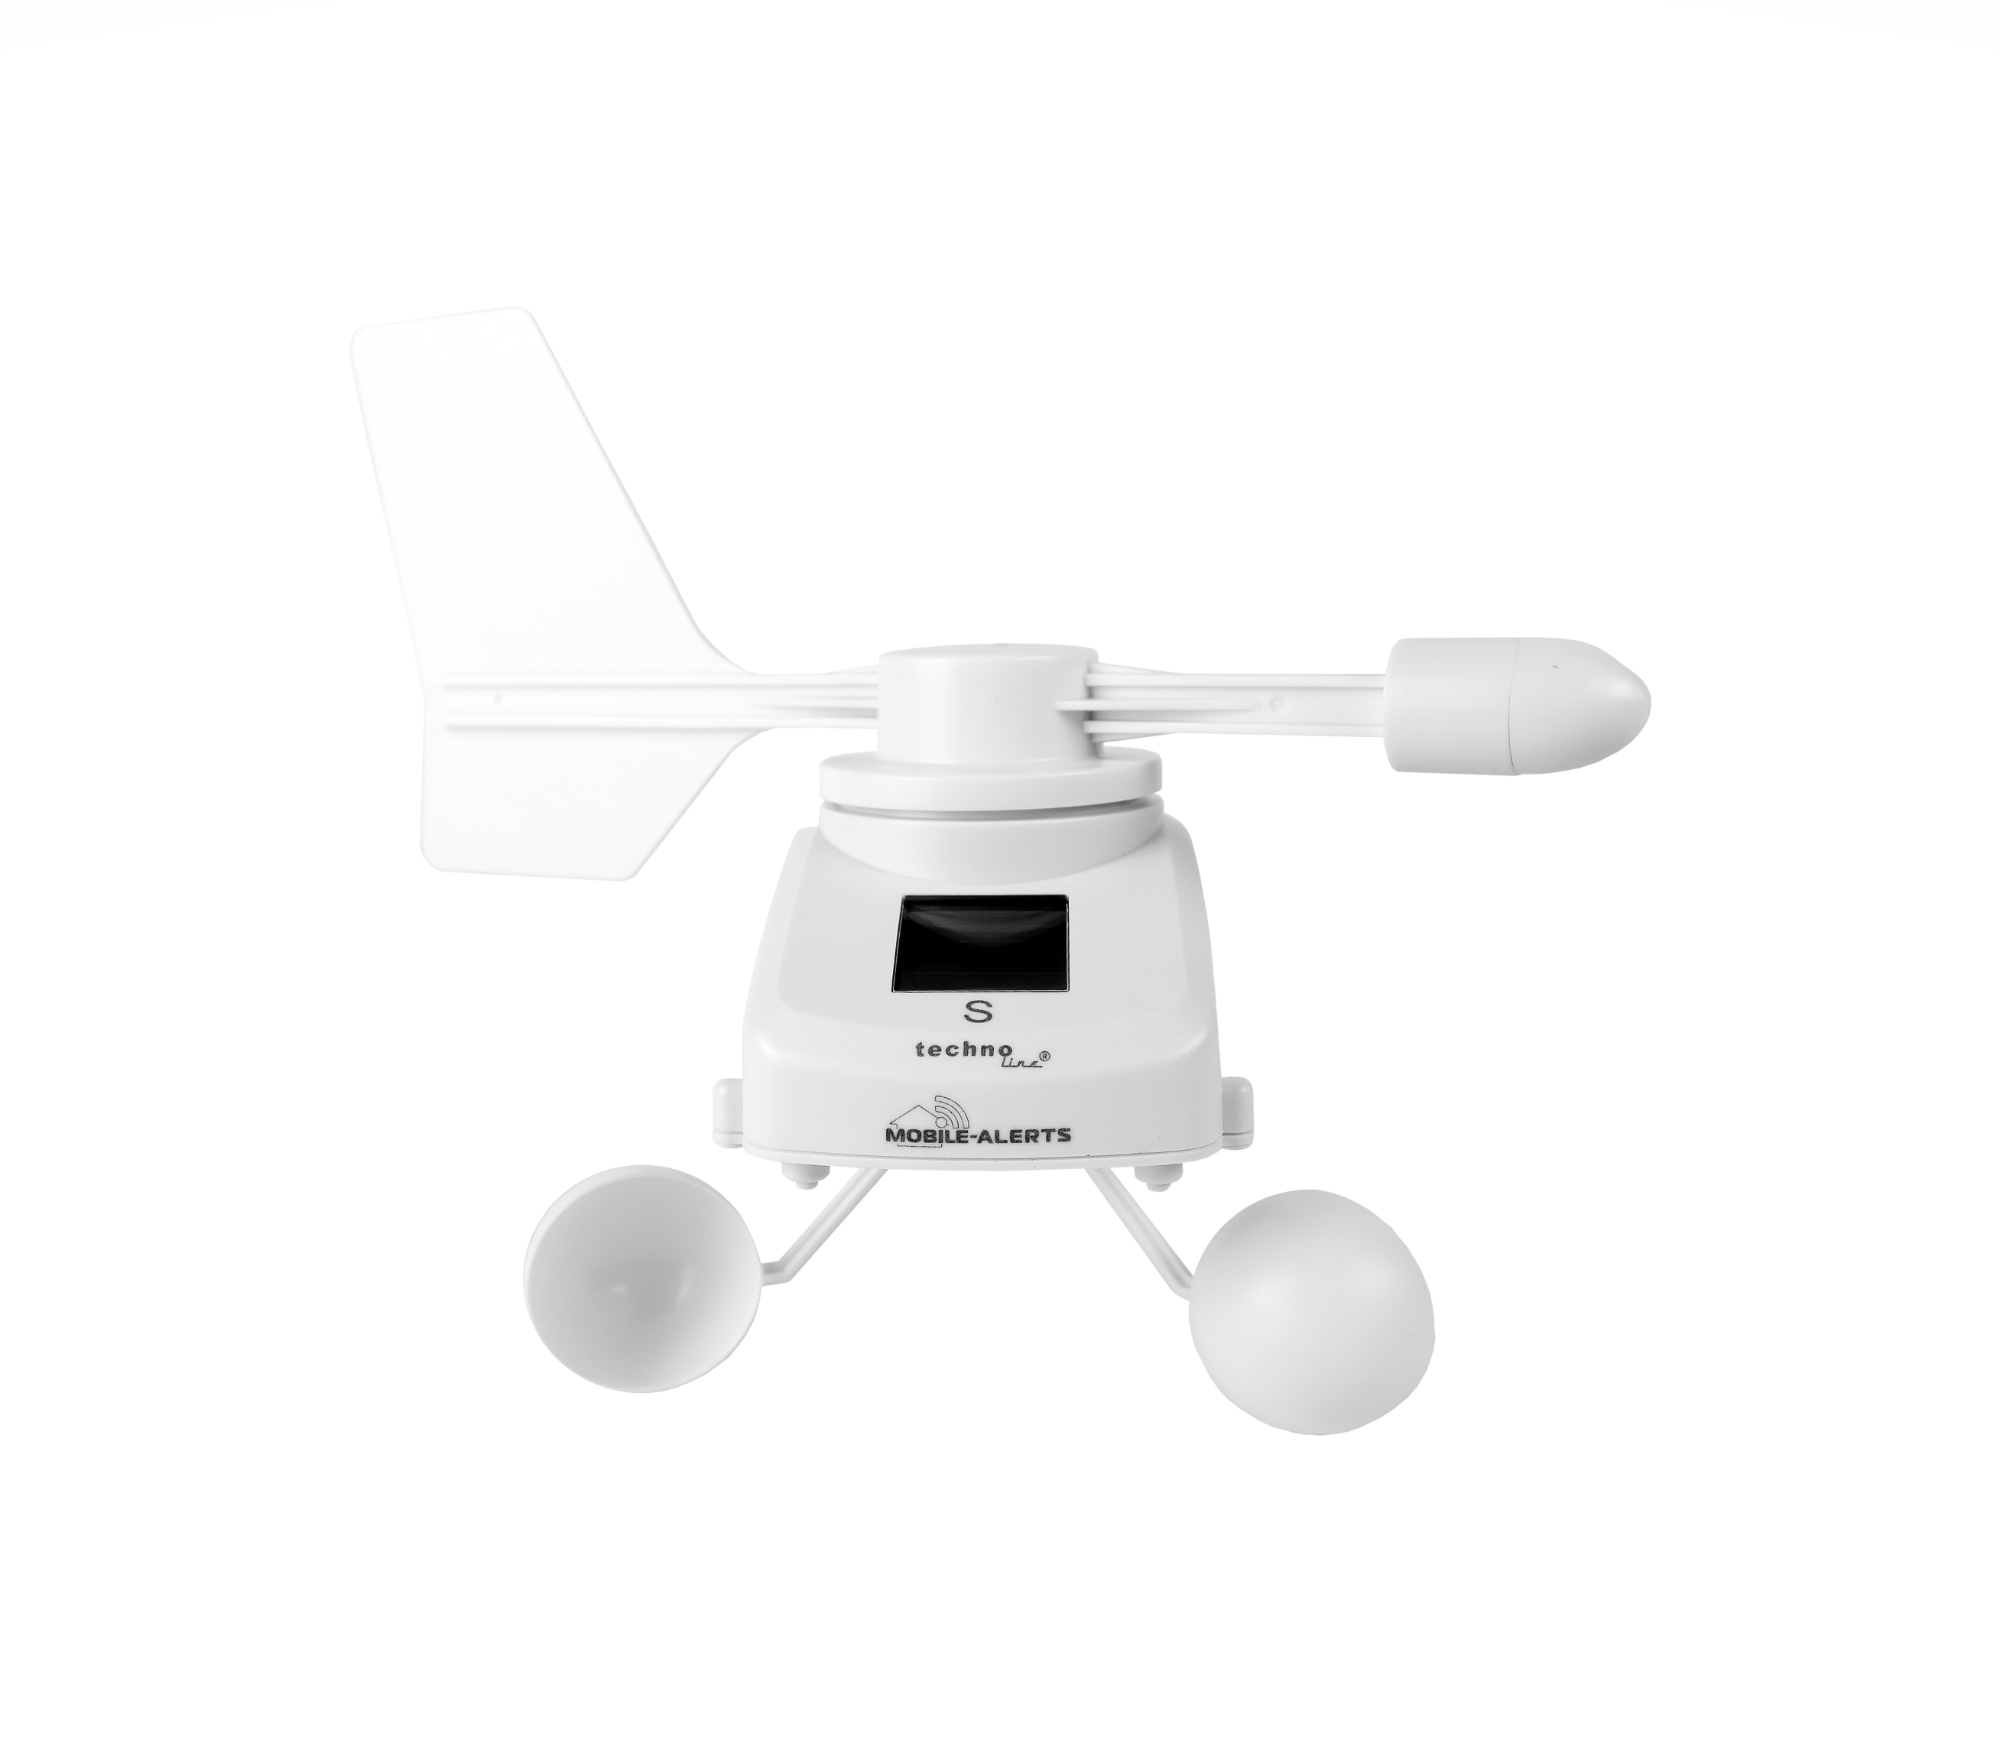
Application
Sensor for monitoring wind direction and wind strength.
Technical data
Power supply:
Solar / accumulator
Measuring wind direction:
0 - 180km/h
Accuracy wind direction:
0,36km/h
Measurement intervals:
7 minutes
Transmission range:
100m (open area)
Display in the app
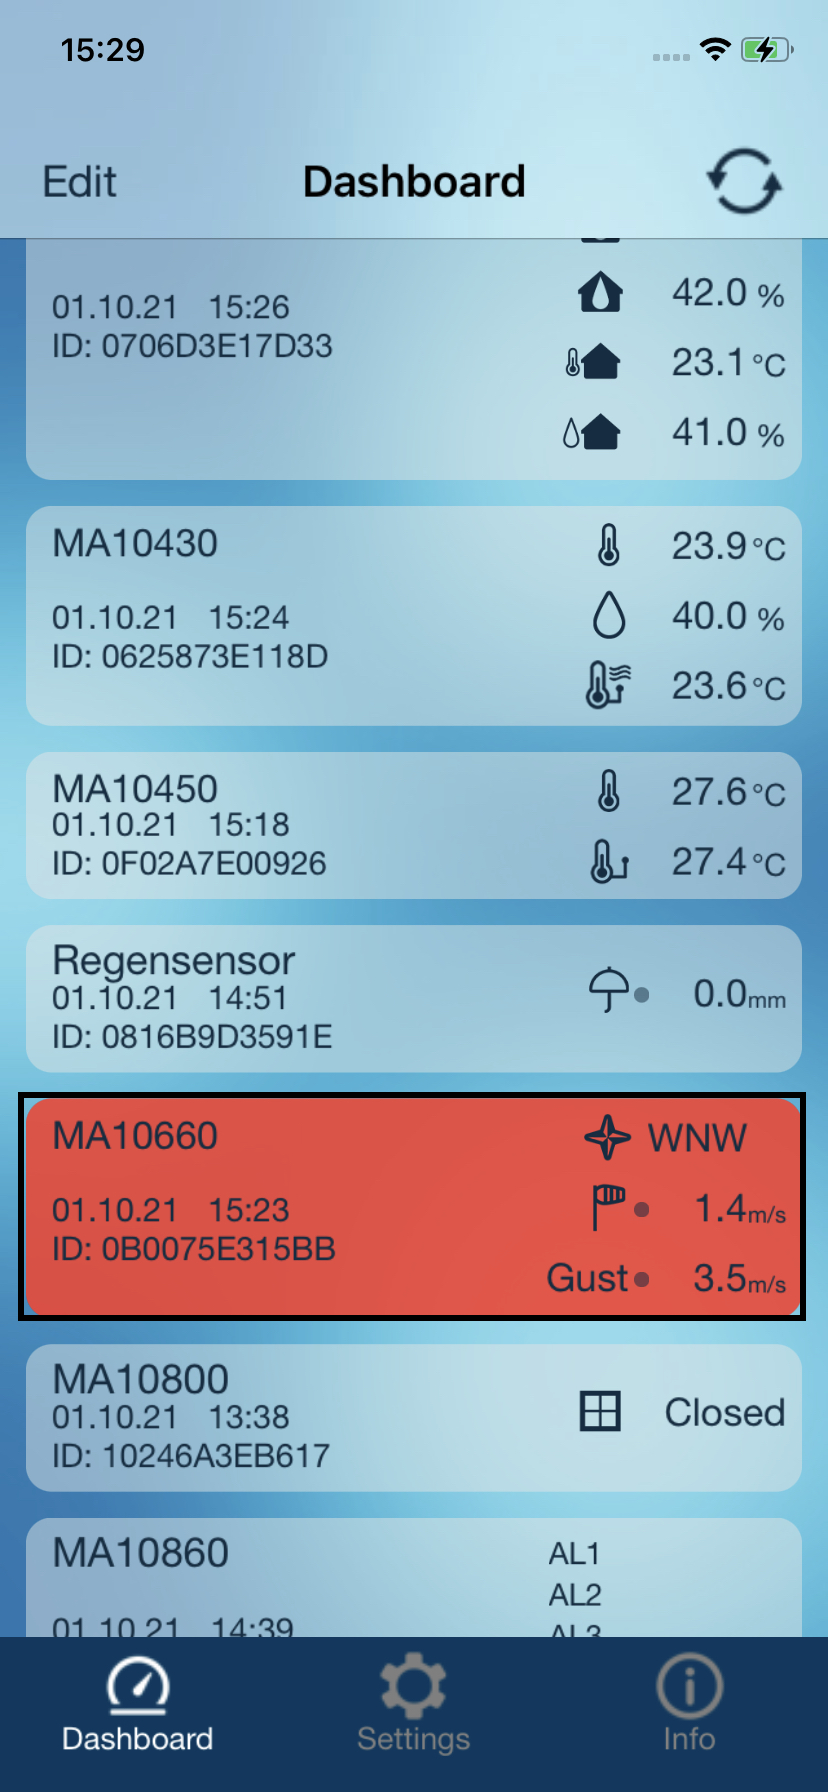
Touch the wind sensor field to enter the sensor menu.
In the dashboard the last measured wind direction, wind speed and gust are displayed.
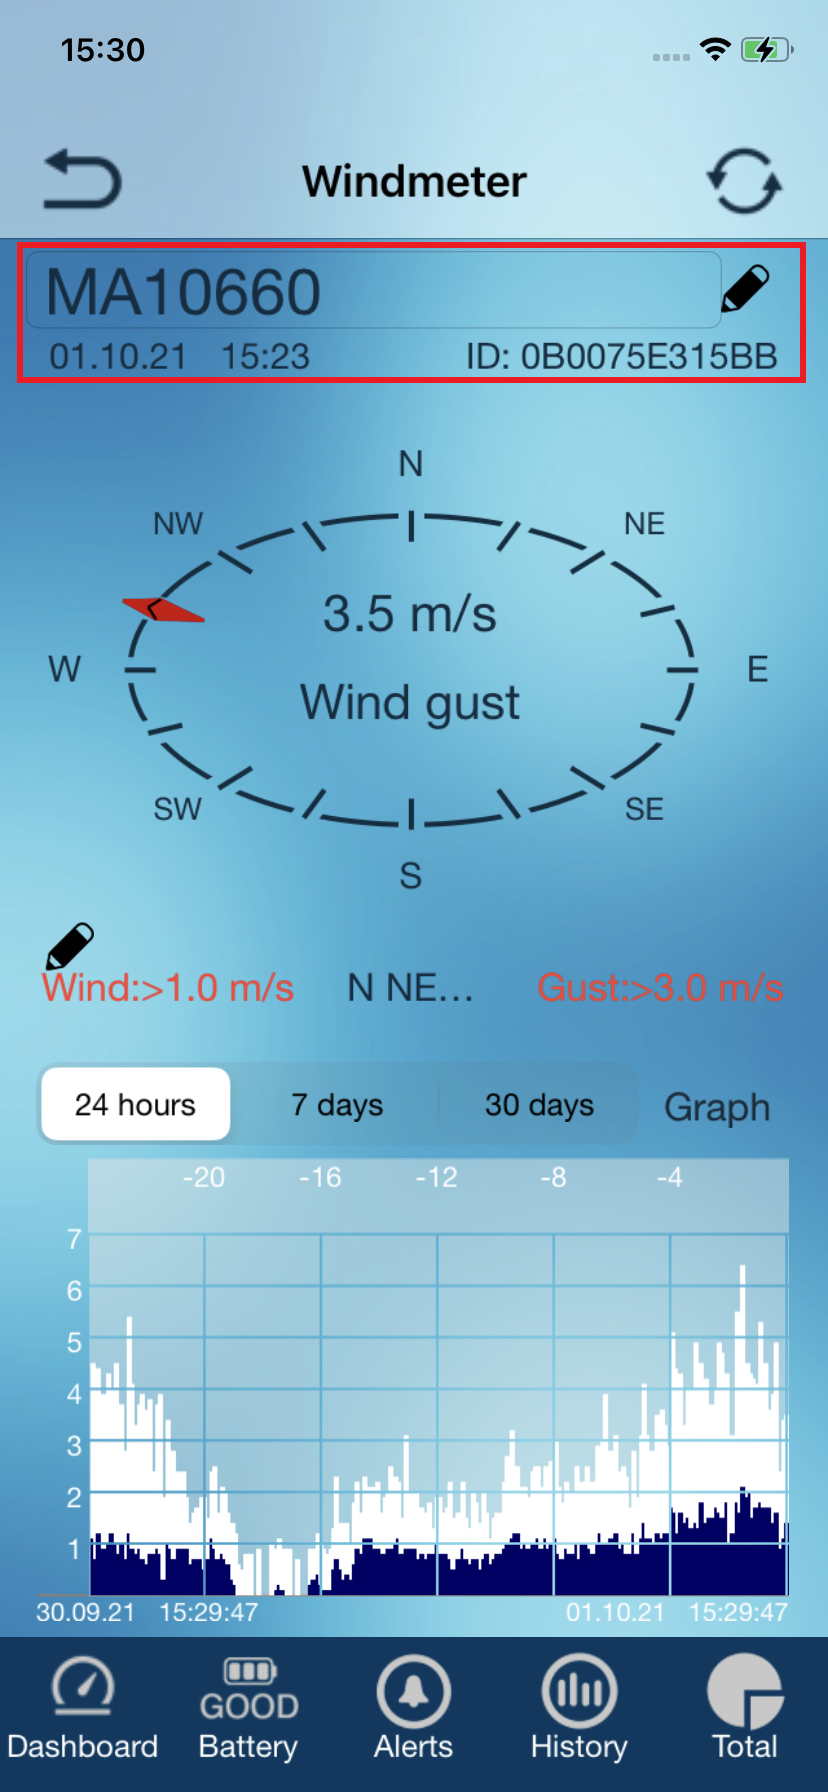
Touch the current label left to the pencil icon to change the name of the sensor.
You can see the time of the last rain sensor data reception and the sensor ID below.
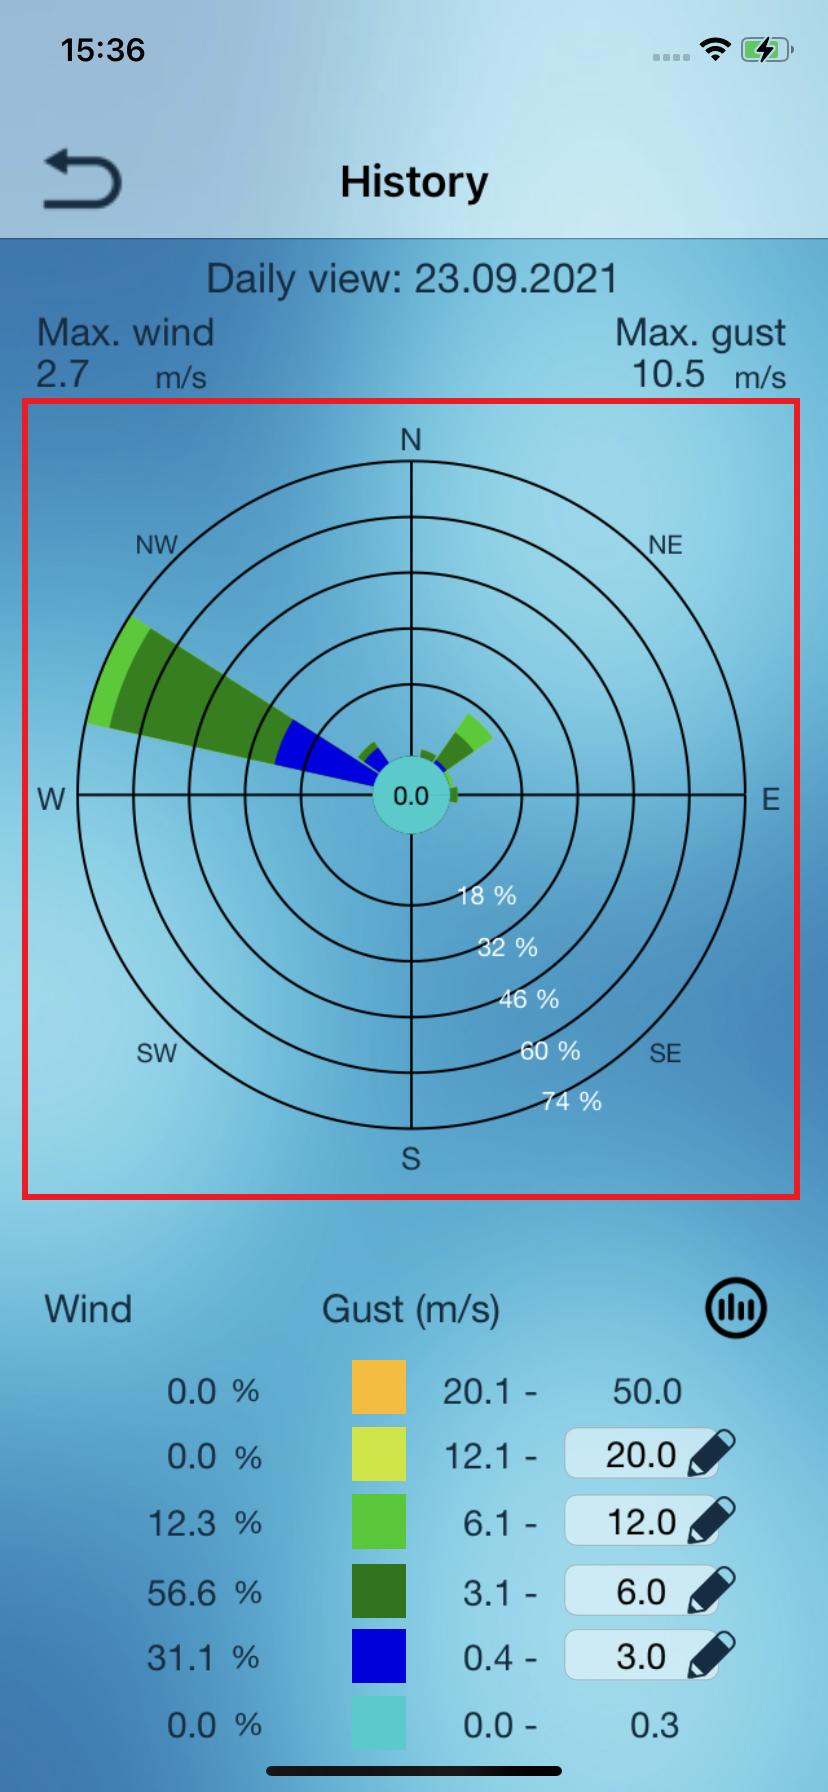
In the compass you can view the most recently measured wind direction, wind speed and gust display. Swipe to the right or left to switch between wind speed, wind gust and direction. The unit can be selected in settings menu between kn, mph, km / h and m / s. The red arrow indicates the last measured wind direction, the green arrows show previous directions.
The wind sensor measures 21 times within 7 minutes, the measured values are transmitted every 7 minutes. The app displays the most occurring wind direction, as well as an average of the measured wind speeds and the highest speed as gust which occurred within the measurement time.
In the compass the following data are displayed scrollable from left to right:
"Wind speed"
"Gust"
"Wind direction"
Below the compass is the line for the alarms.
Tap "Add Alert" on to enter the alarm settings.
On the left is wind speed
alert value, on the right gust alert value and in the middle the alert
for currently chosen wind directions are displayed. Symbols are only
visible when the respective alarm is activated.
At the bottom a graphic is displayed for the wind speeds for the selected period. A graphic for the last 24 hours, 7 days or 30 days can be selected.
By longer touching the diagram, you can display the measured values for the selected time in the compass rose. The selected period will be marked by a vertical red line.The values for wind speed / gust of wind, the date and time of
measurement and the wind direction will be displayed in the compass rose.
The following alarms can be activated here:
- Select wind direction:
selected for which wind directions wind speed and / or wind gusts alarms are generated - Wind speed
- Wind gust
- Period while no new alert is triggered.
If an alert value is exceeded, no new alert is triggered for the selected time period after. This encloses all chose wind directions. Time periods for wind speed and wind gust are counted separately.
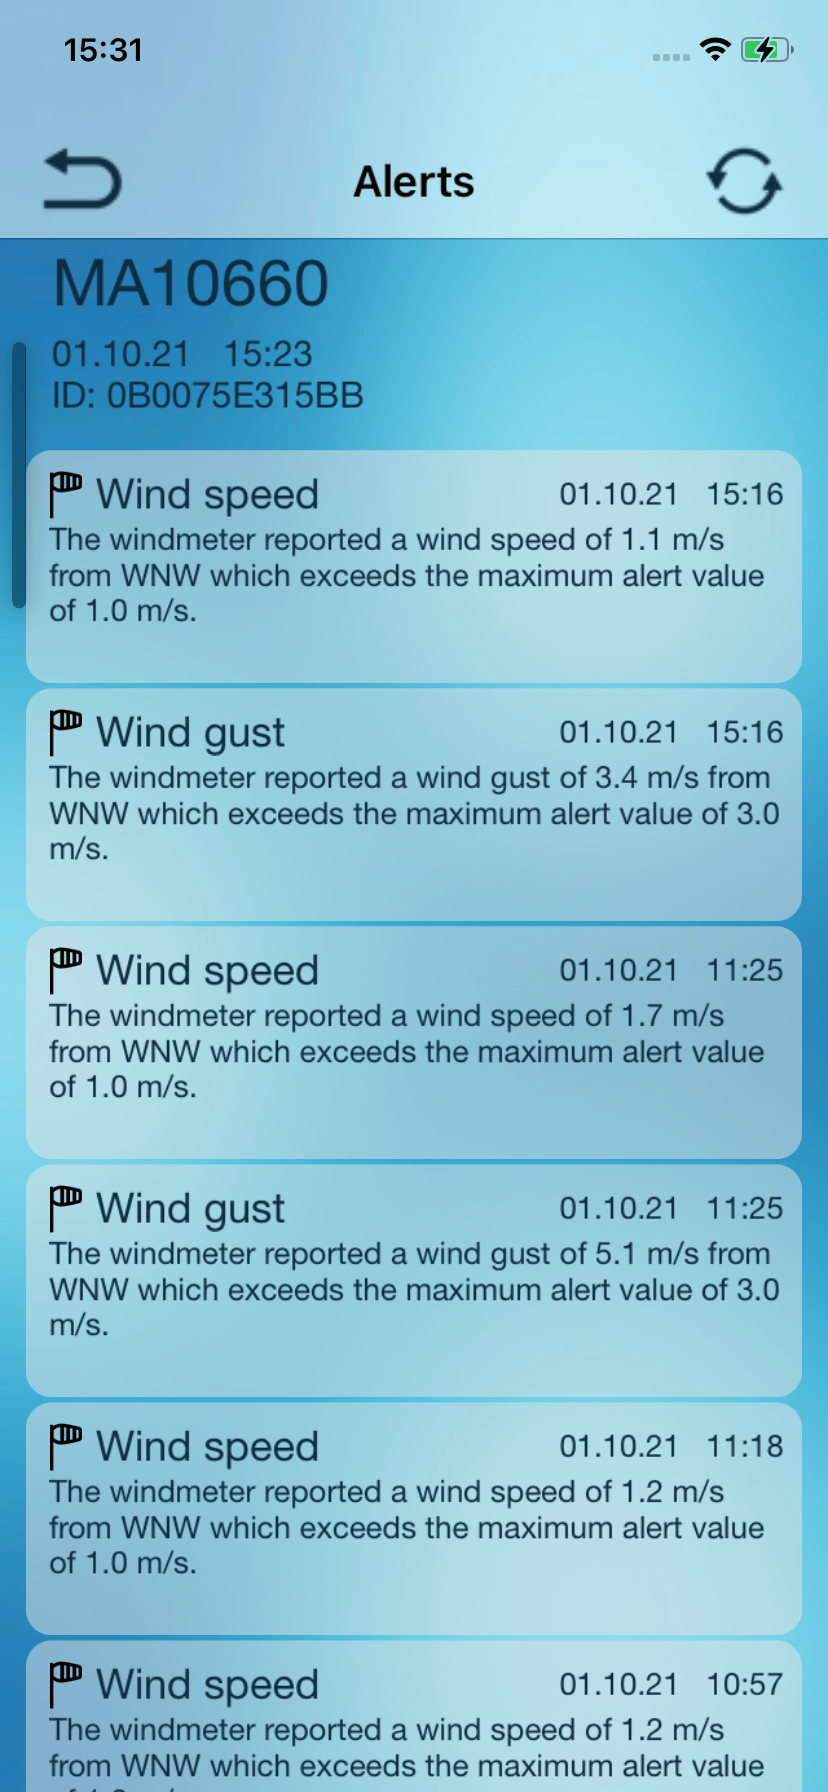
Recent alerts are displayed here.
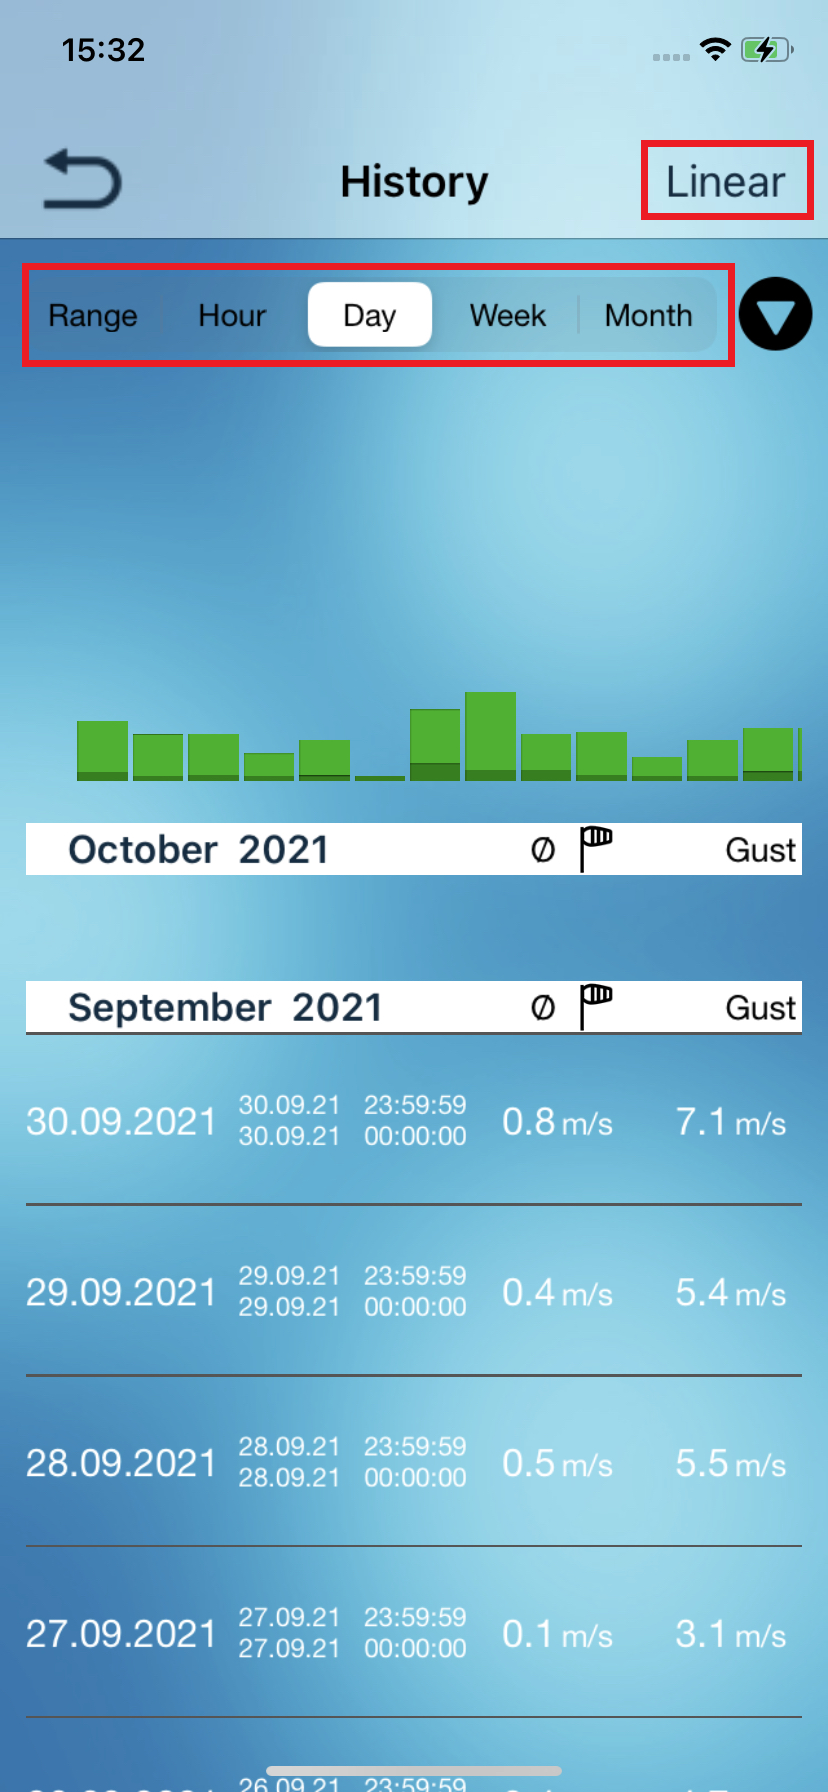
Tapping Logarithmic or linear, you can switch between the views.
Tap the various periods of time to display them.
The period section “Range” displays, after selecting a graphical summary of the measured wind direction, speed and gusts and their percentage for an adjustable
period. A more detailed description can be found below in the "Graph" section and "Range".
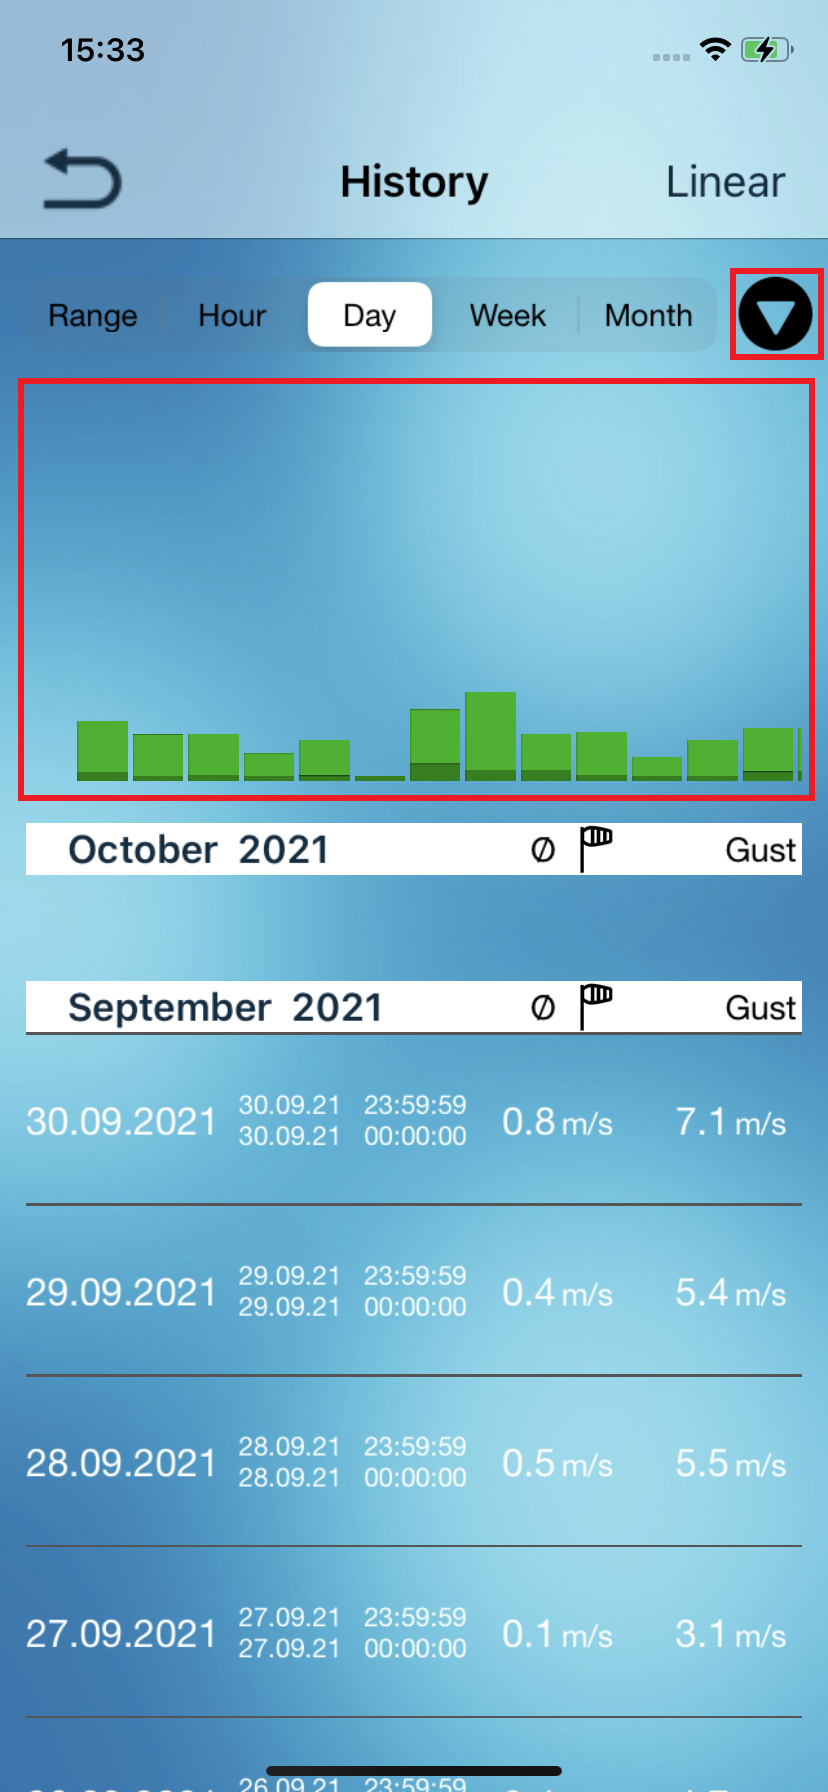
Tap the arrow to sort the data ascending or descending.
You can scroll through the bar graph from left to right.
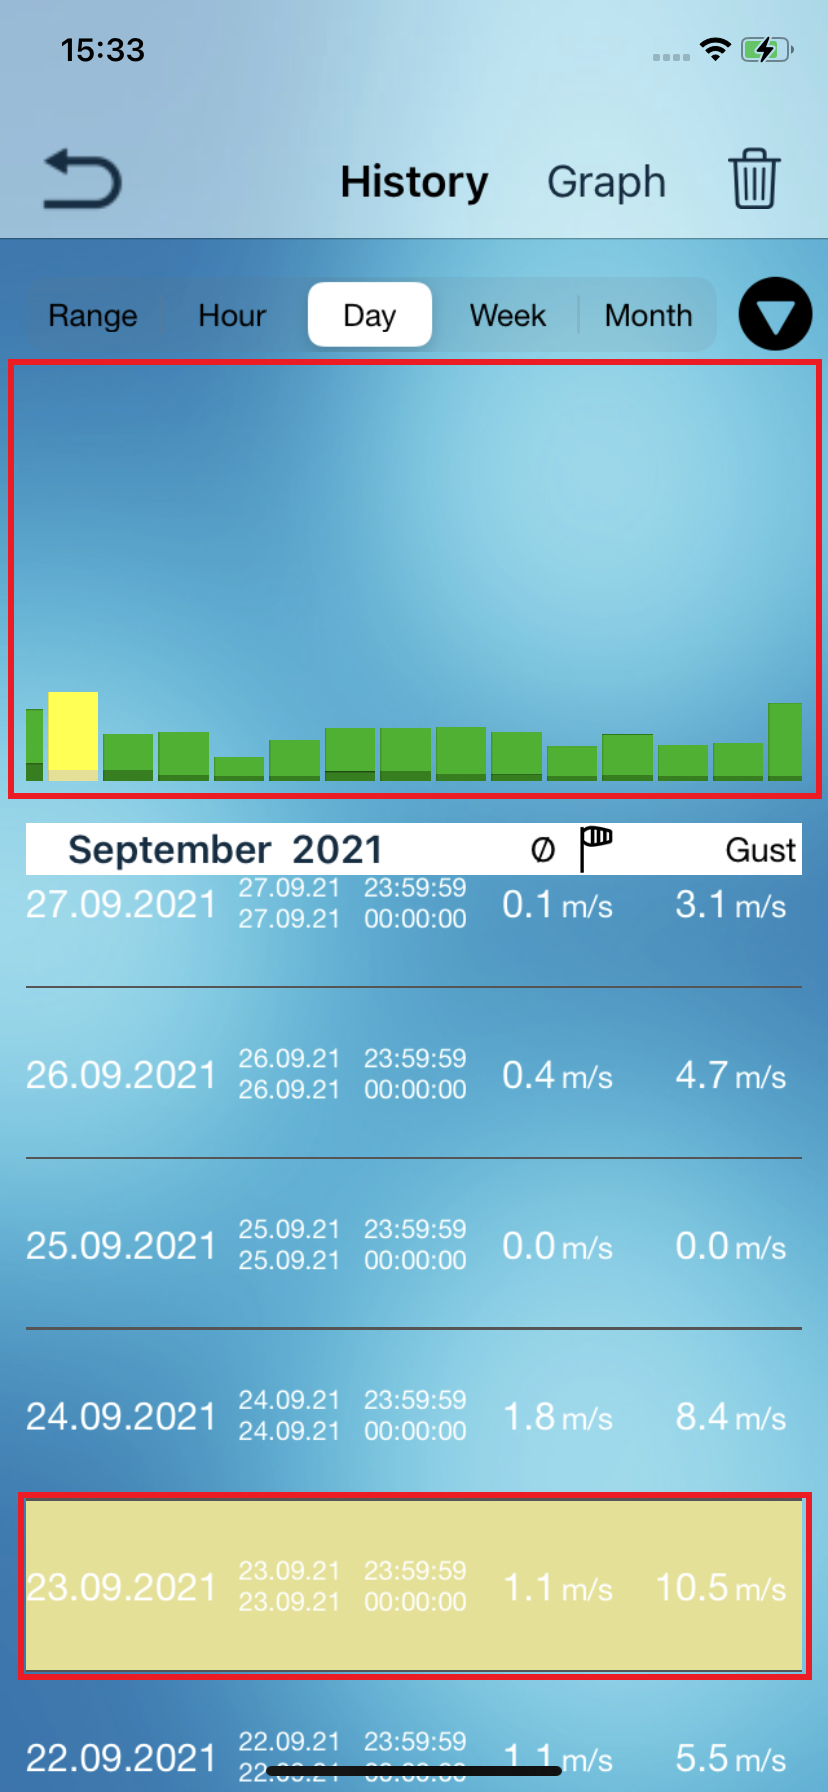
If you select a value by tapping, then the matching bar is highlighted in yellow. If you select a value by tapping, then the matching bar is highlighted in yellow.
If you want to choose a value far back in time, highlight the record of the desired period of time in the year range. If you select the next smaller unit of time now,
for example, the month, the matching period will be displayed automatically.
Tap on the bin in the top right, to delete the selected value for the selected period in the app.
Tap, after a value or bar was highlighted, on "Graph" to display a graphical summary of measured wind directions, speeds and gusts and their percentage for the selected
period.
At the top you can see the time period of the values represented graphically, and witin this period occurred maximum wind speed and gust.
Below is a graphic showing the overall share of wind speeds in the various wind directions and the overall proportion of wind directions occurred during the period. The percentage of wind directions can be read on the percentage figures,
which are located between "S" and "SO".
In the lower part there is an overview, where wind speed ranges can be assigned to specified colors. Tap the white box with the pencil icon to define a self-selected range for one color.
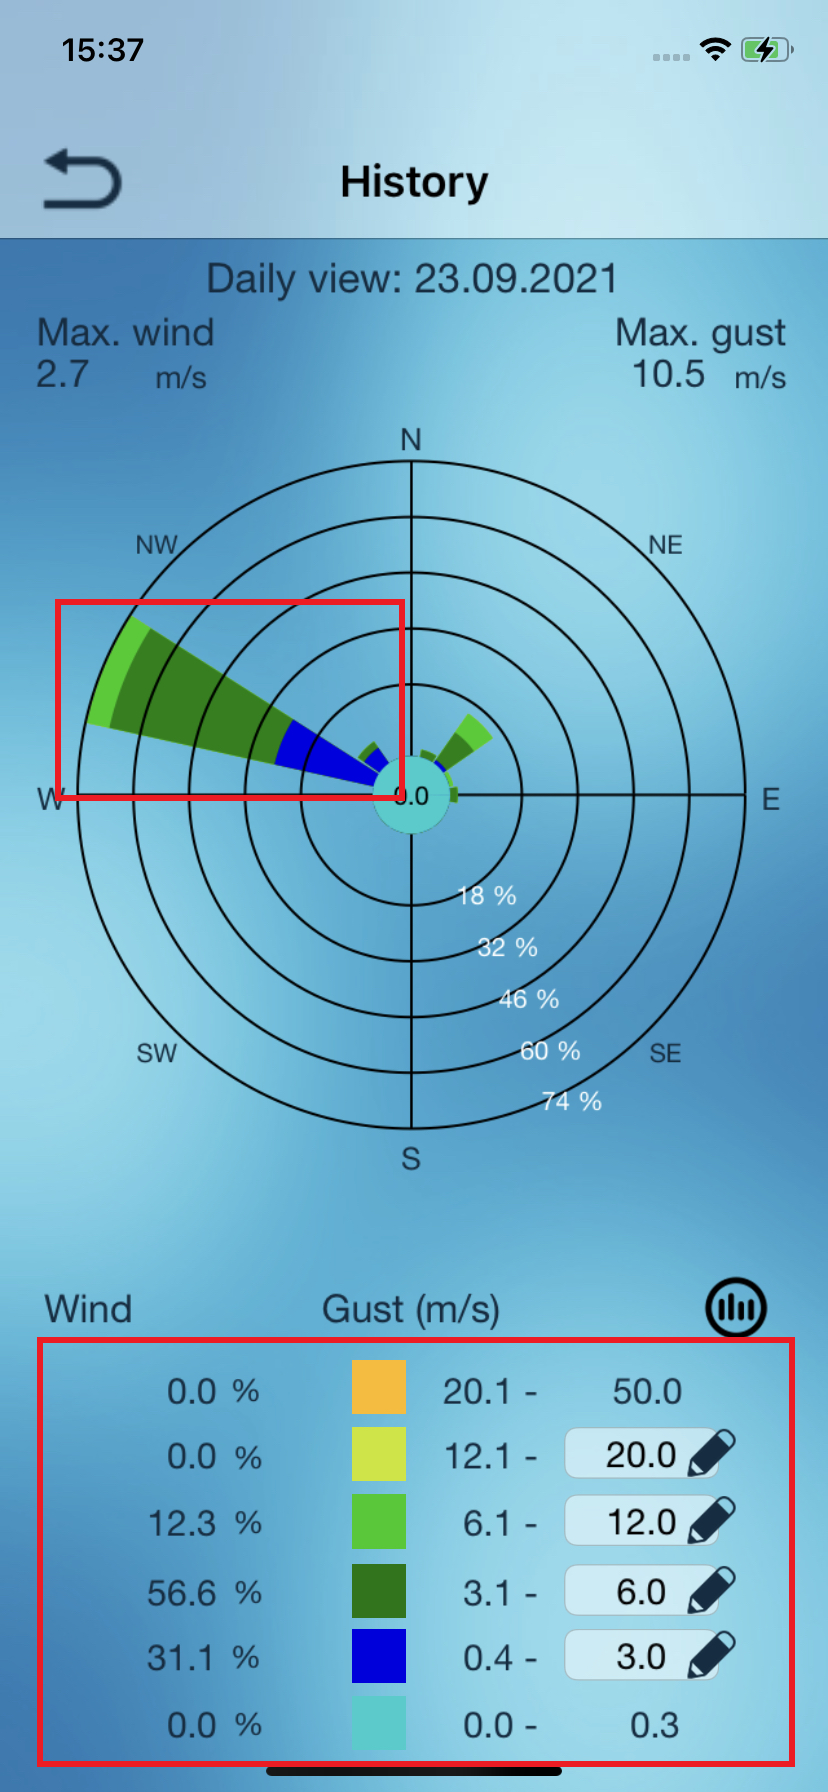
Tap a leg in the graphic, to display the percentage of wind speeds for the selected wind direction in the table below. Tap it again to unselect.
The displays in the "Range" view correspond to the informations of "Graph" view.
Here the time period can be chosen manually. Tap on the date, it appears a selection in order to define the start and end dates.
By tapping next to "From:" and "To:" You can select the time period of the summary.
Tap "Export History" to get the saved values as a .csv file by E-mail.
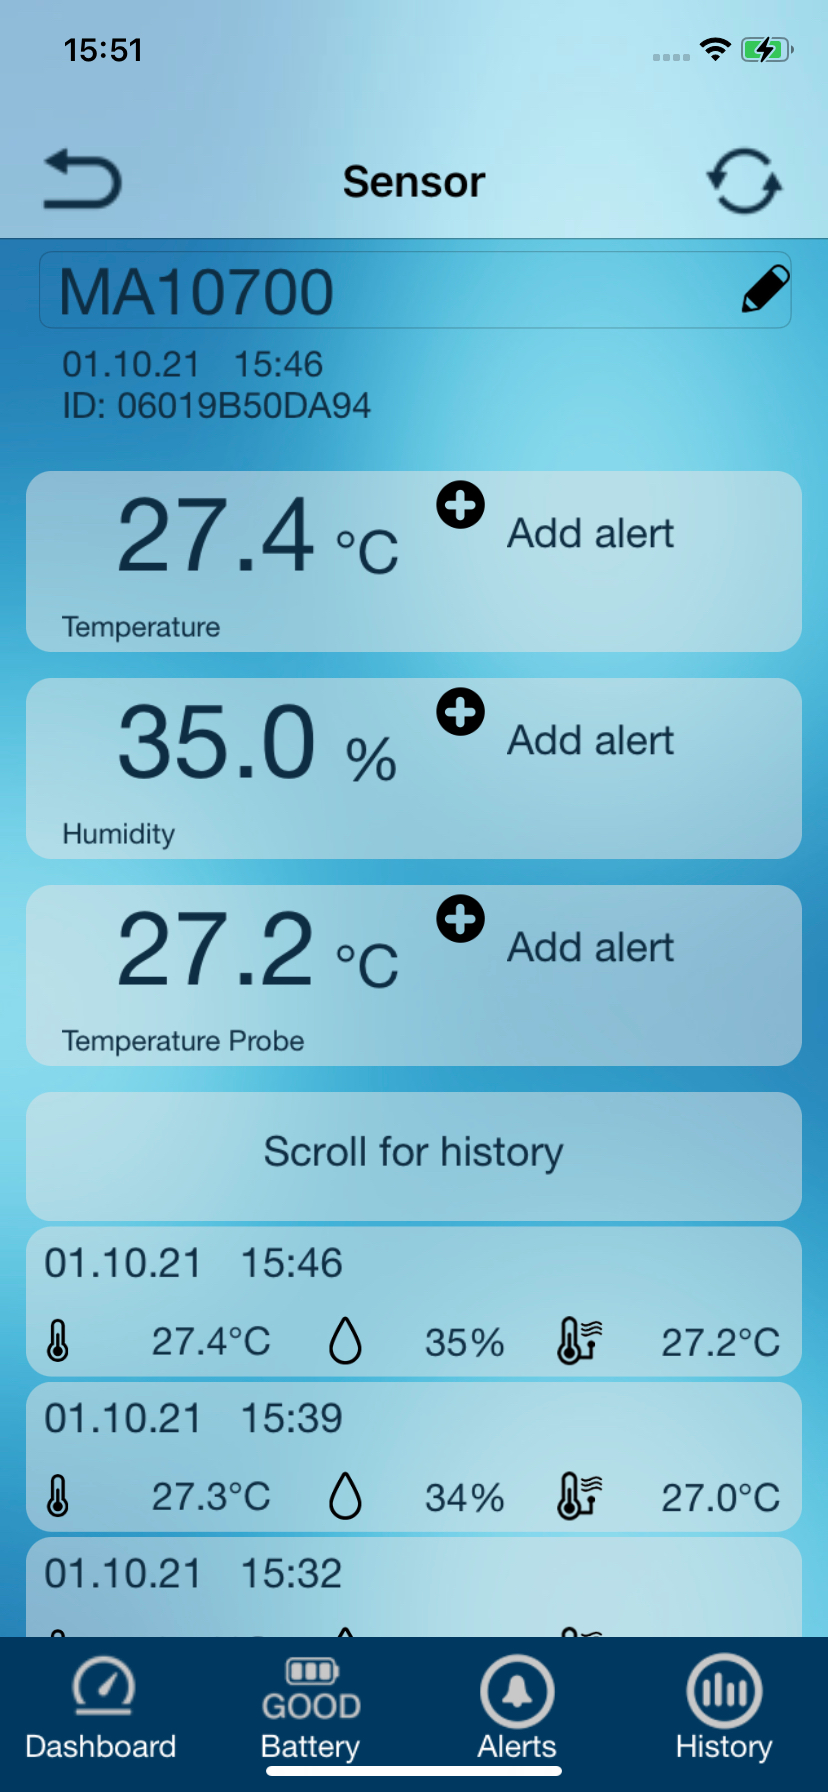
MA 10700
Thermo-hygro-sensor with pool sensor
Master ID06
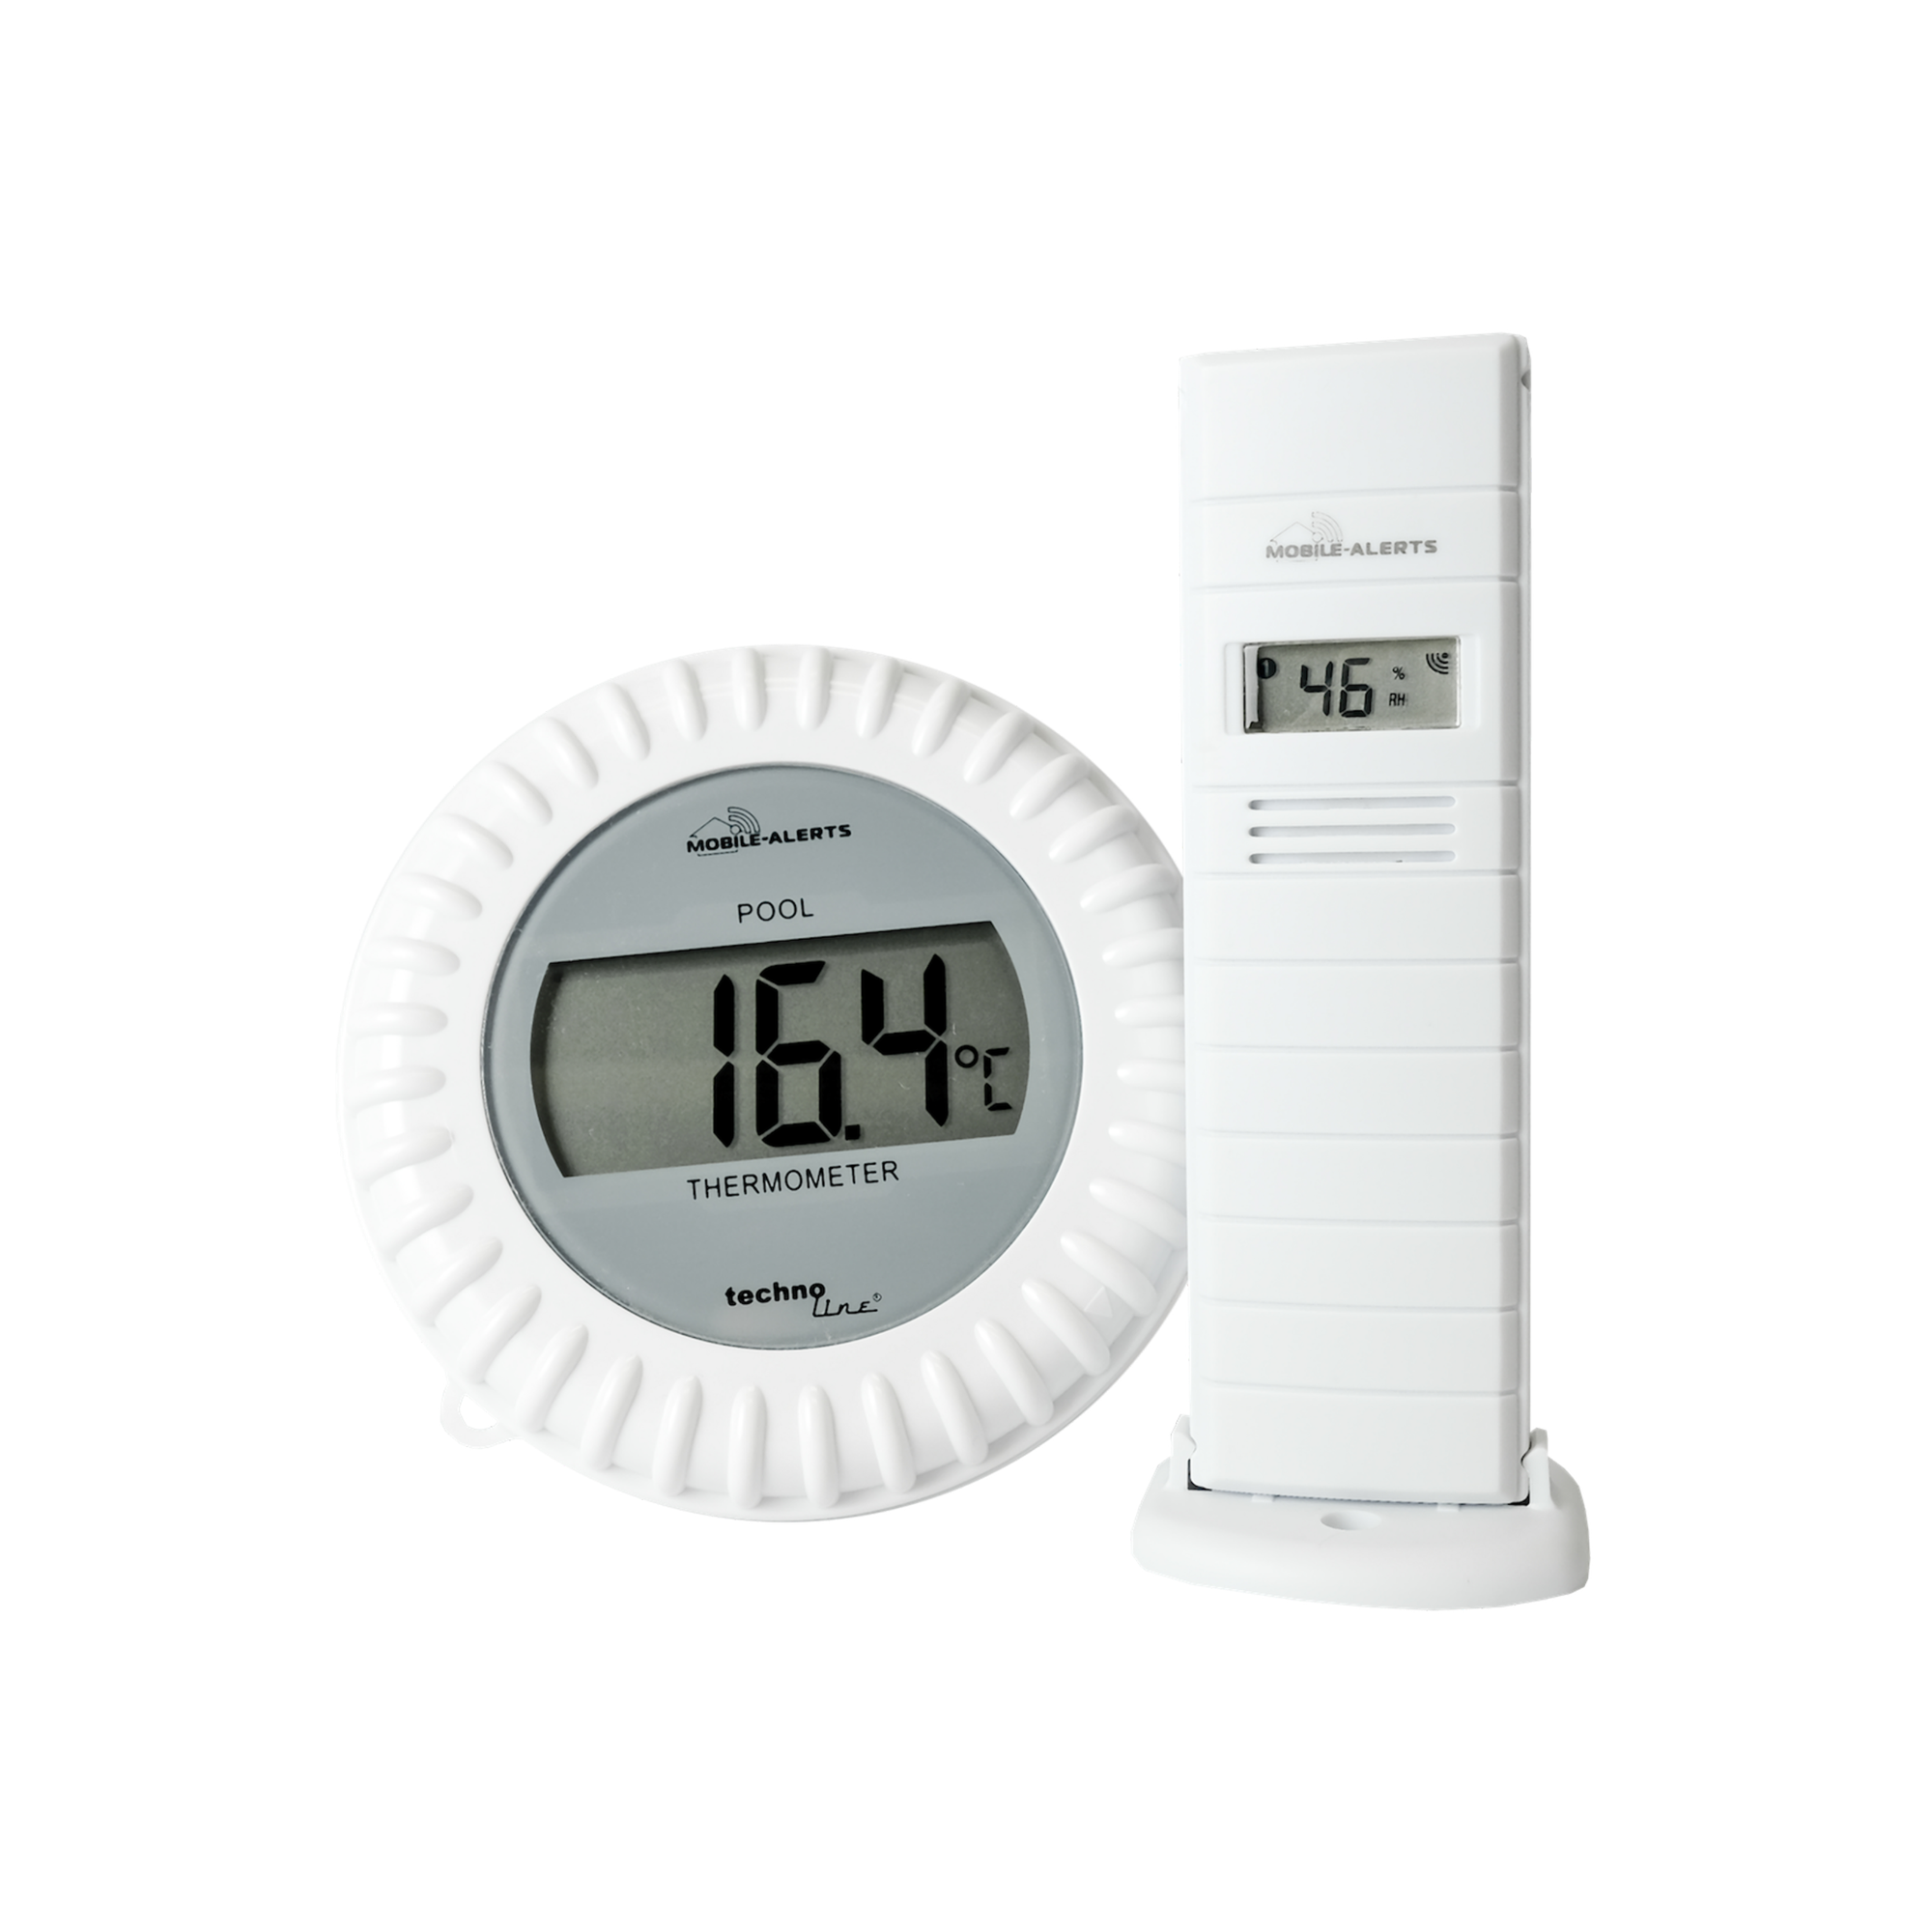
Application
Sensor for monitoring the water temperature.
Place the pool sensor e.g. in a pool or pond to measure the water temperature.
Place the repeater with temperature and humidity measurement spatially between the pool sensor and the Mobile-Alerts Gateway.
Depending on where the temperature and humidity are to be measured, the repeater can be placed indoors or outdoors.
Make sure that the repeater is protected from direct sun and rain.
Tchnical data
Batteries:
2 x Mignon (LR06, AA) Alkaline
Batterie life:
approx. 2 years
Measuring range pool sensor:
0°C to + 59.9°C
Temperature accuracy:
+/- 1°C
Measuring range repeater:
- 39,9°C to + 59.9°C
Temperature accuracy:
+/- 1°C
Humidity measuring range:
1% to 99%
Humidity accuracy:
+/- 5%
Measuring interval:
7 minutes
Range:
50 /100m (open area)
Display in the app
MA 10800
Contact sensor
Master ID10
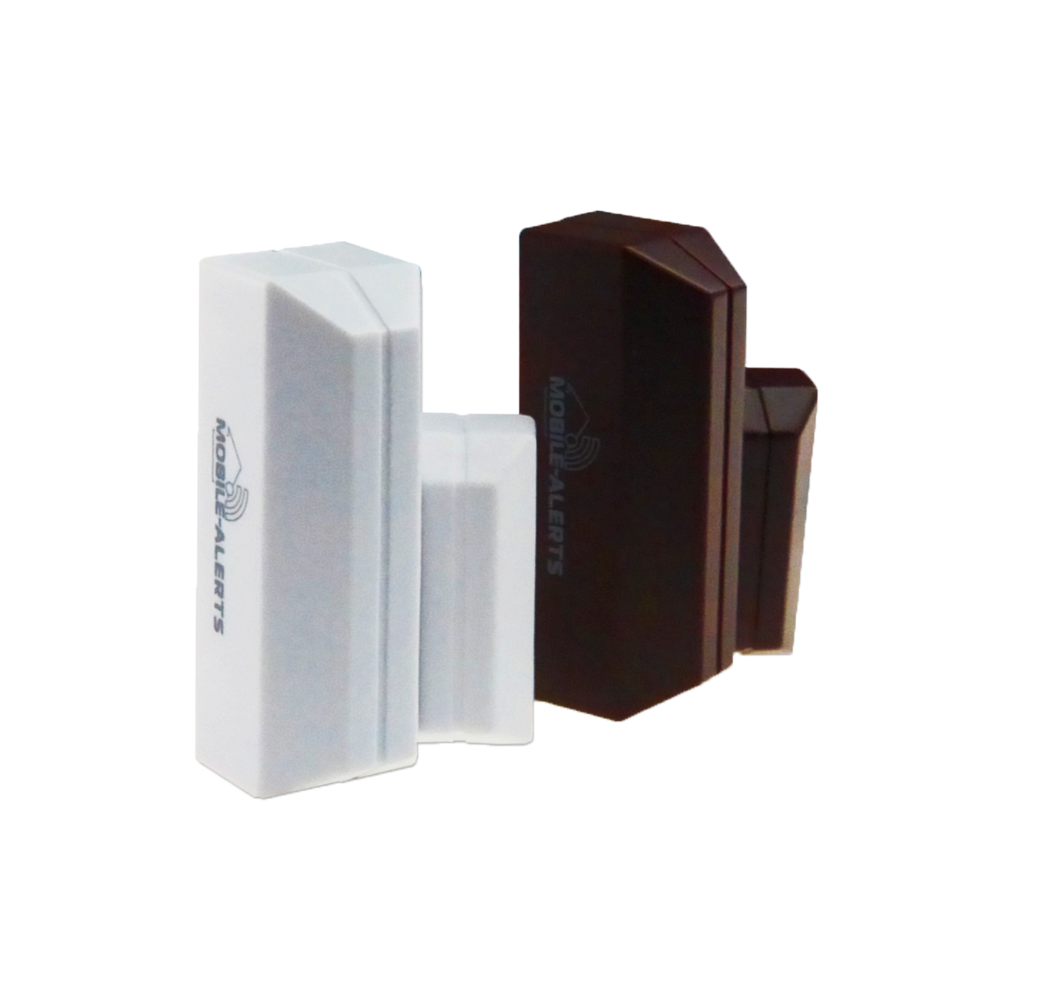
Application
Sensor for monitoring of opening and closing processes, e. g. of windows, doors, drawers etc.
Technical data
Batteries:
2 x LR44
Batterie life:
ca. 2 Jahre
Measuring interval:
in the case of a change of condition
Range:
100m (Freifeld)
Display in the app

MA 10860
Alarm indicator
Master ID0A
Application
Sensor to be taught for monitoring alarm messages.
The sensor detects tones in the frequency range of 2 kHz - 4 kHz and has 4 channels for learning 4 different tones.
Technical data
Batteries:
2 x Mignon (LR06, AA)Alkaline
Batterie life:
approx. 2 years
Frequency range for allert detection:
2 - 4kHz
Temperature measuring range indoor:
-9,5°C to +59,9°C
Measuring interval:
in the case of a change of condition
Range:
100m (open area)
Display in the app
MA 10870
Voltage and temperature sensor
Master ID17
Application
The MA 10870 sensor is a sensor for voltage and temperature monitoring. It reports power failures.
Technical data
Measuring interval:
in the case of a change of condition
Range:
100m (Freifeld)
Display in the app
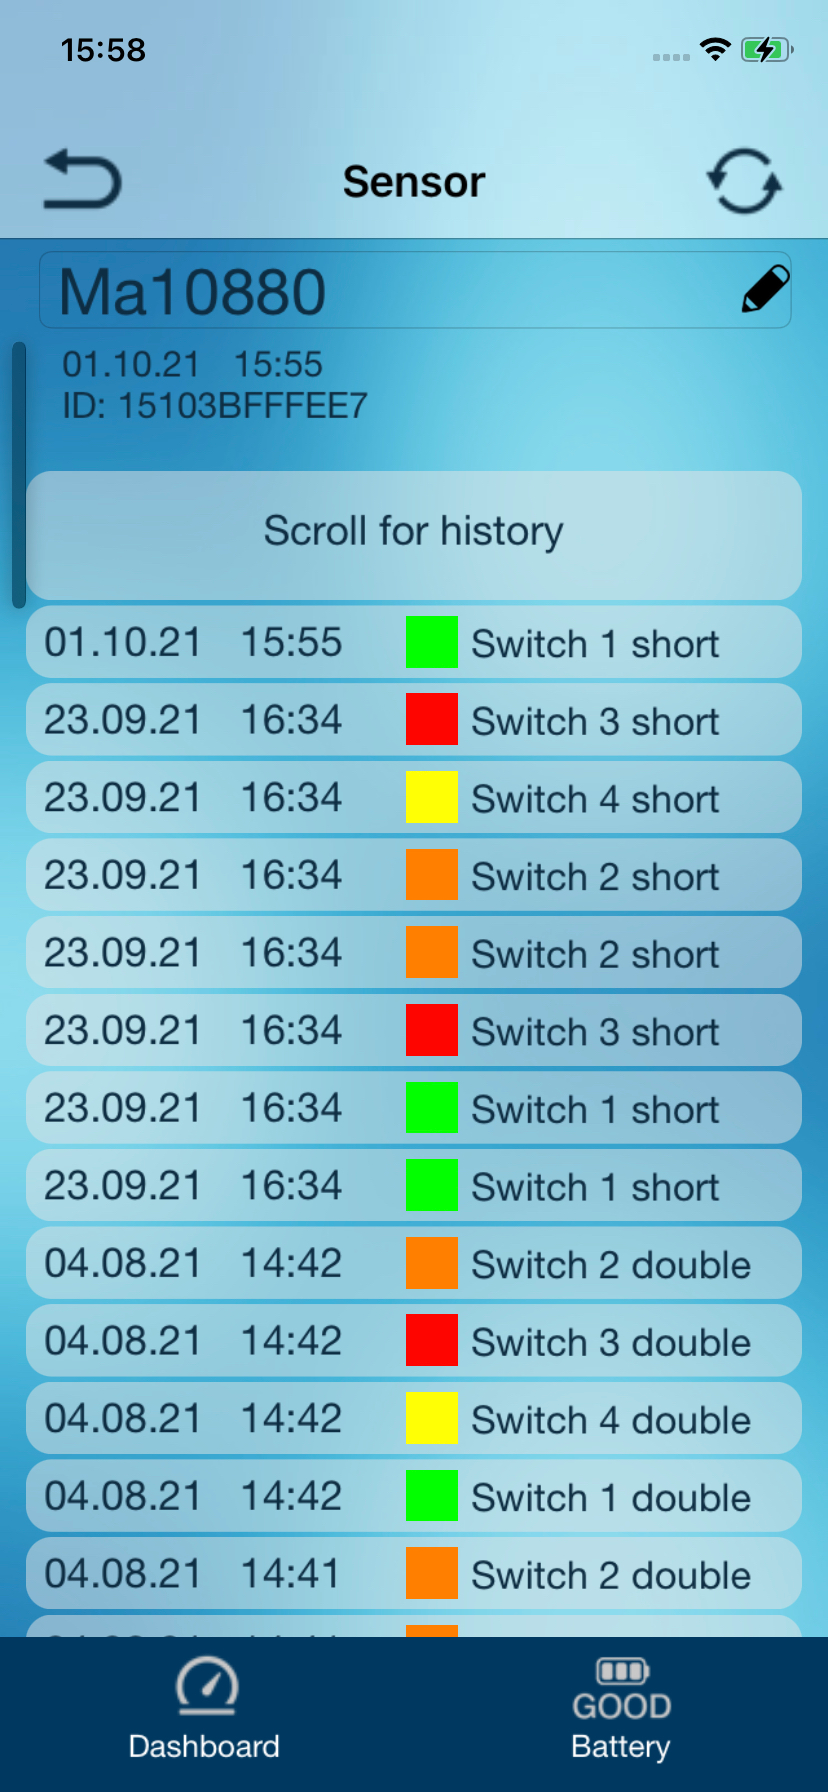
MA 10880
Wall switch
Master ID15
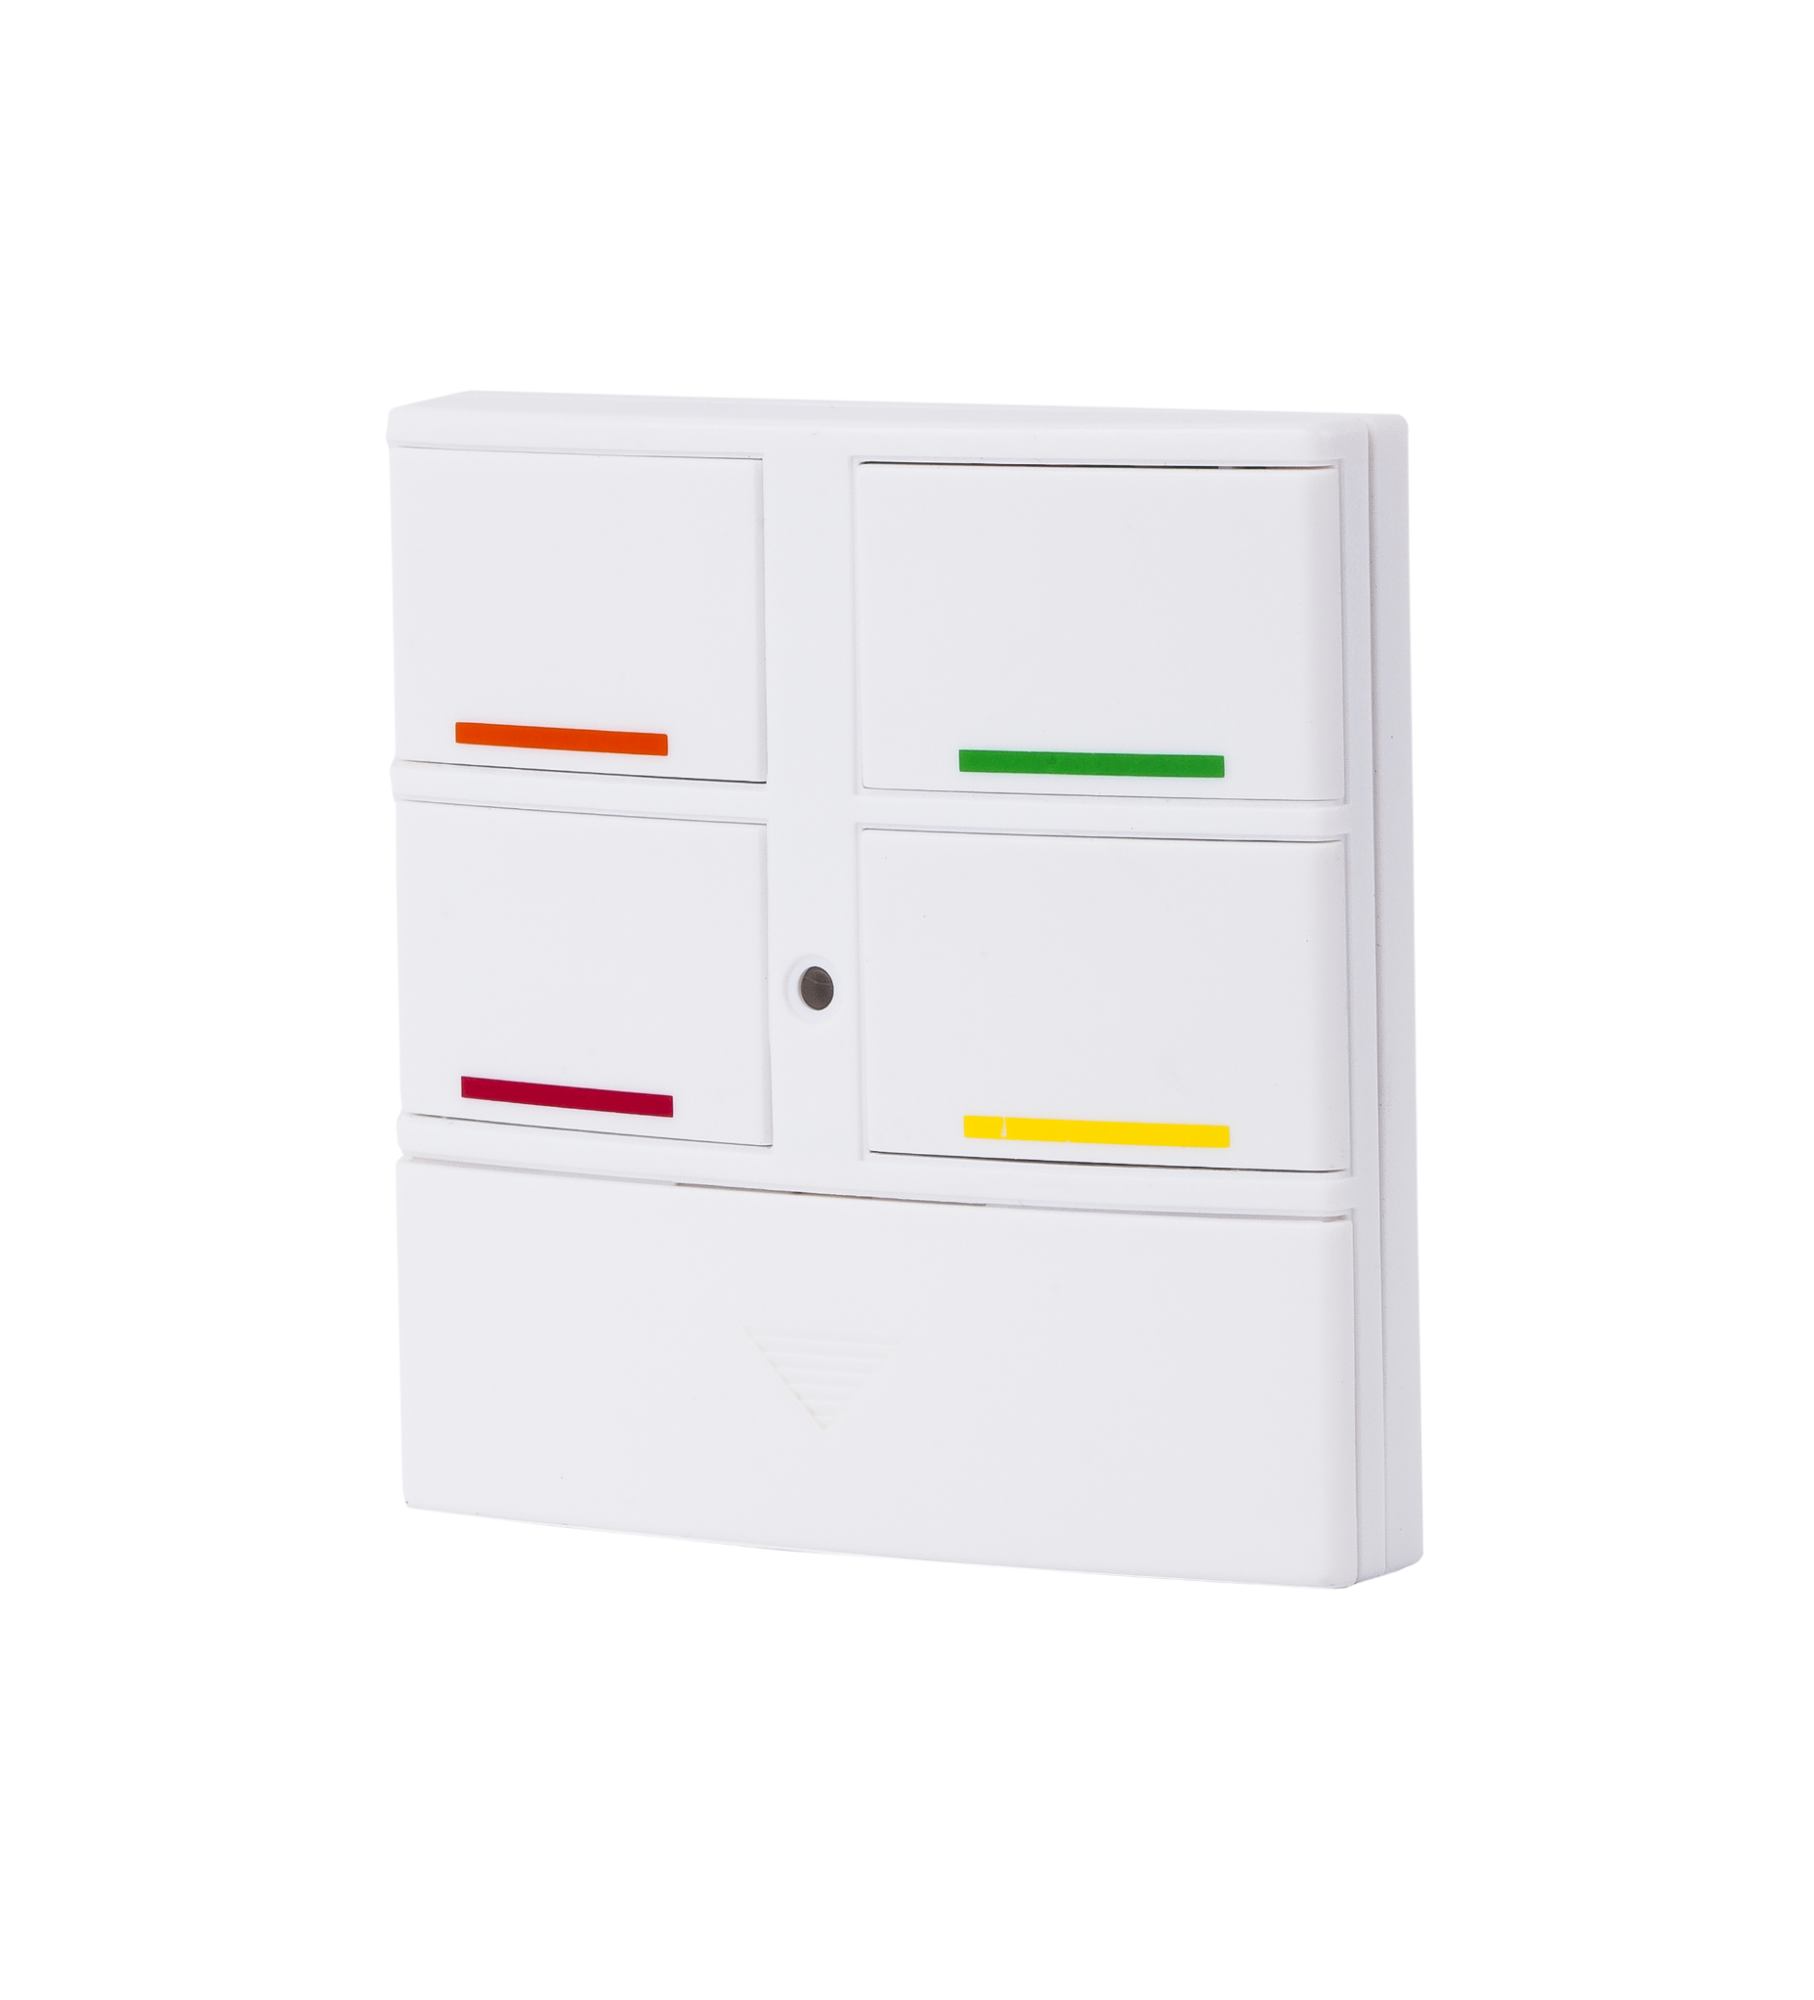
Application
The MA 10880 switch is for toggling Smart Home devices.
4 buttons with 3 functions each.
Many possible uses with connected products of the Conrad Connect system.
Technical data
Measuring interval:
in the case of a change of condition
Range:
100m (open area)
Display in the app
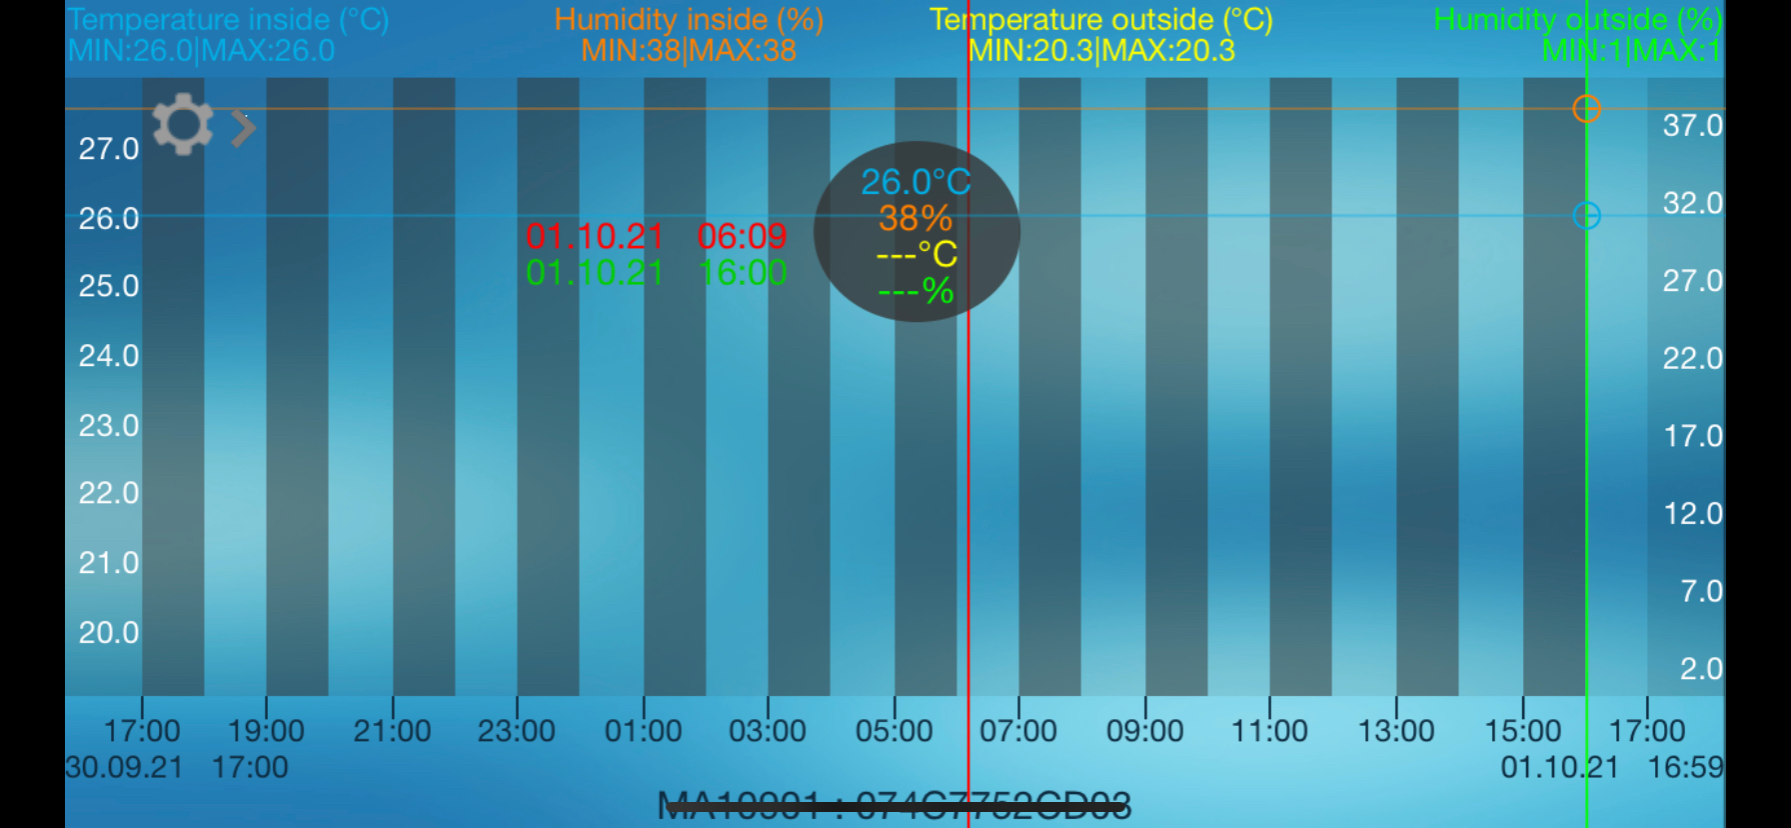
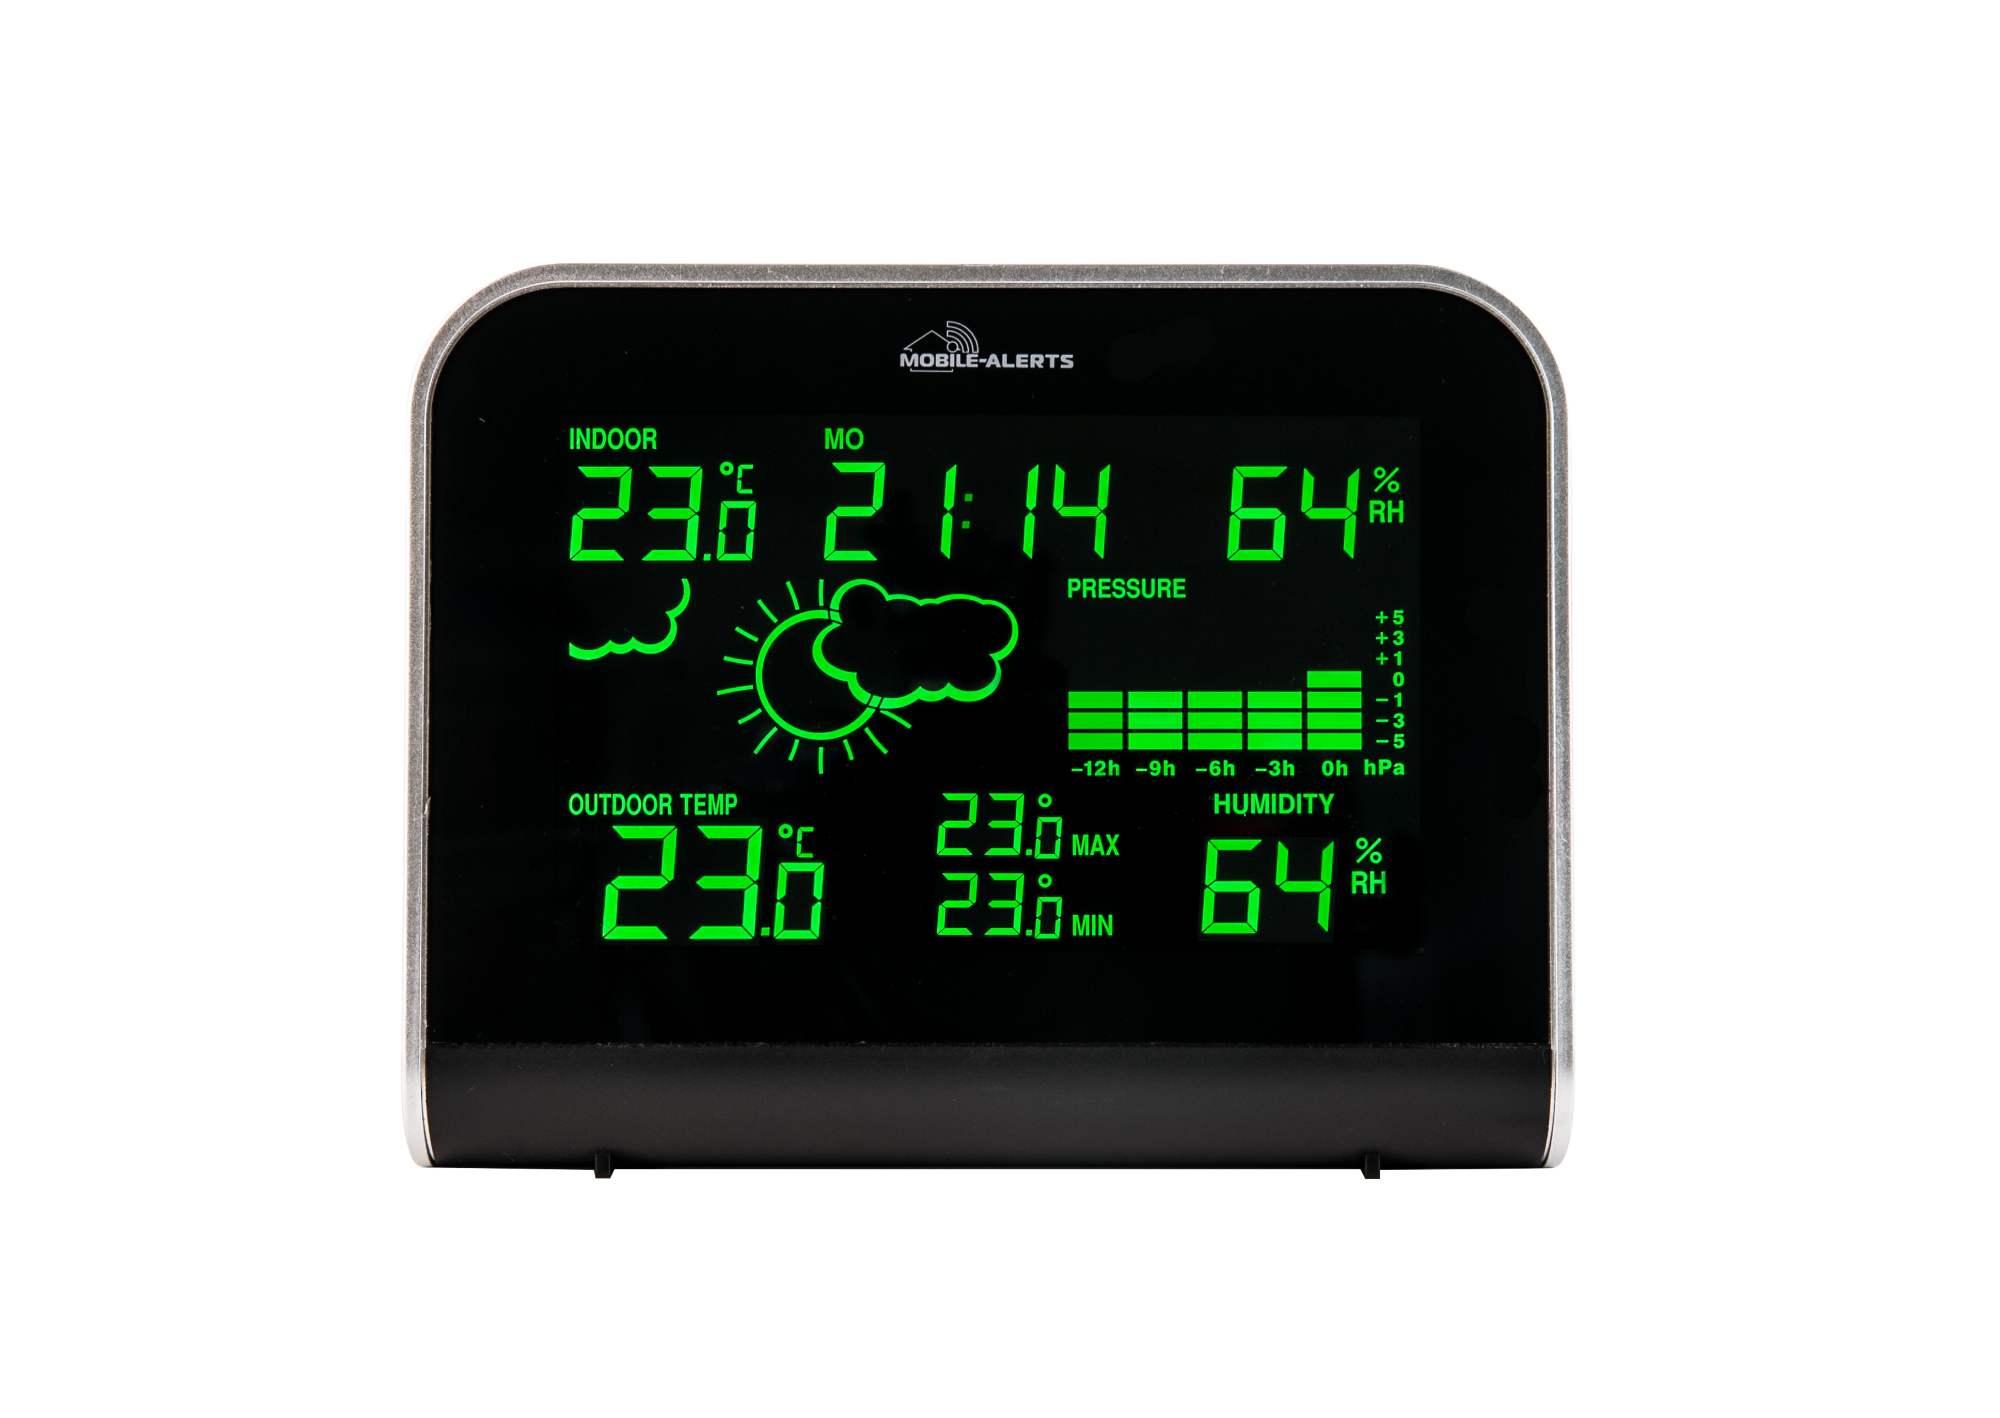
MA 10901
Station for monitoring indoor and outdoor temperature, as well as air humidity
Master ID07
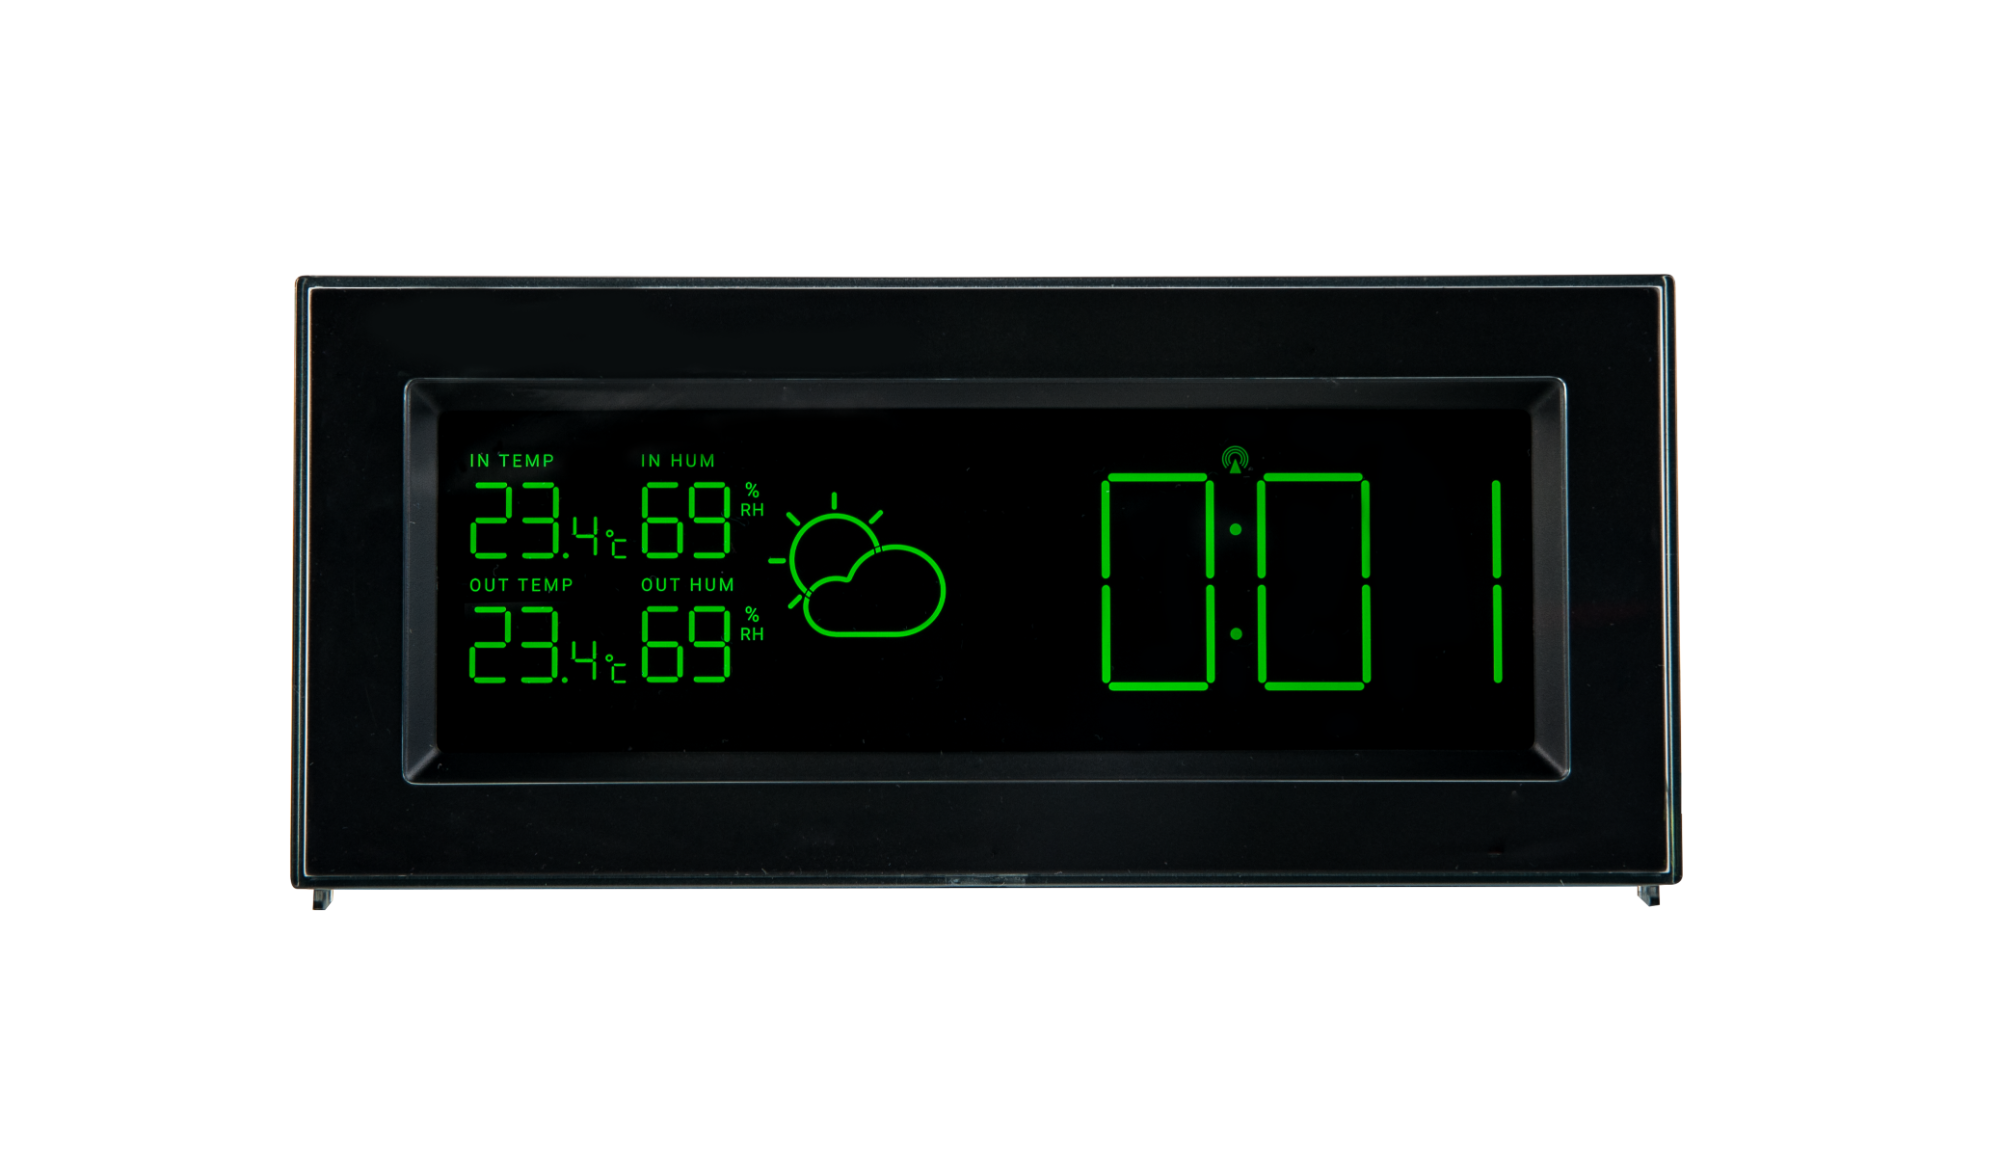
Application
This technoline weather station is supplied with the TX29TH-IT outdoor transmitter.
In addition to displaying the date and time, the time zone can be assigned on the MA10901. It has an alarm clock.
The weather station provides data on indoor and outdoor temperature as well as indoor and outdoor humidity. The minimum and maximum values are stored. The weather station also provides forecast data on the weather situation and weather trends.
It has a backlight with 3 different colour settings.
The station is designed as a stand-alone device.
Technical data
Electricity consumption:
DC 5V, 150mA power supply (station)
2 x AA, IEC LR6 (external transmitter)
Battery life:
about 2 years
Temperature measuring range inside:
-9. 9oC to +59. 9oC with 0. 1oC accuracy
Humidity measuring range inside:
1% to 99% with 1% accuracy
Temperature measuring range outside:
-39. 9oC to +59. 9oC with 0. 1oC accuracy
Humidity measuring range outside:
1% to 99% with 1% accuracy
Measuring interval:
7 minutes
Range:
100m (free field)
Display in the app
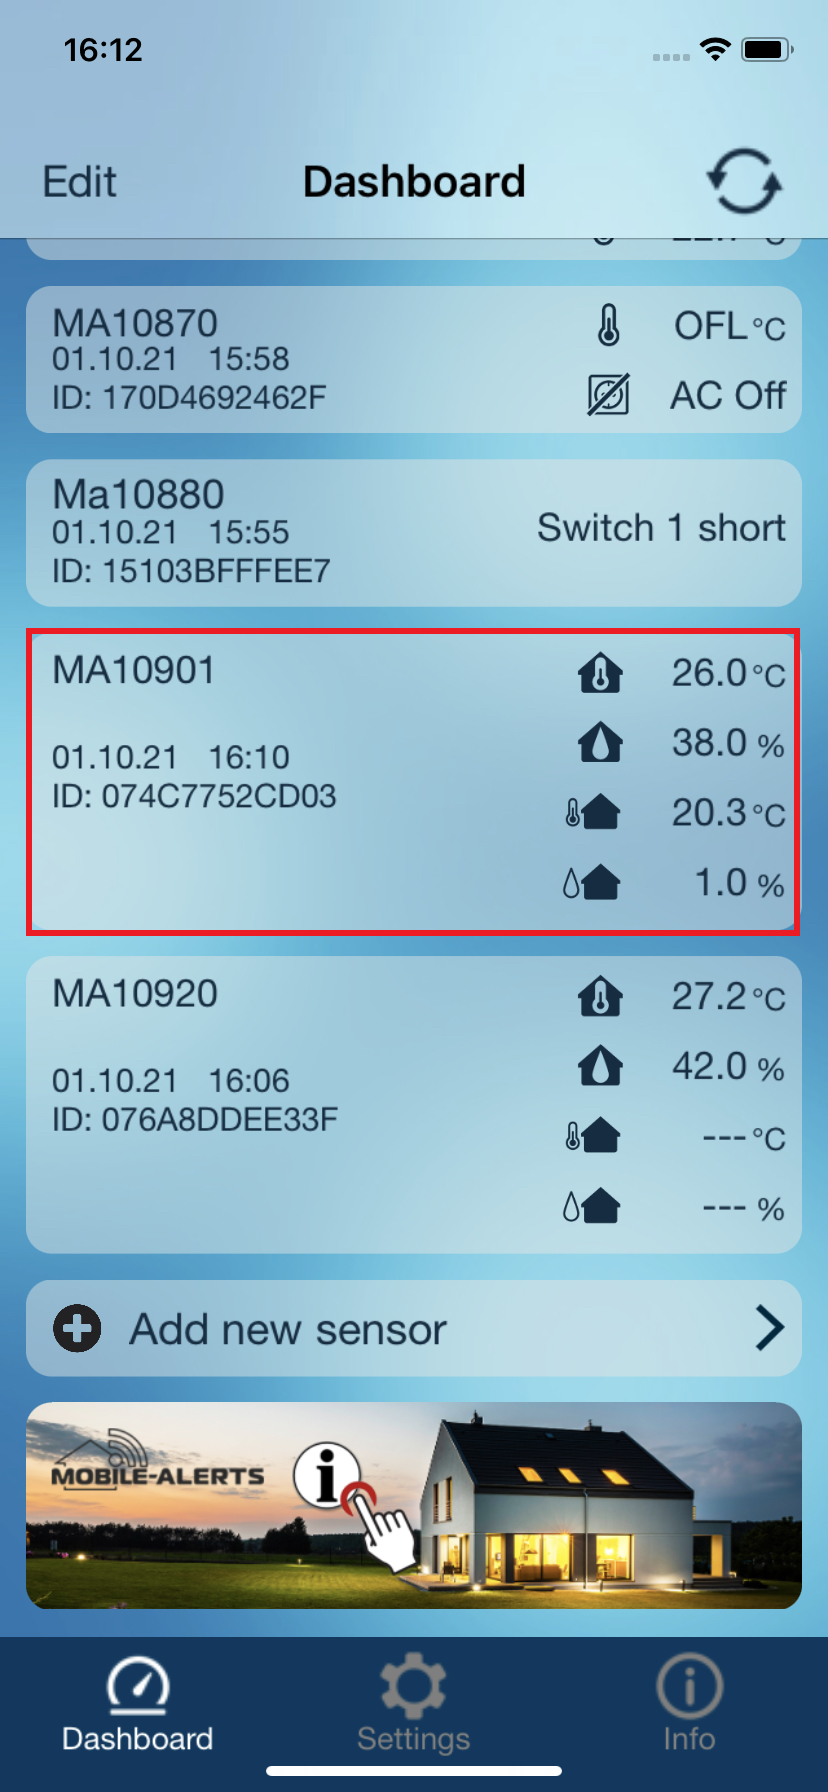
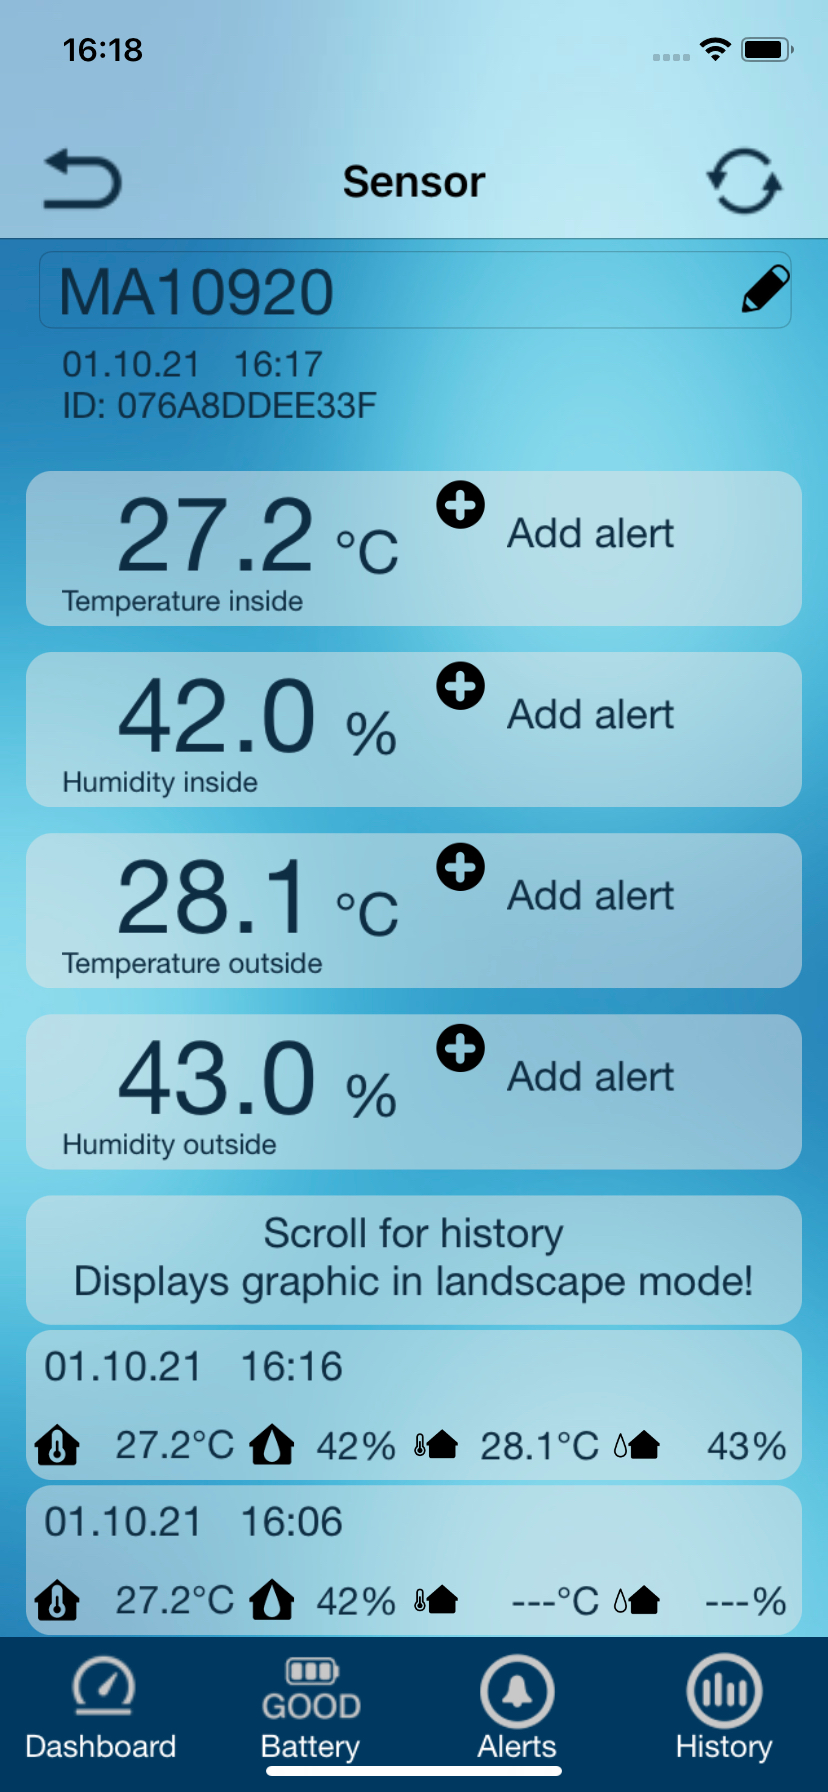
MA 10920
Station for monitoring indoor and outdoor temperature, as well as air humidity
Master ID07
Application
The weather station MA10920 is used with the corresponding outdoor sensor to monitor temperature and relative humidity (rH).
It has other functions such as indoor climate display, temperature alarm, weather forecast, weather tendency display and a built-in DCF radio clock.
Technical data
Electricity consumption:
DC 5V, 150mA power supply (station)
2 x AA, LR6 (back-up only)
2 x AA, IEC LR6 (external transmitter)
Battery life:
about 2 years
Temperature measuring range inside:
-9. 9oC to +59. 9oC with 0. 1oC accuracy
Humidity measuring range inside:
1% to 99% with 1% accuracy
Temperature measuring range outside:
-39. 9oC to +59. 9oC with 0. 1oC accuracy
Humidity measuring range outside:
1% to 99% with 1% accuracy
Measuring interval:
7 minutes
Range:
100m (free field)
Display in the app